


Reset the Decoder Plus SFR, install and configure my Decoder Plus Red by SFR – Red by SFR
![]()
Install and configure my decoder more
- 1x Broadcom chipsets 43602
- Customer only (no AP or repeater)
- Activation only of the 5GHz frequency band
- WiFi 5GHz Mimo 3×3
- Supported standards: 802.11N/AC
- Maximum flow of 1300 Mbps (theoretical)
How to reset my Decoder Plus SFR to restore the parameters by & Nbspdaut & Nbsp?
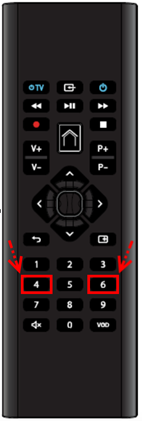
Press the keys 4 And 6 From your remote control to the key flash Home : your remote control is now reset in factory mode.
I reset the decoder
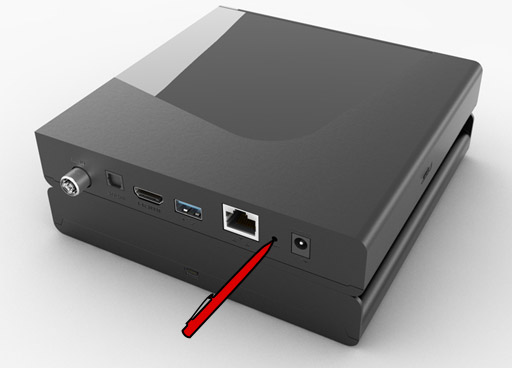
With a pen or trombone, press the button Reset Located at the back of the decoder.
Your decoder is now reset in factory mode.
I resynchronize the remote control
The reset of the decoder leads to the desynchronization of the remote control.
Also, after reset, you must redo the association of the remote control with the decoder.
I reactivate my Rights Canal+ / Canalsat
The reset of the decoder Plus SFR leads to the loss of your rights relating to your subscription to Canal+ or/and Canalsat channels.
Also, after reset, you must reactivate your Duties Canal+/Canalsat.
For further
If none of the above manipulations worked, do not hesitate to contact SFR customer service.
Install and configure my decoder more
Thanks to WiFi, it has never been easier to connect to the Internet. Provided you configure your modem well. Our advices.
- ADSL
- Fiber / very high speed
Evo
Evo
Decoder+
Mini
- Check my pack
- Set up my decoder
- Configure my decoder
- Connect my decoder in wifi mode
- Familiarize myself with the remote control
Check my pack
Your Decoder Plus Pack is made up of different elements.
- The Decoder Plus
- A 12V/2.5A power supply
- A remote control (supplied with 2 batteries)
- An HDMI® Highspeed cable (4K video flow compatible)
- An RJ45 Ethernet cable
- A stackable hard drive (optional)
- A micro USB-USB cable (supplied in the pack with the hard drive)
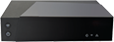
Seen closely, your decoder is very like this:
- HAS. Red/green power LED
- B. WPS button
- VS. Micro SD port
Here are its technical characteristics
- 1x Live flow 2160p + Quick’Zap + Pip (1080p) + 2x PVR 2160p
- Video compatibility:
- SD / HD / UHD / 3D
- MPEG-2
- MPEG-4 BC / H.264
- HEVC / H.265
- 1x Broadcom chipsets 43602
- Customer only (no AP or repeater)
- Activation only of the 5GHz frequency band
- WiFi 5GHz Mimo 3×3
- Supported standards: 802.11N/AC
- Maximum flow of 1300 Mbps (theoretical)
- 1 Gigabit Port Ethernet RJ45
- 1 HDMI 2 output.0 / HDCP2.2
- 1 DVB-T/T2 antenna entrance (RF in female)
- 1 Optical digital audio output
- 1 USB 3 port.0
- 1 micro-SD card reader
- Bluetooth 4.1 (AD2P audio)
- Bluetooth
- Intelligent universal remote control function
- AZERTY keyboard
- Mouse pointer
Set up my decoder
- Choose the location of your decoder more
- This location should allow good heat dissipation (provide at least 5 centimeters of free space on each side).
- Do not cover your decoder and be sure not to obstruct the vents that are on the sides.
- Connect your decoder plus to your Red Box using the Ethernet cable supplied.
- Connect your TV with a more decoder using the HDMI cable provided, to obtain the best image quality, especially for the return of Full HD and Ultra HD video flows (4K).
If your television does not have HDMI socket, use an HDMI/SIDEL adapter (not supplied). In this case, you will not be able to enjoy optimal video quality. - Connect your decoder more to the antenna plug . This optional connection makes it possible to receive TNT channels directly from the antenna of your accommodation. It is recommended to improve the speed of your Internet access.
- Connect your hard drive to your decoder plus
- You can connect a hard drive of your choice to the USB port of the Decoder Plus. Please note, in this case, your hard drive must be formatted before being connected to the decoder.
- Connect the power supply to your decoder plus. Your decoder turns on automatically. You can take the next step.
- Make sure your Red Box Modem Plus is installed, on and connected to the Internet. Otherwise, it will be the black screen !
- Check that the HDMI source selected on the TV corresponds to the socket on which the decoder is connected. If this is the case, the home page of your decoder Plus must appear on the screen.
- Install the batteries (provided) in the remote control included in your Decoder Plus Pack.
- Welcome . When the home screen appears, press the “OK” button on your remote control.
- Local network connection . Prefer connection mode by “Ethernet cable”.
- WIFI connection . Press the WPS key on your box to activate WiFi and Internet connection.
- Update . Wait for a few minutes until the screen asks you to restart your decoder. Press the “OK” key.
- Synchronize your remote control . Press the 7 and 9 keys simultaneously until flashing of the “house” button or the appearance of a light fixed point at the top for your voice remote control.
- Tnt . If you have connected your decoder more to the antenna socket, select “Search for channels available in TNT”. Otherwise, take this step by selecting “Do not use TNT”.
- Codes . Choose a personal code (protection of minors) and a personal code (protection of access to certain functions).
- Press the “Home” button on the remote control to access the welcome screen (or home page).
- Using the directional keys, select “Settings” and validate with the “OK” key.
- Select “Installation”.
- Select “Connections”.
- Select “Wi-Fi wireless”.
- Press the WPS button on your box to connect your TV decoder. The connection is made automatically.
- Insert the 2 batteries (provided) in the remote control,
- If your remote control is inactive, press the 1 and 3 keys simultaneously to the flashing of the “house” or light point of your voice remote control,
- From the television home page, go to “settings” and press the “OK” key (middle of directional keys),
- Select “Telector” and press the “OK” button,
- Select “associate a remote control” and press the “OK” key. A message warns you of the radio frequency uninstalling other remote controls. This means that if you have other remote controls for the decoder, they will continue to operate only if you point them to your decoder. Press the “OK” key to validate the message.
- When the message “please press the 7 and 9 keys of your remote control” is displayed on your television, press the 7 and 9 keys at the same time until the message “Synchronization in current synchronization. Please wait for 4 seconds… ”appears.
- A message informing you that your remote control is associated is displayed on your TV. Press the “OK” key. Your remote control is now associated with your decoder and fully operational !
- A remote control can only be coupled one decoder.
- A decoder can be coupled with several remote controls.
- The coupling is stored in the remote control: even if the batteries are removed, the information is kept.
- 1 + 3 keys to flashing of the “house” key: rocking the remote control from the infrared transmission to the radiofrequency transmission. A new support on 1+3 allows you to change fashion again.
- 4 + 6 keys to flashing of the “house” key: reset the remote control in factory mode (infrared) and cancels remote control / decoder couplings.
- 0 + 2 keys for 3 seconds: erase the configuration of the universal remote control.
- The P+/P- keys are used for fast navigation (moving from page to page) in mosaic interfaces, mini-guide, the complete guide.
- The “Play” key allows you to directly launch the visualization of a content selected from the home page and the “my video” and “my recordings” parties.
- During a VOD session, support on the left / right directional keys allows you to jump into the video of 10 % of the total time of the content (about 10 minutes for a film).
Configure my decoder
Before you start
Set up the decoder
To install the decoder, follow the steps indicated on your TV screen. For a 1st configuration, we recommend an Ethernet cable connection to a connection by WiFi, easy to make later.
Connect my decoder in wifi mode
To switch your decoder plus from Ethernet mode (cable) to wifi mode:
Familiarize myself with the remote control
Combine the remote control with your decoder
To make your remote control recognized by your decoder, you must associate the 2 equipment.
If it has not yet been done, proceed as follows:
First steps
Indispensable to pilot your decoder Plus, your new intelligent remote control conceals many advantages. It operates in particular in radio frequency, so that it is not necessary to point it to the decoder to change its channel.
Detail of my remote control:
Detail of my vocal remote control:
Discover the shortcuts