


Remote desktop customers for remote desktop services and remote PCs – Windows Server | Microsoft Learn, remote desktop – Grant access to your PC from outside the network | Microsoft Learn
![]()
Remote desktop – Give access to your PC from the outside of your PC network
To delete a user account:
Remote desktop customers for remote desktop services and remote PCs
With Microsoft remote desktop customers, you can connect to remote desktop services from Windows Server and PC remote and use and control the offices and applications that your administrator has made available you. There are customers available for many different types of devices on different platforms and form factors, such as desktop computers and laptops, tablets, smartphones and through web browsers. Using your web browser on desktop computers and laptops, you can connect without having to download or install software.
There are many features that you can use to improve your remote experience, especially the following:
- Support for several monitors.
- Personalized display resolutions.
- Dynamic display resolutions and scale.
- Redirection of devices, such as webcams, storage devices and printers.
- Use the apps installed on the remote PC.
- Access network files and resources on the remote PC.
- Leave the applications open when you turn off the customer.
Some features are only available with certain customers. It is therefore important to consult compare the functionalities of remote office customers to understand the differences when connecting to remote office services or distant PCs.
You can also use most versions of the desktop client remotely to connect to Azure Virtual Desktop as well as to remote desktop services in Windows Server or a remote PC. If you want information on Azure Virtual Desktop instead, see Customers Remote Office for Azure Virtual Desktop.
Here is a list of remote desktop client client applications and our documentation on remote desktop services or remote PCs, where you can find download links, new features and information on how to install and use each customer.
| Remote office customer | Documentation and download links | Version information |
|---|---|---|
| Web | Connect to remote desktop services and remote office customers remotely for the web | Novelties |
| macos | Connect to remote desktop services and remote office customers remotely for macOS | Novelties |
| iOS/iPados | Connect to remote desktop services and remote office customers for iOS and iPados | Novelties |
| Android/Chrome OS | Connect to remote desktop services and remote desktop customers for Android and Chrome OS | Novelties |
| Windows Store remote desktop | Connect to remote desktop services and remote desktops with Windows Store remotely for Windows | Novelties |
Connection to your remote PC
Before you can connect to your remote PC, you must activate it remotely. For more information, see Activate Office remotely on your PC.
Remote desktop – Give access to your PC from the outside of your PC network
When you connect to your PC using a remote office customer, you create a peer-to-peer connection. This means that you need direct access to the PC (sometimes called “the host”). If you need to connect to your PC from outside the network and your computer is on, you must activate this access. You have two possibilities: Use the port reaches or configure a VPN.
Activate the port reaches on your router
Port reaches simply maps the port on the IP address of your router (your public IP address) on the port and the IP address of the PC to which you wish to access.
The steps for activating the port reaches depend on the router you use, so you must search the instructions online for your router. To obtain a general description of the steps, consult Wikihow to configure the reaches of port on a router.
Before mapping the port, you will need the following elements:
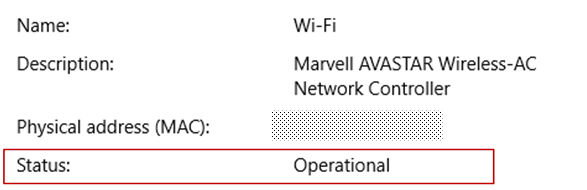
- Internal IP address of the PC: Look in Settings> Network and Internet> State> Display your network properties. Find the network configuration with the “operational” state, and recover theIPV4 address.
- Your public IP address (the IP address of the router). There are several ways to find this information: you can search (in Bing or Google) “my IP address” or consult the properties of the Wi-Fi network (for Windows 10).
- The Mapped Port number. In most cases it is Port 3389, which is the default port for remote desktop connections.
- Administrator access to your router.
Warning You open your PC to Internet access, which is not recommended. If you are obliged, be sure to define a strong password for your PC. It is best to use a VPN.
Once you have mapped the port, you can connect to your host PC from outside the local network by connecting to the public IP address of your router (the second input of the above chips)).
The IP router address may change: your Internet service provider can assign a new IP address at any time. To avoid encountering this problem, consider using a dynamic DNS: this allows you to connect to the PC using an easy to remember domain name, instead of the IP address. Your router automatically updates the DDNS service with your new IP address, if it changes.
With most routers, you can define which source IP address or which source network can use port mapping. Therefore, if you know that you only want to connect from the office, you can add the IP address of your professional network, which allows you to avoid the opening of the port to the Internet. If the host you use to connect uses dynamic IP addresses, define source restriction to allow access from the beach of this internet service provider.
You can also consider the configuration of a static IP address on your PC so that the internal IP address does not change. If you do it, the router port reaches will always point to the right IP address.
Use a VPN
If you connect to your local network using a virtual private network (VPN), you don’t have to open your PC to the Public Internet. Instead, when you connect to the VPN, your remote office client behaves as if they were part of the same network and if it was able to access your PC. There are many VPN services: you can use the one that suits you best.
Start well with the remote desktop application for Windows
The remote desktop application for Windows allows you to use PCs and Windows Applications remotely from another Windows device.
Help the following information to start. Consult the Questions forum (FAQ) if you have any questions.
If you want to connect to Azure Virtual Desktop instead of remote desktop services or a remote PC, see connect to Azure Virtual Desktop with the Remote Office Application for Windows.
We no longer update the remote desktop application for Windows with new features and the management of Azure Virtual Desktop will be deleted in the future.
To benefit from an optimal experience of Azure Virtual Desktop, with the latest features and updates, we recommend that you download the Windows office customer instead.
Get the Office Application remotely and start using it
Perform these steps to start with the desktop remotely on your Windows 10 device:
- Download the Office Application Remote from Microsoft Store.
- Configure your PC to accept remote connections.
- Add a remote PC connection or a workspace. Use a connection to connect directly to a Windows PC and a workspace to access a RemoteApp program, an office based on a session or a virtual office published by your administrator.
- Pin the items to quickly access the office remotely.
Add a remote PC connection
To create a remote PC connection:
- In the connection center, press + Add, then on Pc.
- Enter the following information for the computer to which you want to connect:
- PC name : computer name. This PC name can be a Windows computer name, an internet domain name or IP address. You can also add port information to the name of the PC (for example, MyDesktop: 3389 Or 10.0.0.1: 3389)).
- User account : User account to use to access the remote PC. Press on + To add a new account or select an existing account. The username must respect one of the following formats: username, Domain \ Name, Or [email protected]. Select Always ask me If you want the user to be invited to enter their identifiers when they connect.
- You can also define additional options by pressing on Display more ::
- Display name : name easy to memorize for the PC to which you log. You can choose any channel, but if you do not specify a friendly name, the name of the PC is displayed.
- Band : specify a group to more easily find your connections later. Add a new group by pressing + or select one from the list.
- Bridge : remote PC gateway with which you want to connect to virtual PCs, RemoteApp and PC programs based on a session in an internal business network. Ask the gateway information to your system administrator.
- Connect to the admin session : With this option, you can connect to a console session in order to administer a Windows server.
- Mouse buttons : with this option, you can swap the functions of the left mouse button on the right mouse button. The tilting between the mouse buttons is necessary when you use a PC configured for a left -handed user but you only have a mouse for right -handers.
- Define the resolution of my remote session on : Select the desired resolution for the session. Choose for me : defines resolution according to the size of the customer.
- Modify the size of the display : If you select a high static resolution for the session, you can use this settings to enlarge the elements on the screen to improve the legibility. This setting applies only for Windows 8 connections.1 or later.
- Update the resolution of the remote session after resizing : When this option is activated, the customer dynamically updates the resolution of the session according to the size of the customer. This setting applies only for Windows 8 connections.1 or later.
- Clipboard : When it is activated, this option allows you to copy text and images to or from the remote PC.
- Audio reading : select the device to be used for audio during your remote session. You can choose to activate the sound on local devices or the remote PC, or to completely deactivate the sound.
- Audio recording : when activated, this option allows you to use a local microphone with applications on a remote PC.
- Press on Save.
You must modify these settings ? Press the overtaking menu ( . ) next to the name of the PC, then press To modify.
You want to delete the connection ? Again, press the overtaking menu ( . ), then press DELETE.
Add a workspace
Workspaces can be RemoteApp programs, offices based on a session and virtual offices published by your administrator using remote office services.
To add a workspace:
- In the connection center screen, press + Add, then on Workspaces.
- Enter theFlow URL provided by your administrator and press Search for flows.
- When you are invited, enter the identification information necessary to subscribe to the flow.
The workspaces will be displayed in the connection center.
To remove workspaces:
- In the connection center, press the overtaking menu ( . ) Next to the workspace.
- Press on DELETE.
Pin a recorded pc at your start menu
To pin a connection to your Start menu, press the overtaking menu ( . ) next to the name of the PC, then press Pin on the start menu.
You can now start the PC connection directly from your start menu by pressing it.
Connect to a remote desktop gateway to access internal resources
A remote desktop gateway allows you to connect to a remote computer on a business network from anywhere on the Internet. You can create and manage your bridges using the Office Application Remote.
To configure a new remote office gateway:
- In the connection center, press Settings.
- Next to the gateway, press + To add a new gateway.
Notes you can also add a gateway when you add a new connection.
- Server name : computer name you want to use as a gateway. This server name can be a Windows computer name, an internet domain name or IP address. You can also add port information to the server name (for example: Rdgateway: 443 Or 10.0.0.1: 443)).
- User account : select or add a user account to use with the remote PC gateway to which you connect. You can also select Use the office user account If you prefer to keep the same identification information as that used for connection to the remote PC.
General application parameters
You can define the following general settings on your client by pressing on Settings ::
Managed elements
- User account : allows you to add, modify and delete user accounts saved on the customer. You can also update the password of an account that has been changed.
- Bridge : allows you to add, modify and delete gateway servers saved on the customer.
- Band : allows you to add, modify and delete groups saved on the customer. You can also group the connections here.
Session parameters
- Start connections in full screen : when this option is activated, each time is starting a connection, the customer uses the active screen in its entirety.
- Start each connection in a new window : when this option is activated, each connection is started in a separate window. You can thus have the connections in different screens and go from one to the other by means of the taskbar.
- When resizing the application : allows you to control what is happening when the customer’s window is resized. The default action is Stretch the content, retaining its proportions.
- Use keyboard commands with : allows you to specify where keyboard commands like Win Or Alt+tab are used. By default, these orders are sent to the session only when the connection is in full screen mode.
- Prevent screen expiration : allows you to prevent the screen from expiring when a session is active. Preventing expiration is useful for connections that do not require interaction for long periods.
Application settings
- Show PC previews : allows you to display the preview of a PC in the connection center before you connect. This setting is enabled by default.
- Help us improve the office remotely : Send anonymous data to Microsoft. We use this data to improve the customer. To find out more about how we use this anonymous personal data, see the Microsoft Privacy Declaration. This setting is enabled by default.
Manage your user accounts
When you connect to a PC or a workspace, you can save account information to connect later. You can also define user accounts from the customer instead of saving user data when you log into a PC.
To create a user account:
- In the connection center, press Settings.
- Next to the user account, press + To add a new user account.
- Enter the following information:
- Username : username to save it to use it with a remote connection. Enter the username in one of these formats: nom_utilizer, domain \ nom_utilizer or [email protected].
- Password : password associated with the specified user. Leave this field empty if you want the user to be invited to enter a password when he connects.
- Press on Save.
To delete a user account:
- In the connection center, press Settings.
- Select the account to be deleted from the list under user account.
- Beside user account, press the modification icon.
- Press on Delete this account below to delete the user account.
- You can also change the user account and press on Save.
Navigate your remote session
This section describes the tools available to help you browse your session remotely once you are connected to the service.
Start a remote session
- Press the name of the connection you want to use to start the session.
- If you have not recorded the identification information for the connection, you are invited to enter a username and one password.
- If you are invited to check the certificate of your workspace or PC, review the information and check that the computer is a trusted PC before pressing on Connection. You can also select No longer ask me for information about this certificate To automatically accept this certificate.
Connection bar
The connection bar gives you access to additional navigation checks. By default, the connection bar is placed at the top of the screen, in the middle. Press the bar and slide it to the left or right to move it.
- Panoramic control : allows you to enlarge and move the screen. Panoramic control is only available on tactile devices and in direct tactile interaction mode.
- To activate or deactivate panoramic control, press the panoramic icon in the connection bar to display control. The screen zooms in when the panoramic control is active. Press the panoramic icon again in the connection bar to hide the control and reject the screen in its original resolution.
- To use panoramic control, press the panoramic control for a long time and drag it into the direction you want to move the screen.
- To move the panoramic control, press the panoramic control for a long time to move it on the screen.
Control bar
Press on . in the connection bar to display the control bar on the right side of the screen.
- Welcome : Use the home button to return to the connection center from the control bar.
- You can also use the previous button for the same action. If you use the previous button, your active session will not be disconnected, which allows you to launch additional connections.
Use direct touch entries and mouse fashions
You can interact with your session using two mouse modes available:
- Direct touch interaction : Pass all tactile interaction contacts to the session so that they are interpreted remotely.
- This mode is used in the same way as with a touch screen on a windows device.
- This mode is used in the same way as with a touchpad on a windows device.
In Windows Version 8 or a later version, native tactile interaction movements are supported in direct tactile interaction mode.
Mouse mode Action with mouse Movement Direct touch interaction Left click Finger Direct touch interaction Right -click on Press a finger at length Mouse pointer Left click Finger Mouse pointer Left click and shift Press a finger twice for a long time, then slide Mouse pointer Right -click on Tap Mouse pointer Right click and shift Press a long time with two fingers, then slide Mouse pointer Mouse roulette Long press with two fingers, then slide up or down Mouse pointer Zoom Tighten the two fingers to make a rear zoom or spread your fingers to zoom in front Send your comments
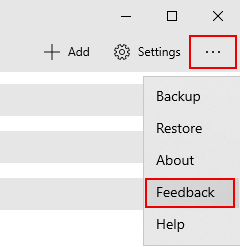
You want to suggest a functionality or report a problem ? Tell us everything about the comment hub.
You can also tell us about your comments by selecting the suspension point button (. ) in the client application, then Comments, as illustrated in the following image.
To help you better, we need you to give us as much detailed information as possible on the problem. For example, you can include screenshots or registration of the actions that have led you to the problem. For more advice on how to provide useful comments, see comments.