


Make photos and videos with a webcam on PC, Windows 10: how to mount a video easily with the photo application
![]()
Windows 10: how to make a video easily with the photo application
If the project suits you, you can export your film. To do this click on Finish the video (3).
Make photos and videos with a webcam on PC
Your PC is equipped with a webcam ? You can use it to take photos and save videos thanks to the camera software, integrated as standard in Windows 10. A simple, quick and useful solution !
Whether it is integrated, as on laptops or all-in-one models, or external, webcam is one of the essential devices of any computer today. Obviously, this is the essential tool for videoconferences and video calls, very popular practices since the containment and generalization of telework. But this small camera can easily be diverted for other very useful purposes, especially to take photos and record videos. Convenient to quickly make a selfie – for a profile photo on a website, for example – or to shoot a sequence to publish online on social networks, especially when you have nothing else on hand.
Admittedly, this solution does not offer all the advantages of a real camera, a real camera or even a smartphone, whether in terms of image quality or freedom of movement. But it can help out in many situations, and above all, it is very simple to implement. Indeed, unlike a widespread belief, it is not necessary to install additional software or to invest in a specialized application to make you take the portrait or save videos with the webcam of your PC: Windows 10 embarks in standard camera, a tool specially provided for this purpose that works with any webcam, internal or external. A simple utility to handle, and free !
How to take photos with the webcam of a PC ?
The Integrated Camera Application Standard to Windows 10 allows you to take photos with your webcam when you are in front of your computer and you have nothing else on hand. It works with integrated webcams as well with dull models, connected to USB.
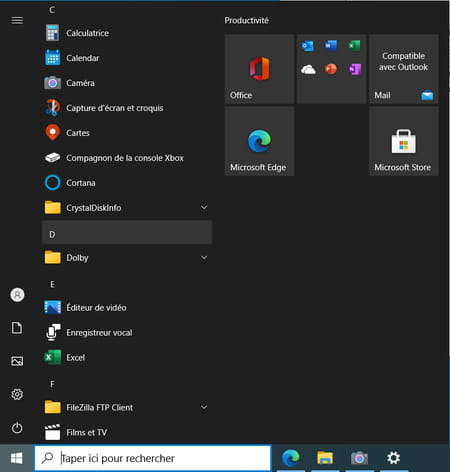
- Click on the menu To start up and, in the list of software installed on your PC, to the letter C, click on Camera To launch the application.
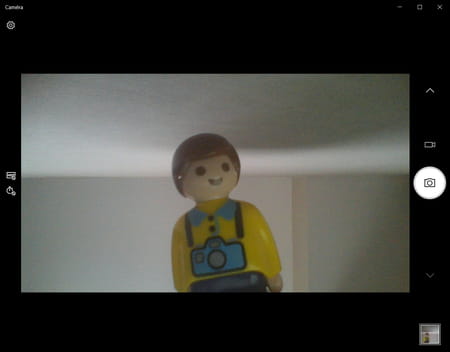
- The webcam activates automatically and the application opens by default in the latest mode used, photo or video. To switch to photo mode, click on The camera icon Or on One of the arrows, to the right of the window. Most of the window is occupied by the image captured by the webcam. Be careful, this image is reversed, as if you were in front of a mirror. But once the photo or the video is taken, the image saved is in normal mode.
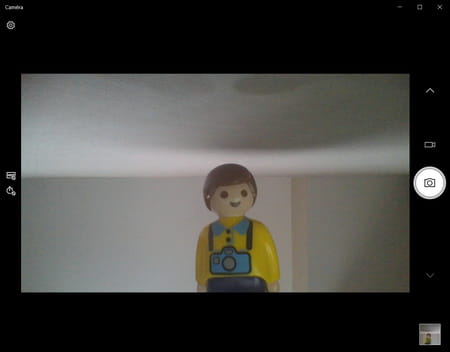
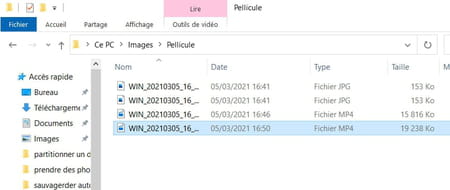
- To take a photo with the webcam, just click on The camera icon trigger. The captured image is automatically saved in JPEG format in the Windows 10 Images folder, in the film subdossier.
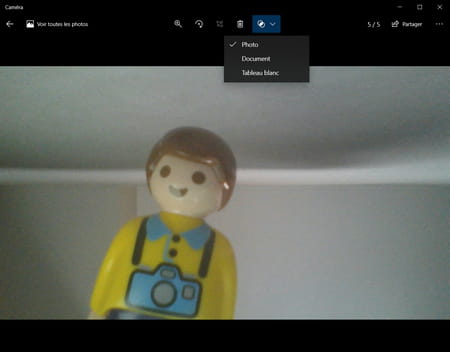
- As soon as a photo is taken, it appears in miniature in a small square, bottom right of the window, which gives access to the film – which contains all the photos and videos taken with the webcam. Click on this miniature : the photo is displayed in a visualization module specific to the camera application. A mini toolbar, above, above the image, allows you to zoom in the photo, to rotate it, crop it, delete it, or to apply a filter Document Or Whiteboard which can be useful if you have photographed a paper document to scan it with the webcam. Click on The three points, On the top right to copy the mage in the clipboard or open with the Windows explorer the folder where it is saved. Finally, click on the arrow, top left of the window, to return to the shooting mode.
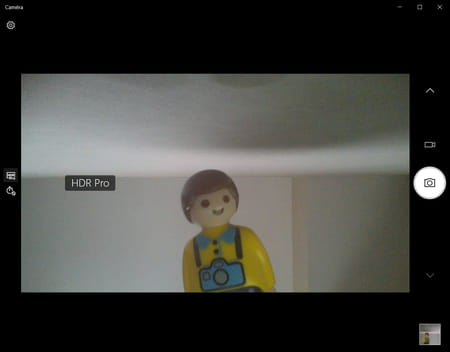
- In photo mode, two options are offered in the form of icons, to the left of the window. Click the icon Hdr To activate or deactivate HDR (Hugh Dynamic Range) mode that improves the lighthouse of the cliché.
- The icon with a stopwatch is used to activate and adjust the delayer function. Click several times on the button To configure the duration of the delayer (from 2 seconds to 10 seconds) or deactivate it completely. When the delayer is activated, click on the trigger right to launch the countdown while you place yourself in front of the lens. When the time defined is sold, camera takes a photo automatically and records it in the film.

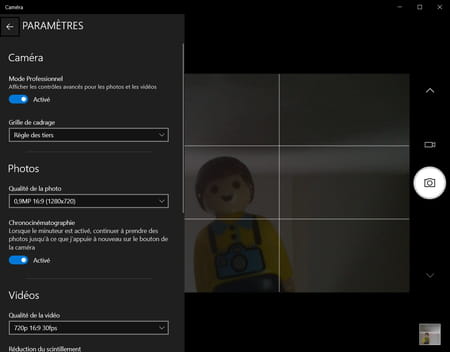
- Camera offers several additional settings. To access it, click on The gear icon, on the top corner left.
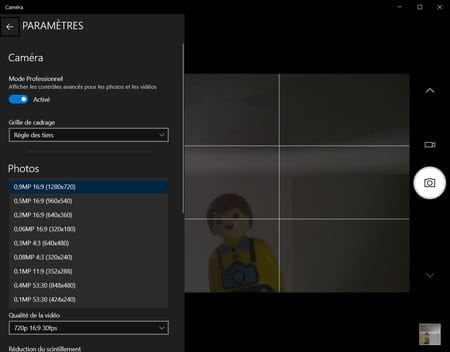
- The blind Settings appears on the left of the window. The section Camera applies to the webcam, whatever the shooting mode (photo or video) selected. You can activate the switch Professional mode To make the HDR option disappear in favor of a cursor allowing to manually adjust the brightness of the camera.
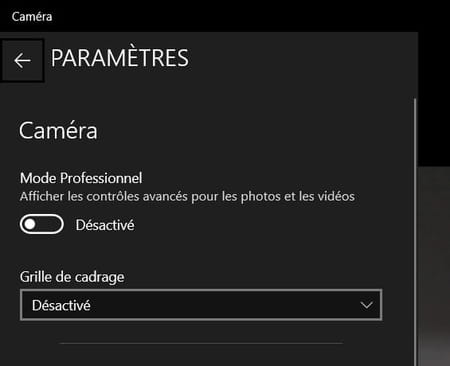
- By clicking on the menu Framing grid, You can also shift a grid on the screen to help you better frame your photos and videos. The application offers several: third party rule, number of gold, reticle and square. You are free to choose the one that suits you.

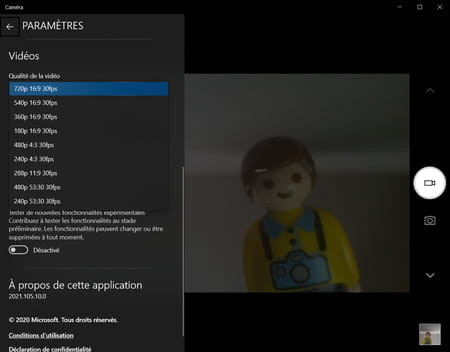
- Section settings Pictures only apply to photo mode. By clicking on the menu Photo quality, You can choose the definition and ratio of the captured image: the list varies according to your webcam used, but we are far from the definition of a current smartphone ..
- The last parameter dedicated to the photo is the mode Chronocinematography. If you activate it by clicking on the switch corresponding, and that you use the delay for your shots, the webcam takes photos continuously until you stop it by clicking again on the camera icon. A gadget to test.
How to film videos with the webcam of a PC ?
The Camera Application Integrated with Windows 10 can also be used to save videos using the webcam of your PC.
- Launch the camera application, and click on The camera icon to the right of the window to switch to video mode. As in photo mode, most of the window is occupied by the image captured by the webcam. Be careful, this image is reversed, as if you were in front of a mirror. But once the video is taken, the image saved is in normal mode.
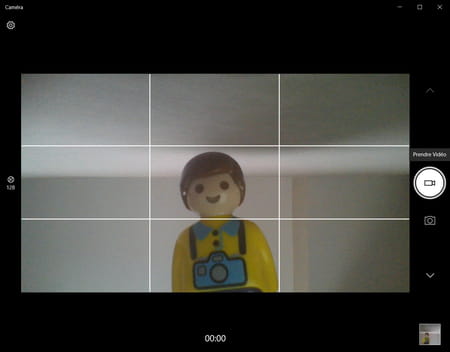
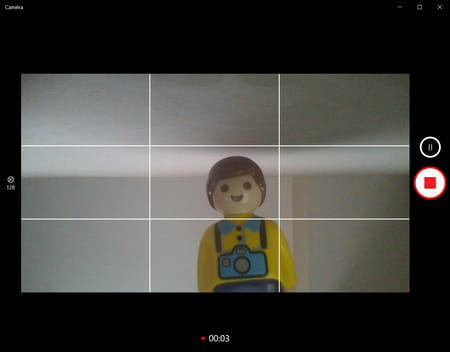
- To start recording a video, simply click on this same camera icon. The duration of the video during recording is automatically displayed at the bottom of the window. Then click on the red round button Stop To stop recording. If you need to take breaks during recording, click on The Pause button (the small circle with two vertical lines), just above. The recorded video is automatically saved in MP4 format in the subdossier film of the Images of Windows 10.
- As with photo mode, video mode has its own settings. Click on the gear icon, at the top left of the window to access it.
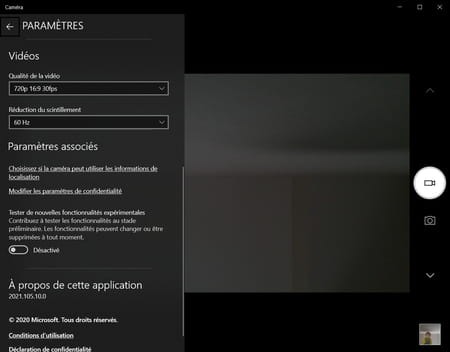
- The blind Settings unfolds. As with the photo, the functions of the Camera section concerns the webcam. You can activate the Professional mode with a switch and display a framing grid in a menu.
- Click on the menu Video quality, in the section Videos, To select the definition, the ratio and the flow (in number of images per second) of the video. The choice obviously depends on the possibilities of your webcam. Again, we are far from the quality of a current smartphone.
- Finally, the menu Flickering makes it possible to mitigate the flickering effect of the image which can occur under certain conditions, in particular because of the lighting used.
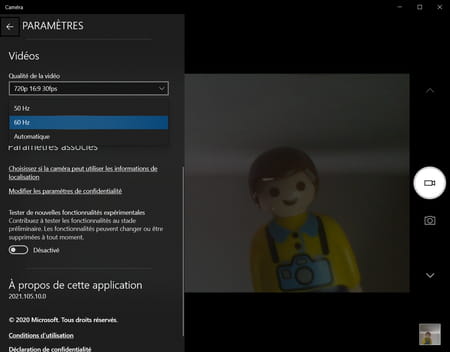
- Finally, the section Associated parameters Gives access to additional functions such as location information, Windows confidentiality parameters and experimental functions. Nothing essential to record short daily videos.
Windows 10: how to make a video easily with the photo application


Make a short film using clips stored on your computer’s hard drive without installing a third party application.
Save videos with your smartphone and save them on your computer’s hard drive often ends in the same way in all users. The clips accumulate, occupy the little storage remaining on your machine, and are never watched. To put an end to this bad habit, why not make a quick assembly in order to create a structured and staged video to better enjoy these forgotten memories and thus get rid of these rushes that have become useless ?
On Windows, there are many free video editing software, often very complete, addressing all audiences. But if you do not want to have to immerse yourself in a too complex tool, it is quite possible to make a simple video editing using the Photos application, installed natively on Windows 10. Here’s how to use it.
To discover also on video:
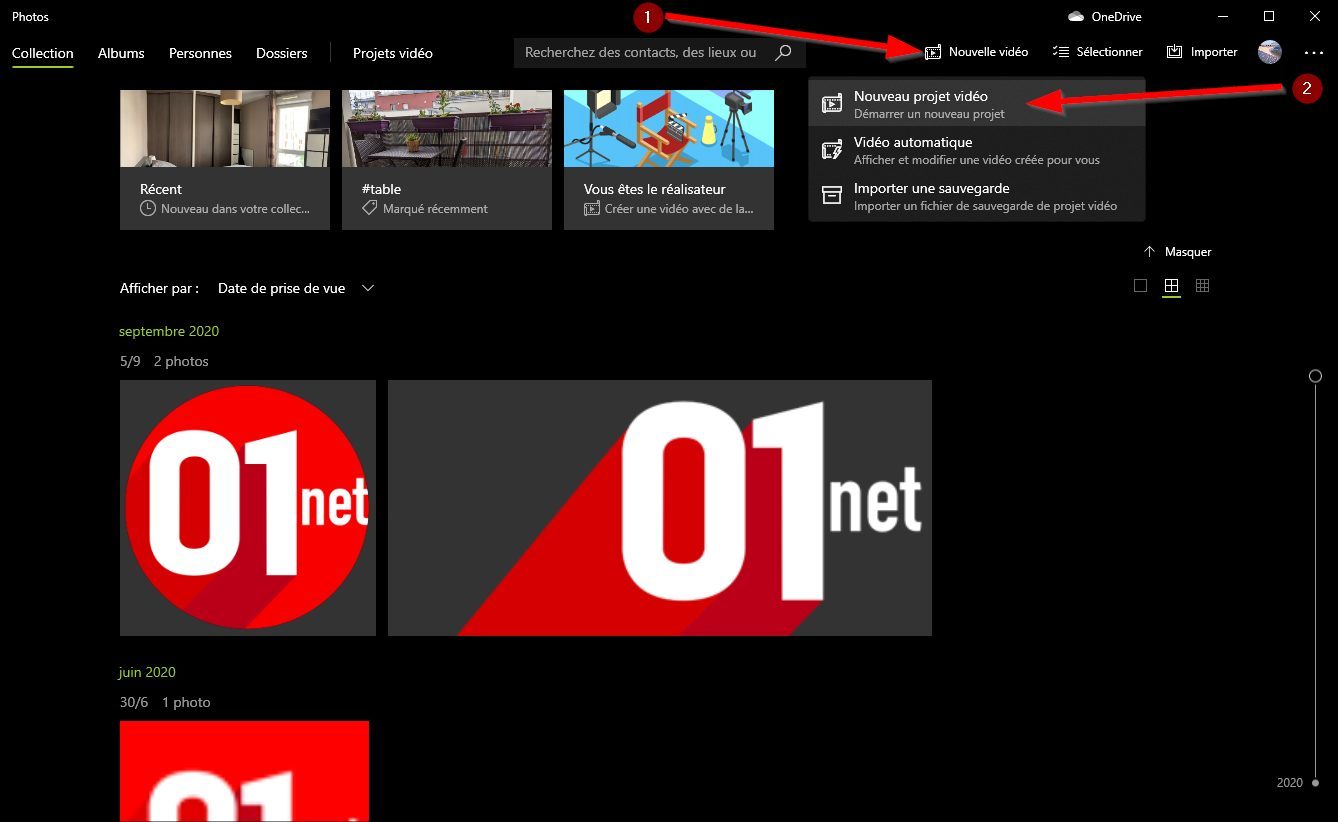
1. Create a new video
Launch the Photos Application on your PC. On the main page displayed, click the button New video (1) Then choose to create a New video project (2). Then enter the name of the video you are about to make.
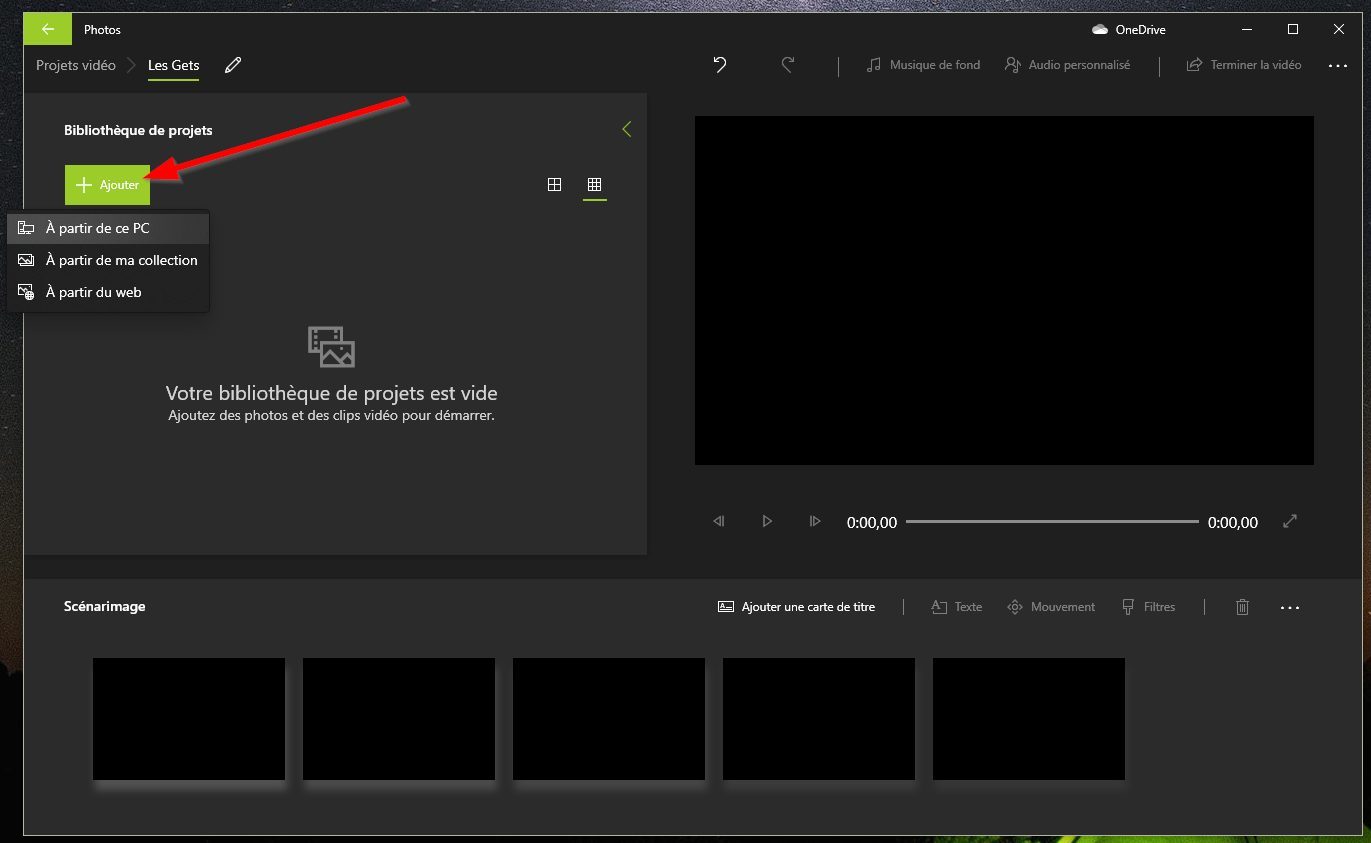
2. Import content in your project
Before you start putting up your movie, you must import into your project all the video clips you want to use. To do this, click the button Add (1) And choose the source from which you want to import your clips. Wait for a few moments, while photos imports the media into your project.
3. Insert your clips
The interface of the assembly tool integrated into photos is cut into three parts: the videos you plan to use for your film are grouped to the left, the preview of the current assembly is done in the right pane, while the headband at the bottom, Scenamage, is none other than the game on which you will work.
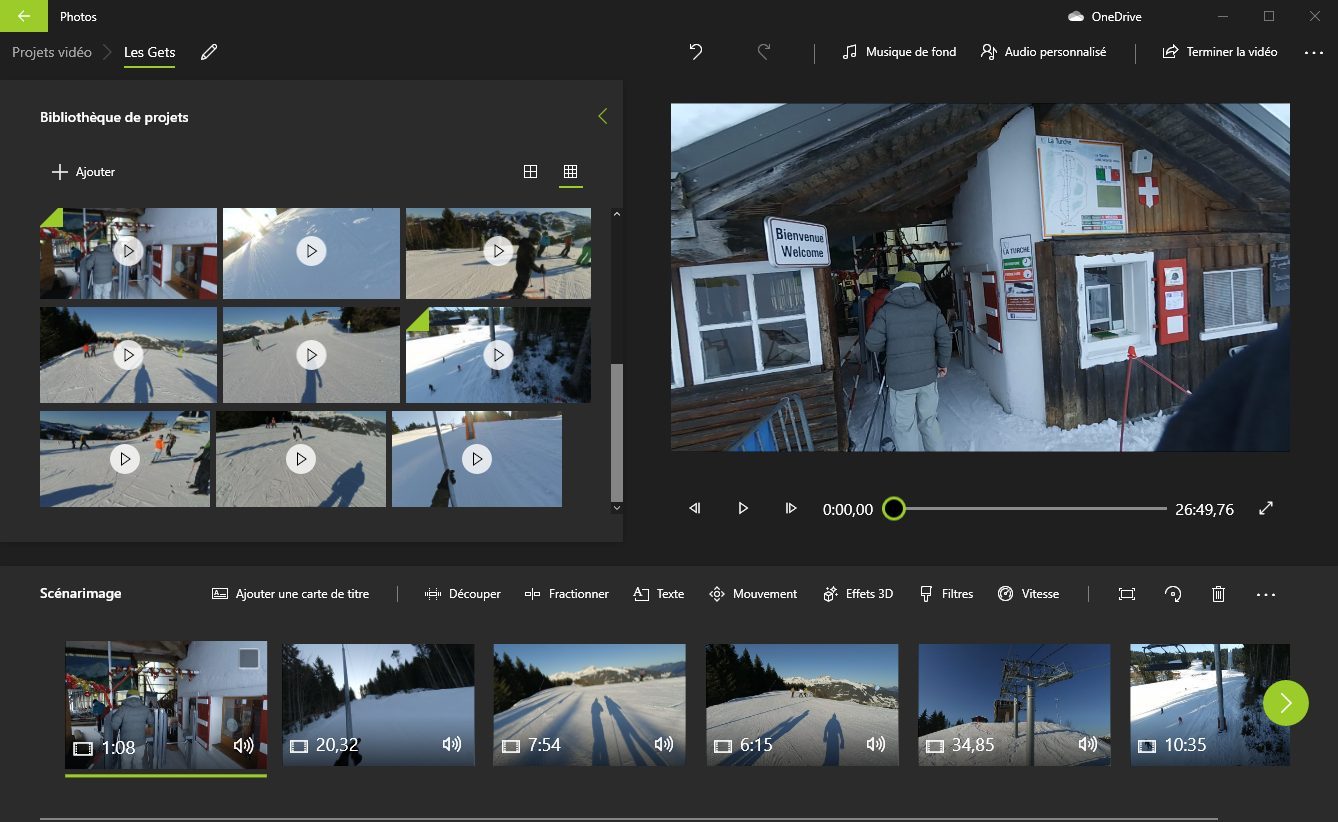
To import the first clip that will constitute your film, slide the file directly from the Project library to the headband Scenamage.
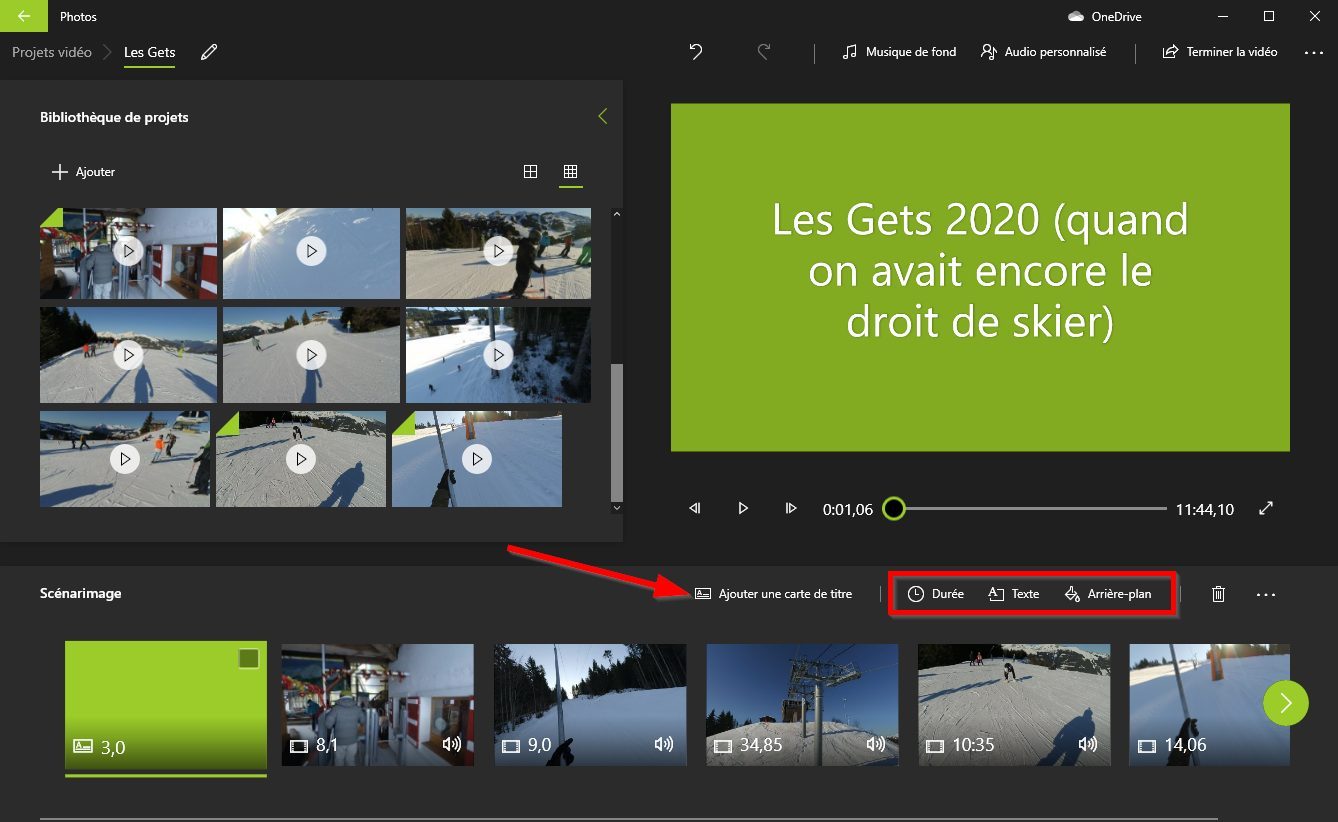
4. Add a title
If you wish, you can start your film by adding a short introduction. To do this, choose fromAdd a title card. This should automatically be selected and visible in the preview component of your project. Use the tool banner available to you to modify the Duration, add Text Or customize theBackground.
5. Edit your clips
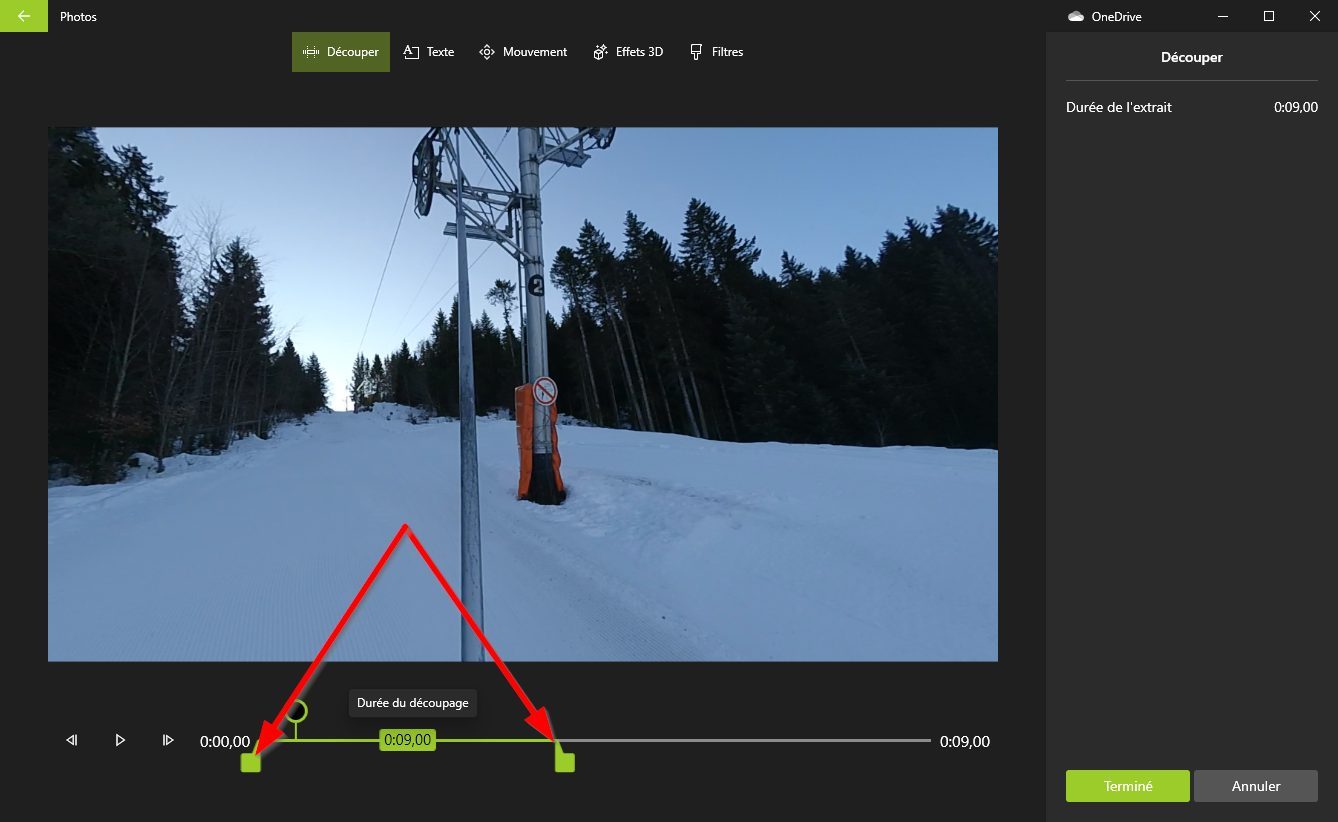
There is a good chance that the videos you imported in your project are too long. To give a little consistency to your film, select a clip and edit it using the function Cut, Or Split up.
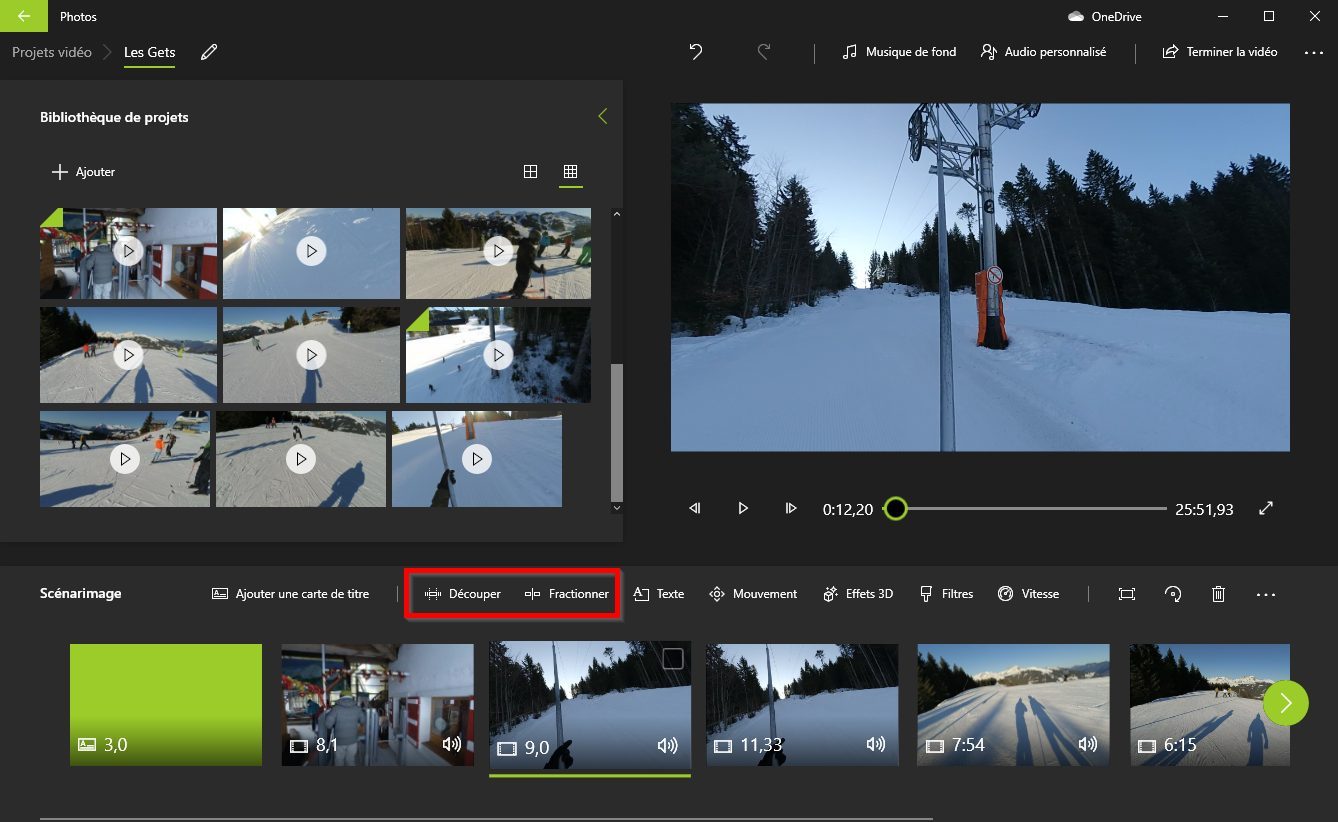
The first will allow you to select exactly the passage to keep, while the second will be used to split a video in two clips. You will only have to act on the sliders displayed to select the passage or indicate the place where the video must be cut.
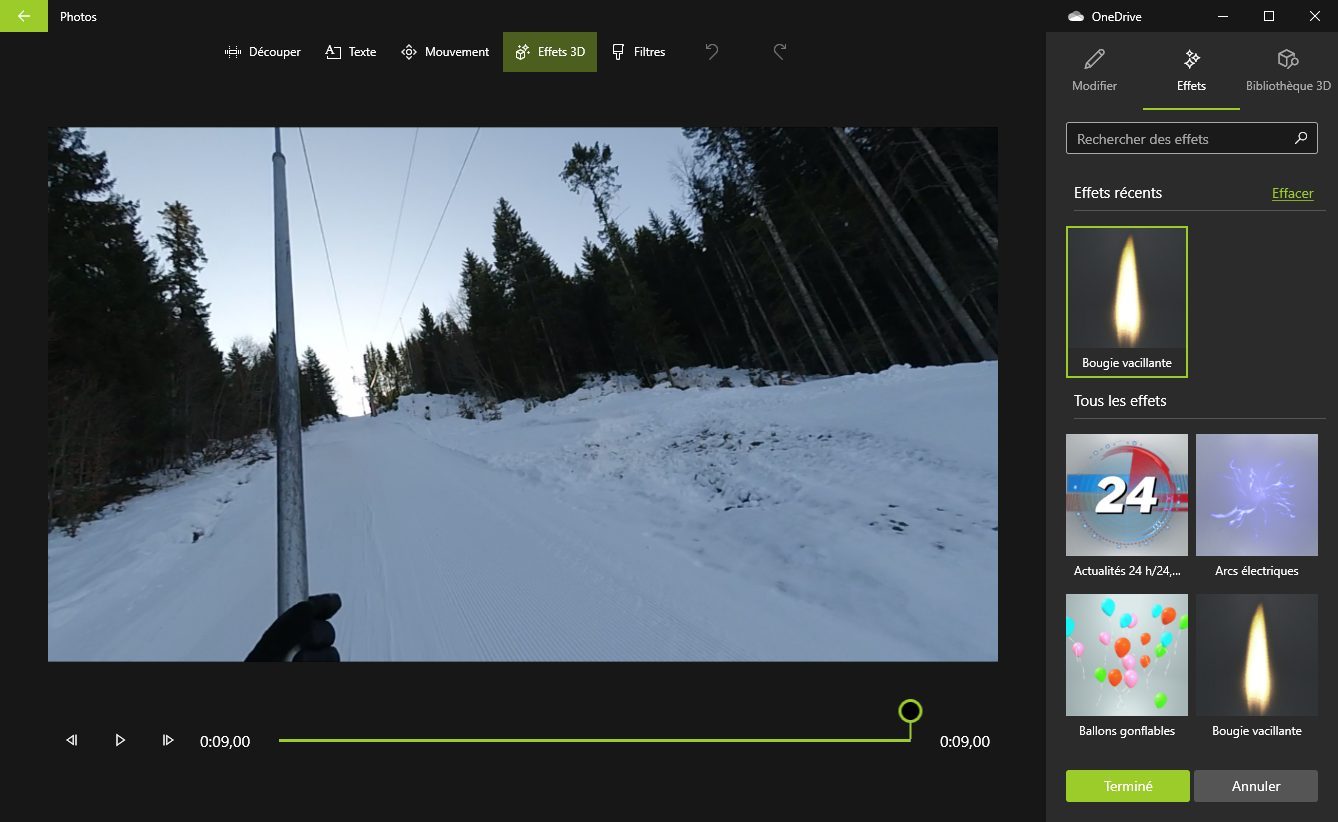
6. Add effects
To give rhythm to your assembly, the tool offers a number of effects. You can add Text In your clips, apply a Movement, of the 3D effects, of the Filters or change the Speed extract.
7. Insert a sound covering and personalize the theme
To finalize your assembly, you can integrate a Background music Among predefined music in the program with the possibility of synchronizing your video with the rhythm of the music, or select a file Personalized audio From your hard drive.
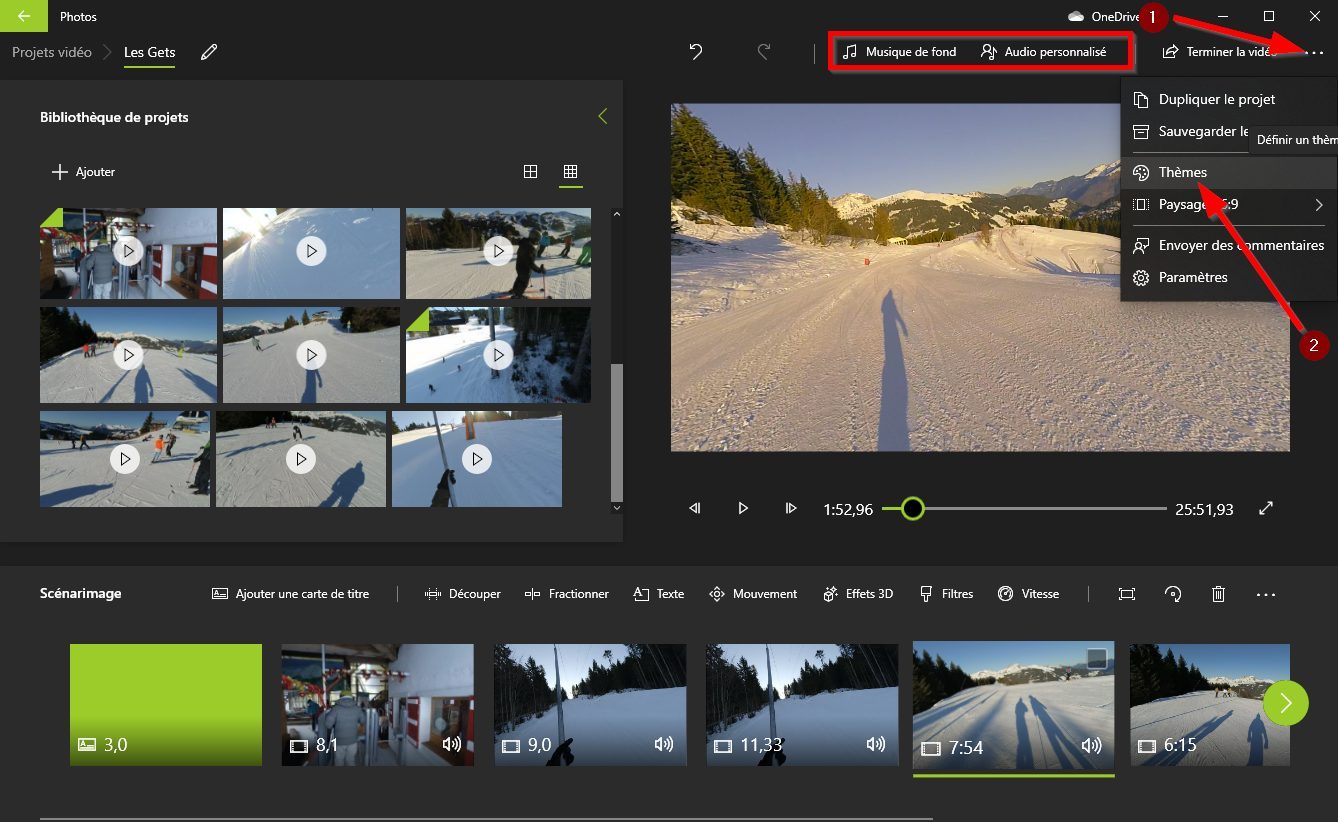
Furthermore, if it is possible to keep your assembly as is, you can also choose to apply one of the Themes predefined in the application. Click on the options menu represented by three small points (1) and enter Themes (2).
After choosing your theme and having applied it to your editing, music and dressing of your film should be modified.
8. Export your movie
When all the elements constituting your video are ready, you can watch an overview of the finalized film by selecting the first clip (1) And by launching the film’s reading from the preview window (2).
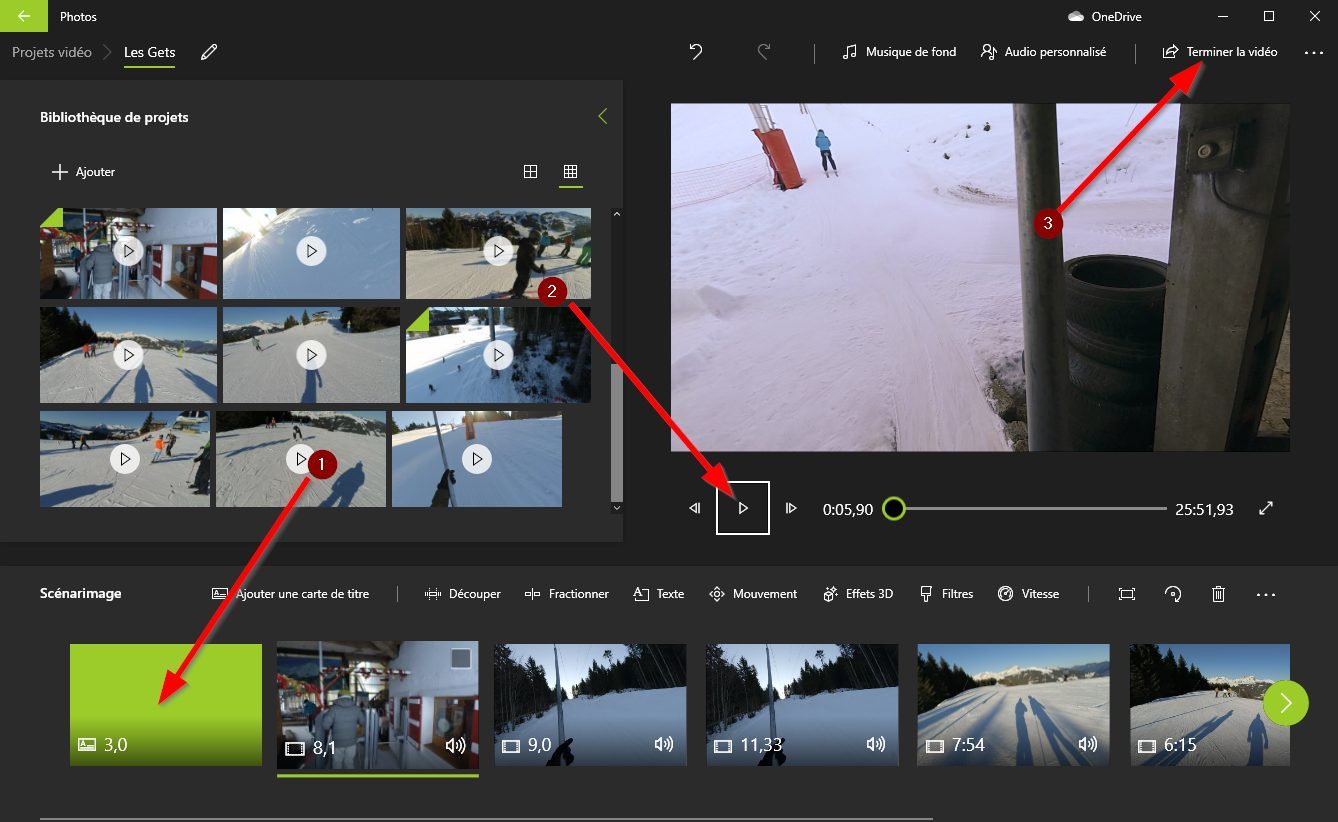
If the project suits you, you can export your film. To do this click on Finish the video (3).
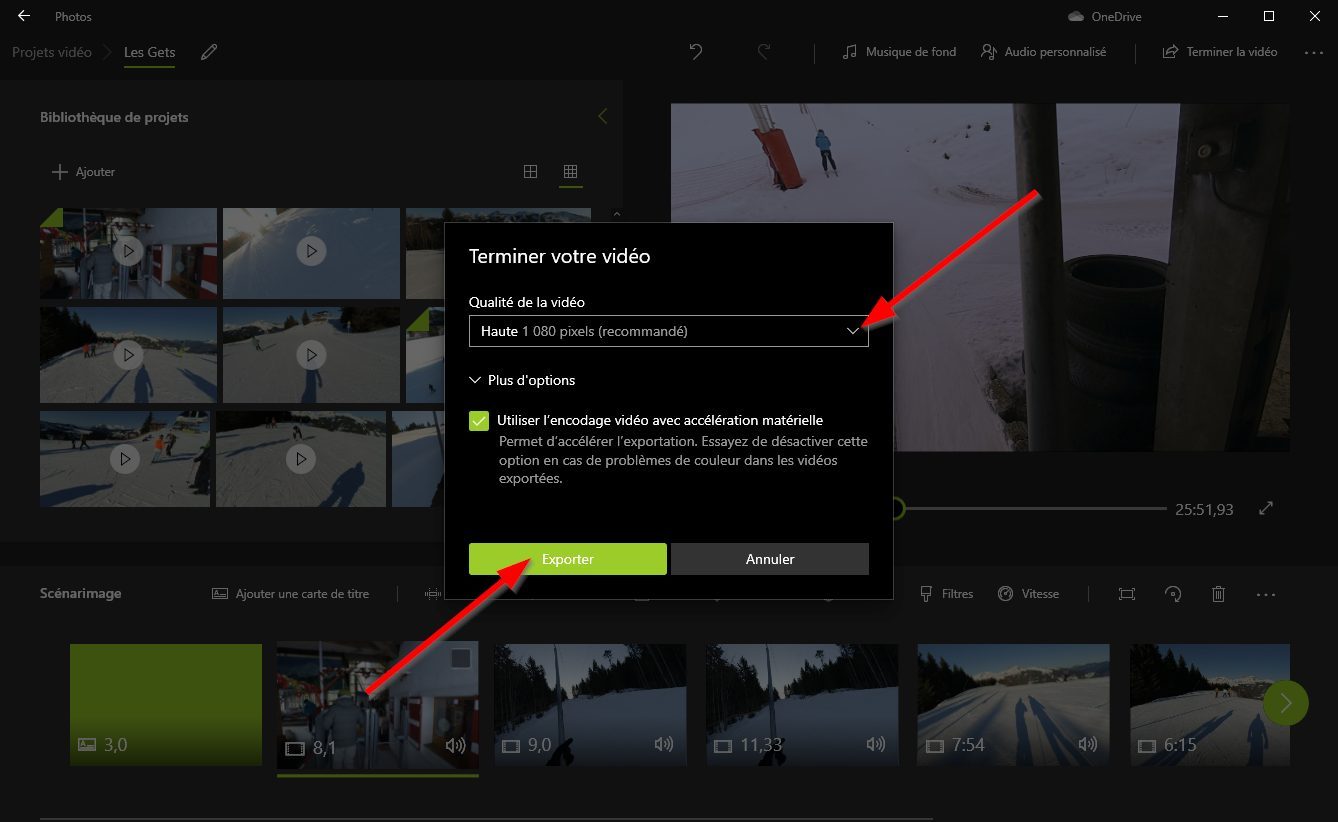
Select the quality of the final video (high in 1080p, average in 720p and bass in 540p) and click on Export And choose a backup location on your machine. The process of exporting your film starts and, depending on the performance of your machine, the export duration of your project can take more or less time.