


How to reduce the file size from a PDF file, how to reduce the size of a PDF file?
![]()
How to reduce the size of a PDF file
There are PDF compression applications on Windows plethora. However, our choice fell on free pdf compressor, a free, light and easy -to -use utility whose reputation is well established.
How to reduce the file size from a PDF file

PDFs are an incredibly practical file format when it comes to sharing documents between different operating systems and software. Regarding the size of PDF files, it turns out that this size is important. For what ? Because it is difficult to move the larger files through messaging servers, it takes an eternity to set them out and to download them, they are difficult to share and tend to use an unnecessary memory storage place. For example, have you ever had an email that just didn’t want to leave ? I’m sure you understand for having already experienced it. It’s Friday and the end of your working day. You are ready to leave the office, you just have to send your last very important email. You press send to only watch the email lingering in your shipment box where it is stuck. Why, ask yourself ? Your PDF attachment is too large. Irritated and frustrated, you are faced with … So what to do now ? In a case like this, you can divide the PDF file into several documents, or download it from a cloud storage service, but if you just want to attach the PDF file to email and send it, you will have to compress your file Pdf.
What does PDF compression do ?
She does almost exactly what she seems to do. The PDF compression reduces the size of a PDF file, which generally allows you to preserve the integrity of the information you are ready to send, which facilitates sending by e-mail, download or loading your file file. When compression of image files, such as JPEG files, leads to a loss of quality, the PDF compression made with care (and with the right tools), will ensure that the quality of your information remains intact. In other words, even if the size of the files decreases, the quality and the integrity are maintained – as long as you use the right compression tools. You can also opt for the flattening of a PDF file which can reduce even more the size of the file. However, the flattening of a PDF will result in data loss in the document.
Directives for compression of PDF files
- You are about to send a PDF attachment by more than 5 MB by email.
- Your document will be tense or downloaded by other people.
- You like the idea of keeping memory on your computer, tablet or smartphone.
How to compress a PDF file ?
First stage
Download and install a free copy of PDF Creator.
Second step
From your “Start” menu or the shortcut of your desk, open PDF Creator.
Third step
Click “Open” to locate the PDF file you want to compress.
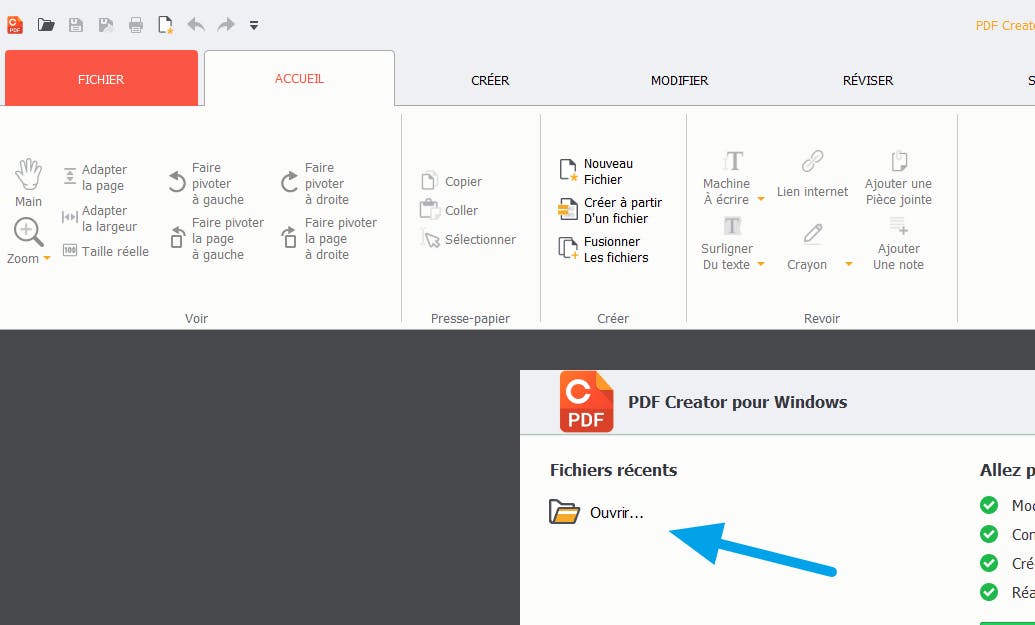
Step 1 In the opening of a file in the PDF Creator application
Fourth step
Choose the file and click Open. In my case, I choose a PDF manual TV Samsung file stored on my desktop.
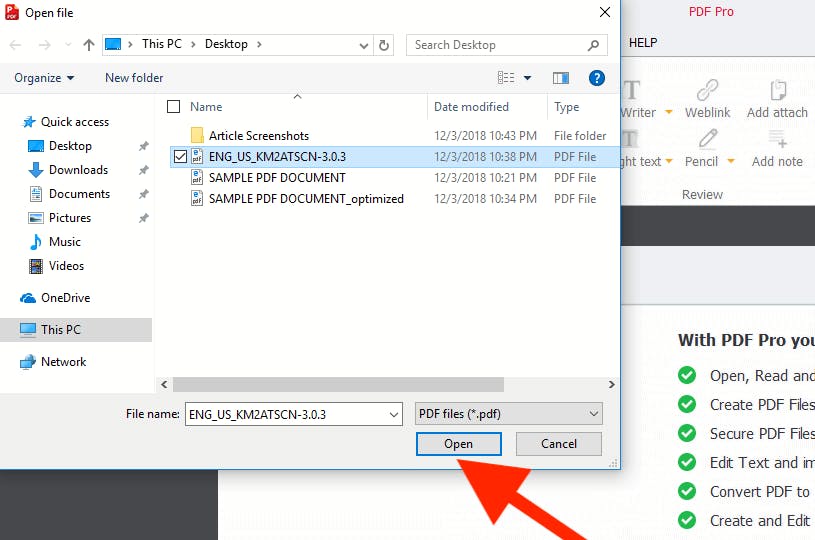
Step 2 In the opening of a file in the PDF Creator application
Fifth step
Then click on the “File” tab in the navigation tape at the top left.
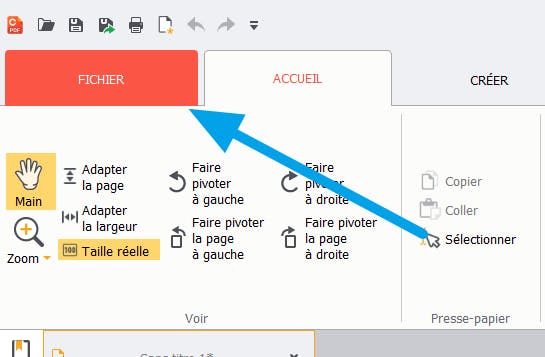
PDF Creator> File tab
Sixth step
Now click on “Optimizing” in the left navigation menu.
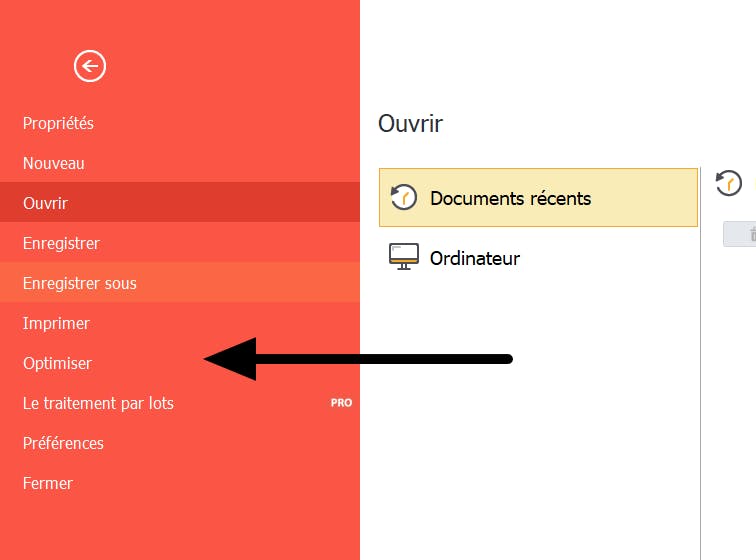
The PDF opimization tool in the PDF Creator application is the “File” tab
Seventh step
Then click on “Optimizing the document and reducing its size”.

PDF size reduction options
Eighth step
You will have 3 ways to compress your PDF file.
- The first option, “ Reduce ”, Performs a number of adjustments to your PDF. First, the images included are reduced to a resolution of 150 dpi. Images at this level of resolution are better for screen display, but they are not excellent when printed. The text or the content flow of your document is rebuilt. Useless objects, such as attachments, form fields, metadata, comments, etc. are deleted. Finally, the document is “flattened”, which eliminates multiple layers (often used in the creation of an interactive document), which results in a single layer. Interactive documents, in this case, are likely to be affected by this selection.
- The second option ” Reduce printing size and loan “, Reduces the resolution of all images of your PDF to 300 DPI – an acceptable resolution for printing. As with the above selection, content flows are reconstructed, unnecessary objects are deleted and any interactive content is flattened. This selection is preferable if your document is intended for printing.
- The option ” custom made ”, Offers you a more personalized control. Here, it is you who have the most flexibility on what must be removed or flattened. If you are not of course, try the first two compression selections before using the personalized function.
Ninth step
After choosing the file compression level, you must determine whether to “save it in the current file” or “save in a new file”. The selection “Save in the current file” will rewrite your original PDF file. If it is important to keep an original version of your file, it is better to choose the following selection “Save in a new file”. After choosing if you want to rewrite the original file with “save in the current file”, or “save in a new file”, then click “Optimize”.
Noticed :
If you use the PDF Creator assessment version, you will receive the following alert after compressing your file. The use of a test version adds a small amount of text at the bottom left of each PDF pages. To eliminate the added text, go to the full version.
For our example, I compressed a file of 15.76 MB. The final compressed size was 4.38 MB. After compressing your file, you should see the original size of the PDF file compared to the size of the compressed file (or reduced).
Other PDF file compression methods
PDF compression using Windows 10
Windows 10 has an integrated PDF compression tool. Simply click the right mouse button on your PDF file, click on “Send to”, then select “Compressed folder (zipped)”. Your PDF file is instantly compressed and placed in a separate folder. Although you can reduce file size, You have no control over what is compressed, which may cause unwanted data loss. In addition, when compression of our example of 15.76 MB, PDF Creator10 reduced the file to 4.38 MB, while the compression software integrated into Windows A Reduces the file to 6.49 MB. PDF Creator10 offers complete control over compression of your files and includes options such as fusion of files, file splitting, the annotation of documents, etc.
Free online tools such as Smallpdf
Smallpdf.com is a simple online tool for compressing pdf files. By simple drag and drop (or by choosing a file from your computer), Smallpdf.com will instantly compress your file. Using the 15.76 MB file that I used in the example with PDF Creator, Smallpdf.com reduced the size of the file to 1.76 MB. Unfortunately, like the Windows 10 option integrated above, You have no control over the type or quantity of compression. When I tried Smallpdf, the document obtained had a less than ideal print quality at 144 dpi. And, once again, no other option such as merge files, divide files, annotate documents, is available on Smallpdf.com.
Advantages of PDF Creator
PDF Creator is complete PDF software. With him, you can:
- Reorganize the pages in a single PDF document – thus eliminating the need for new digitization;
- Merge several PDF documents;
- Rotate the pages;
- Convert PDF pages into Word documents;
- Add text, drawings or comment on pages;
- And add your signature to important documents.
Start with a free trial version of PDF Creator today.
How to reduce the size of a PDF file ?

Reduce the size of your files in PDF format in a few seconds using these free applications for Windows and MacOS.
If you happen to carry out administrative procedures on the Internet, you have undoubtedly already been blocked because of a too large PDF file. Whether it’s sending a document by e-mail or uploading it to an online service, a size limit is generally imposed for sending your documents.
In the majority of cases, the too large PDFs all have the same origin: these are documents having been scanned with a dedicated scanner, or a mobile application provided for this purpose and whose scanning parameters are configured by default to obtain Optimal quality. Only problem, the more a scanned document has pages, the more voluminous it will be if you do not have it upstream properly configured.
By default, a scanner will tend to scan your documents in 300 dpi (for dot per inch or, in French pp, for pixels per inch), while resolution of 150 dpi (or 150 ppi) is more than enough in the case documents containing only text, for example.
To correct the shooting, it is quite possible to use compression tools dedicated to PDF format. And if there are free online services that will carry out this operation without a hitch, nothing can assure you that these platforms will not exploit the potentially sensitive personal data that your documents may contain. We cannot therefore advise you to avoid as much as possible to send personal documents to third -party online services to carry out this kind of operation.
Instead, it is best to turn to applications that work locally on your machine. There are several, completely free on Windows as on MacOS, which will allow you to compress your PDF files as simply as a drag-drop. Here they are.
How to compress a PDF file on Windows ?
There are PDF compression applications on Windows plethora. However, our choice fell on free pdf compressor, a free, light and easy -to -use utility whose reputation is well established.
1. Download Free PDF Compressor
If not already done, start by downloading free pdf compressor on your pc. Then install the software on your machine and open it.
2. Select the PDF to compress
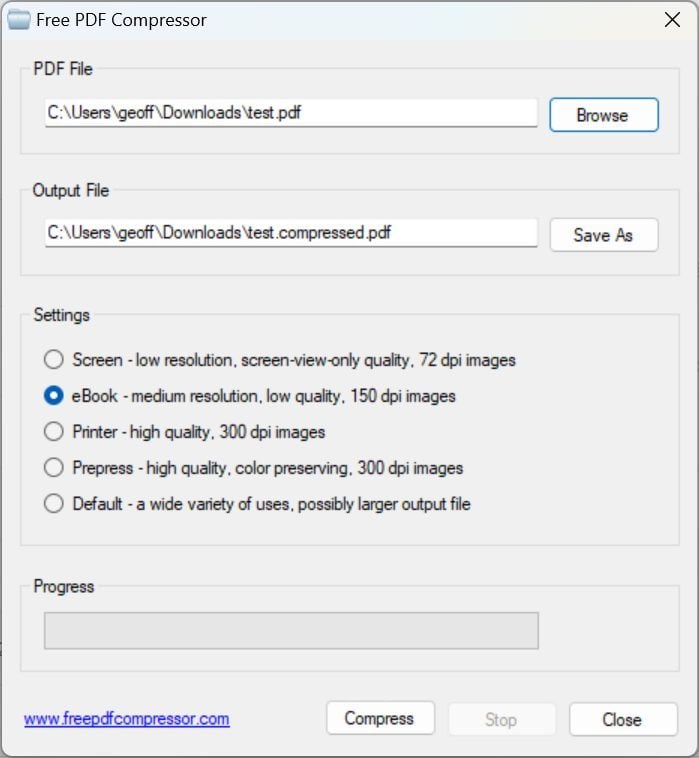
In the free pdf compressor window, on the line PDF File, click on Browse, Then in the file explorer window that appears, select the PDF file to be compressed. By default, the field Output File, which corresponds to the path of the compressed file backup directory, is automatically informed. Free pdf compressor natively back up your compressed files in the source directory and renames the file by adding the mention .compressed.

3. Choose the compression parameters
The part Setings from the window includes the different compression levels available in the program:
– Screen 72 dpi corresponds to a fairly sufficient resolution for a display on a screen
– ebook 150 dpi corresponds to an average resolution, considered to be of low quality, but which is generally enough for text to print.
– Printer, 300 dpi corresponds to high quality resolution, for printing
– Prepress 300 dpi corresponds to high quality resolution, with colors preservation. This resolution is generally used by printing professionals
To compress a document containing mainly text, prefer the level ebook 150 DPI. The quality of your file displayed on a screen should not change and it should be sufficient for your document to be perfectly readable when printed.
4. Launch compression
Once the compression settings have been chosen, just click the button Compress. The application should then compress your document and register it automatically in the source directory. A pop-up should be displayed once the compression process is completed. Click on the button OK.

If however the quality of the file obtained is not sufficient for your liking, you can relaunch the compression process on your initial file by increasing the chosen compression chosen.
How to compress a PDF file on macOS ?
On macOS, it is possible to use a small free utility, downloadable directly from the Mac App Store. Lightweight PDF, This is its name, is a very light tool in which it is enough to drag and drop the PDF too heavy to compress it. Be careful however, Lightweight PDF offers no room for maneuver. You cannot play on any compression parameter. In addition, it crushes the original file once the compression has been applied. So don’t forget to duplicate your PDF document before any operation.
Those who do not wish to cling to an additional application on their Mac will be able to use preview without problem to compress their PDF. The application includes a compression tool available from the menu File> Export. This is a quartz filter named reducing file size.
Unfortunately, used with its default settings, the quartz filter applies too much compression that makes the images blurred and the texts that are difficult to read. It is nevertheless possible to modify the parameters of this filter quite easily. here’s how.
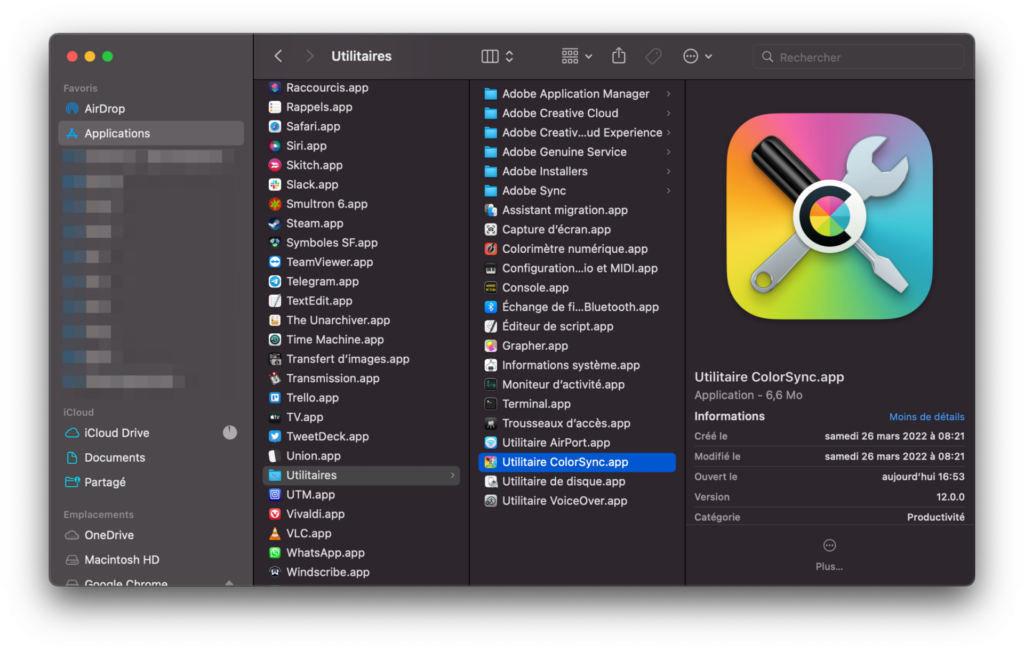
1. Open the Colorsync utility
For those who do not wish to cling to an additional application, it is quite possible to use preview to compress your PDF documents. MacOS has an utility, Colorsync, which allows you to manage and use color profiles to make sure that the colors of your images are always identical regardless of the screen on which they are displayed. It is also from this utility that it is possible to modify the famous quartz filters, whose filter reduce the size of the file.
Open Colorsync by entering his name in Spotlight, or since Finder, by going to Applications > Utility > Colorsync utility.
2. Duplicate the filter Reduce the size
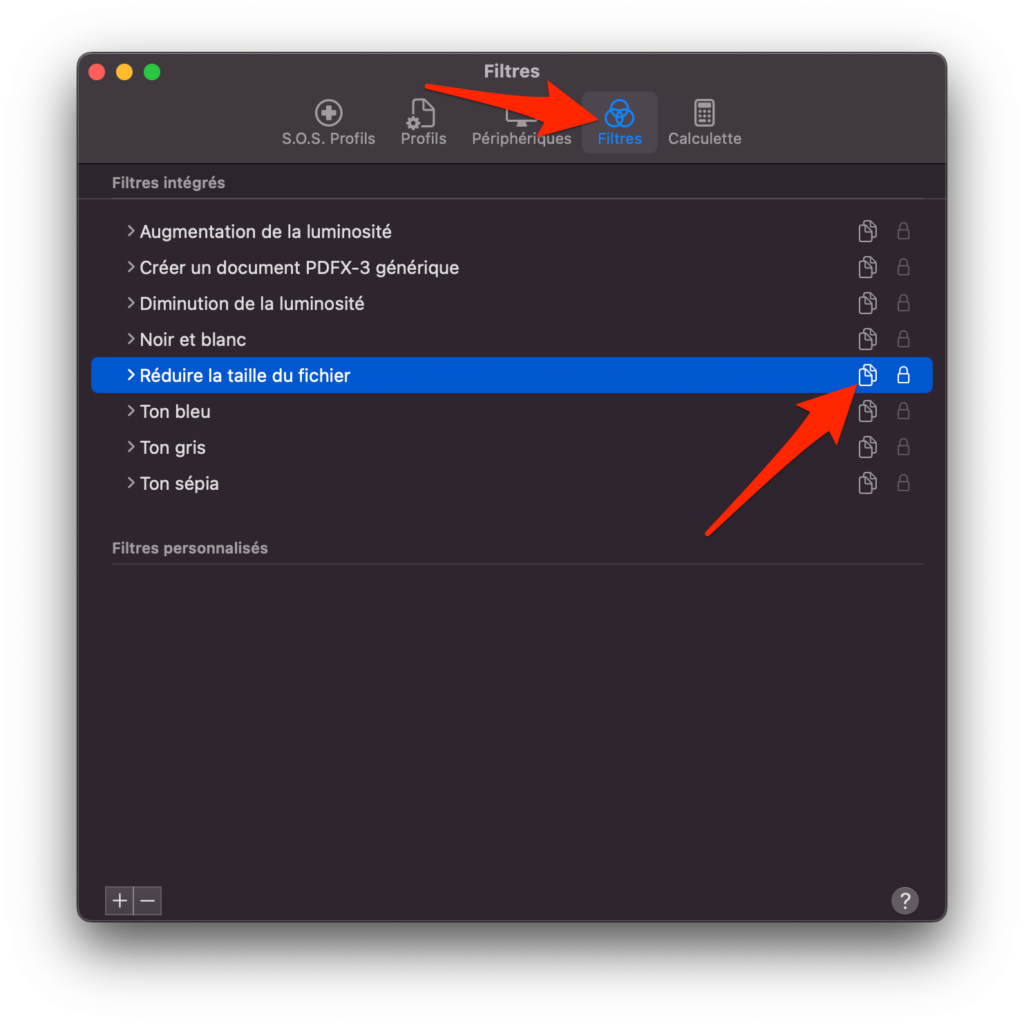
In the utility window Colorsync, Select the tab Filters, Then at the line Reduce file size, Click on the duplication button figured by two bunk rectangles.
3. Change the duplicated filter
A copy of the filter Reduce file size should then appear in the list of Personalized filters. Click on the arrow to deploy the filter tree, then deploy the tree structures from the section Image sampling And Image compression. In Image sampling, Check the option Define resolution and replace the default value (72 pixels / inch) by at least 150 pixels / inch. Then uncheck the option Limit size.
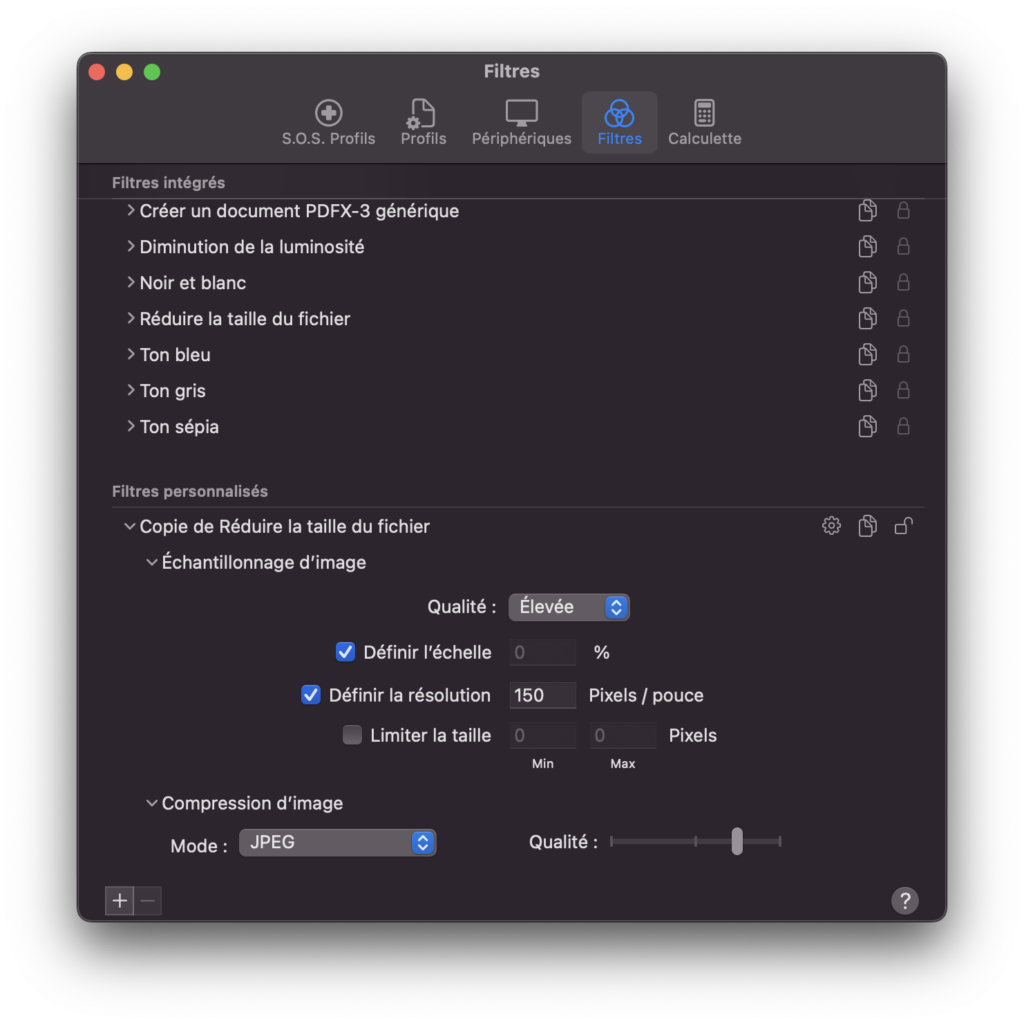
Below, in Image compression, Adjust the quality to go to three -quarters. Finally click on the button on a padlock Open to lock your personalized filter.
4. Compress your PDF
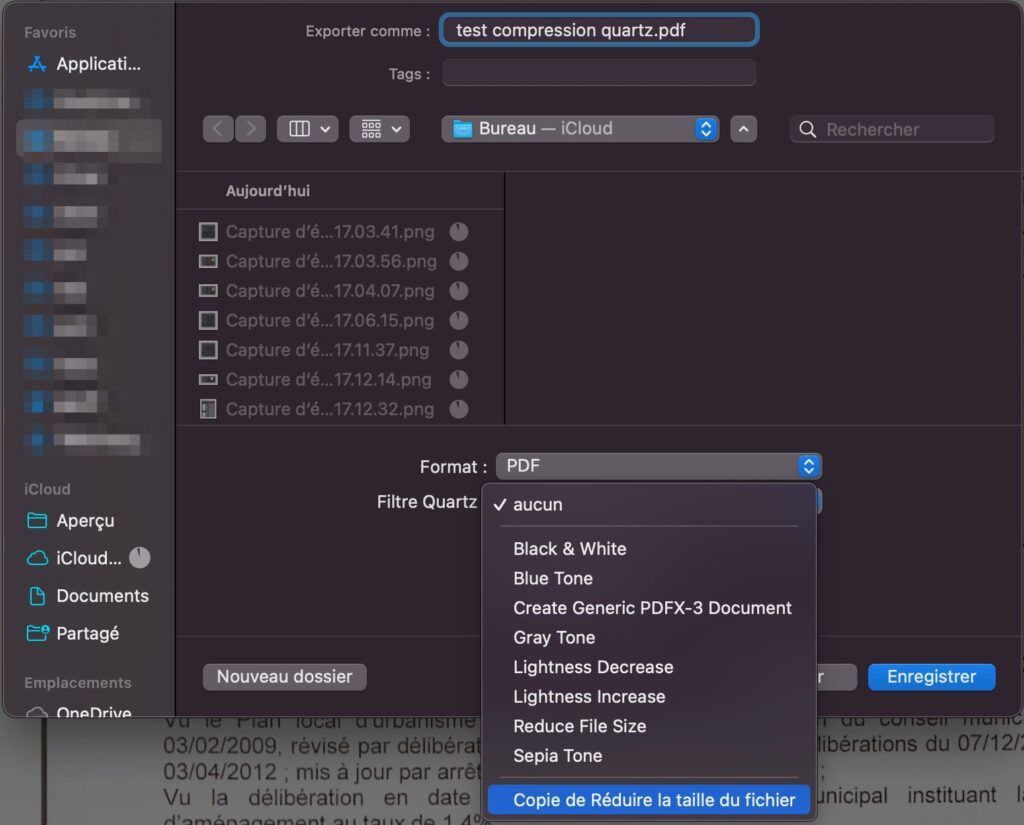
Open your PDF in Preview, then click on File and select Export. In the window that appears, select a backup directory, give your document a name, then to the line Quartz filter, Click on the drop -down menu and select the quartz filter you duplicated and modified. Finally click the button Save. The size of your file should now be reduced and the quality of your document should be preserved.
For our handling, a document scanned in PDF format whose initial weight was 13.9 MB could be reduced to 1.7 MB with sufficient quality for a display on screen and printing.