


How to create your VPN server with OpenVPN and Debian, how to mount your own VPN on a server – Numerama
![]()
How to mount your own VPN on a server
To set up a VPN server based on openvpn, there are different solutions: lean on a firewall like PfSense, use a Linux machine, use a Windows machine, etc. Today, we are interested in the implementation on a Linux machine, in this case under Debian 11.
Debian 11 and OpenVPN: how to create your own VPN server ?

In this tutorial, we will learn to configure a VPN server under Debian 11 with OpenVPN, with the aim of creating a VPN server on which we will rely to navigate the Internet. This tutorial is ideal if you want to set up your own VPN server, on a VPS server in the cloud at OVHCloud or other. Thus, a remote client machine can connect to the OpenVPN server to access the Internet by exploiting the connection of the OpenVPN server, but also to the remote infrastructure, whether it is the VPN server itself, or another server of the same network. Indeed, this principle is based on the implementation of a “client-to-site” VPN.
As a reminder, VPN means Virtual Private NOTebork And the objective of a VPN is simple: The VPN will create a virtual link between two points, For example between two business networks (VPN site to site), or between a customer PC and a business network (VPN customer at site). Within this link, which is called a tunnel, The data will be quantified And isolated from the rest of the traffic, this is all the interest of VPN and this notion of “private”. Nowadays, VPNs for personal use are very popular to get around censorship, hide your navigation on the Internet, etc.
To set up a VPN server based on openvpn, there are different solutions: lean on a firewall like PfSense, use a Linux machine, use a Windows machine, etc. Today, we are interested in the implementation on a Linux machine, in this case under Debian 11.
Here is some information on the infrastructure of the day:
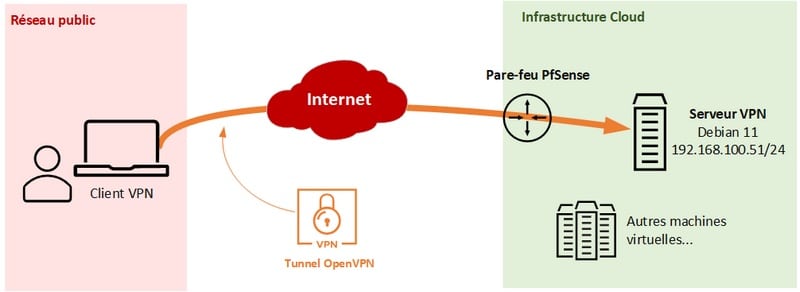
There are several possible architectures, including:
- The OpenVPN server has a public IP address (case of a VPS) so we connect directly to its public IP address
- The OpenVPN server is masked behind a router / firewall, and therefore behind a nat. Result, we connect to the public IP address of the equipment (router/firewall) and thanks to a Port Redirection rule, we connect to our VPN – I am in this case, as part of this demo
Once connected to VPN from the VPN client, all the traffic traffic goes through the VPN and leaves through the internet connection of the OpenVPN server.
II. Installation of OpenVPN Server on Debian 11
We could configure the OpenVPN server manually, and step by step on our Debian 11 server. However, we will use an installation script that will allow a VPN server to be deployed very easily and quickly. This script, compatible Debian, Rocky Linux, Fedora, Ubuntu, etc. is available on GitHub: you can revise its code at will.
What is this installation ? This script is very practical, but what will it do on the machine ?
- On a Debian machine, he will install the following packages: openvpn, iptables, opensssl, wget, ca-querificates, curl, unbound
- Configure openvpn via the configuration file:/etc/openvpn/server.confused
- Configure iptables on the server to allow flows
- Activate routing on the VPN server (“SYSCTL NET.IPV4.ip_forward = 1 “in /etc /systeml.D/ 99 -OPENVPN.confused ))
Beyond installing OpenVPN Server, the script will rely on a local PKI to generate an essential certificate for the proper functioning of VPN.
Before you start, make sure your VPN server is well connected to the Internet and has a fixed IP address.
HAS. Download the installation script
Connect to your future VPN server, and start by updating the package cache. We also take the opportunity to install curl.
Sudo ApT-Get Update Sudo Apt-Get Install Curl
Then download the installation script with curl:
curl -O https: // raw.githubusent.com/Angristan/OpenVPN-Install/Master/OpenVPN-Install.sh
As soon as the script is downloaded, you must add execution rights in order to be able to execute it later:
CHMOD +X OPENVPN-INSTALL.sh
Then run the script to start the configuration step by step of openvpn server:
sudo ./OpenVPN-Install.sh
B. Configure the VPN
The message “WELCOME TON THE OPENVPN Install!”Affects and the configuration steps will be linked. First of all, it is necessary Indicate the IPV4 address of the VPN server, But the good news is that it goes back automatically. If it is the local IP address, it means that there is a nat and in this case, it is logical. Otherwise, the public IP address of your server, for example of your VPS server, will be displayed here. Here, the script goes back well “192.168.100.51 “Validate.

Besides, The script detects the presence of NAT and indicates the public IP address. Just validate, unless you want to specify a specific domain name or correct the information raised by the script (which relies on curl to recover your public IP).

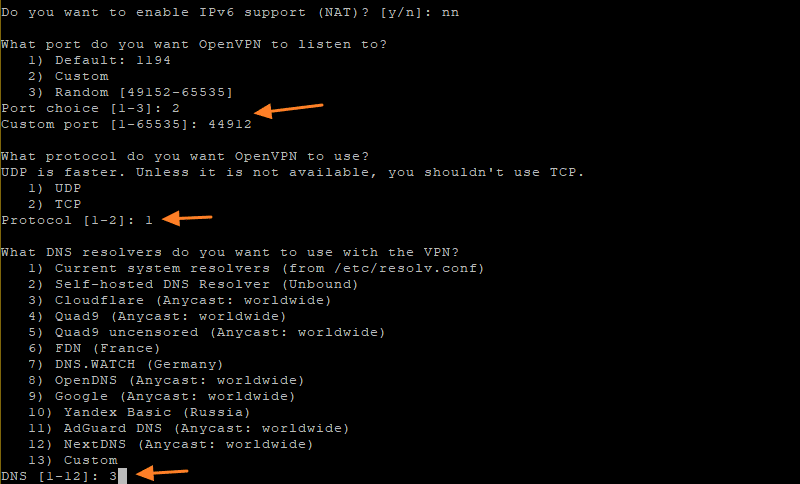
It is requested if you want to activate the IPv6 support, you can indicate “n” to refuse.
- What port do you want openvpn to list?
Then you have to choose the port on which the VPN server will listen to. By default, this is port 1194, but I recommend that you use a personalized port to hide your VPN (You can use a port used by another protocol (example: 443/HTTPS) to pass more easily through certain firewalls).
To define a personalized port, indicate “2” then indicate the port number. For example “44912” in my example.
- What Protocol do you want openvpn to use ?
OpenVPN is faster with the UDP transport protocol, and moreover it is its default operating mode. I encourage you to stay on UDP, unless you try to pass through a firewall: if you use Port 443, it is more consistent to use TCP to do like HTTPS !
- What dns resolvers do you want to use with the vpn ?
Once connected to VPN, which VPN server do you want to use for name resolution. You can choose a personalized server with choice 13, or choose one from the list indicating your number.
So much for the first series of questions. Let’s go after.
- Do you want to use compression ?
The script recommends that we do not use compression, because it is used by voracle attacks. Indicate “n” and validate.
- Customize Encryption Settings ?
The script is already preconfigured to use certain parameters for encryption of the VPN tunnel and its safety as a whole. You have the possibility of defining your own parameters by indicating “y”, otherwise just do “n”.

Below, here are the different options offered (as well as the recommended choices and corresponding to the automatic configuration) for those who decide to personalize encryption options.
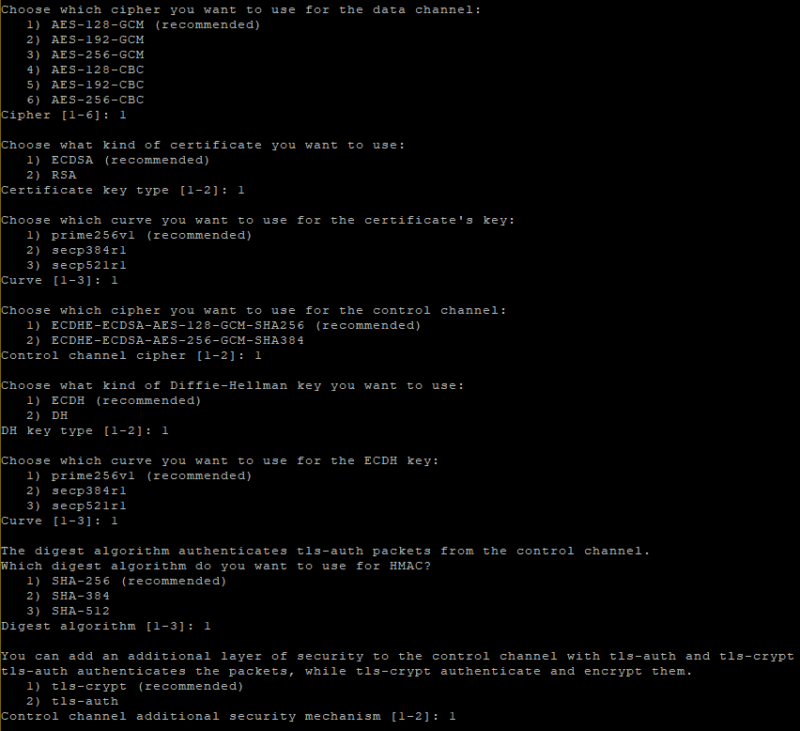
The first part of the interrogation is finished ! So far, the script has not yet changed the local machine. On the other hand, at this precise moment if you press the “Enter” key (or another touch), the installation of the OpenVPN server will start.
![]()
VS. Creation of a first customer
Following the configuration of the VPN server, the installation via the script continues with the creation of a first VPN customer. Indicate the name of the PC which will use the VPN (just to find your way), for example “PC-Flo“”. Then the question “Do you want to protect the configuration file with a password?“displayed, indicate” 2 “for yes in order to Define a password that will be necessary to establish the VPN connection.

This will generate an OVPN configuration file in the user profile in use. Here, I am connected as a root so the configuration is generated in “/root/”. From a point of view of the VPN server, the addition of this customer will generate two files:
- The customer certificate in /etc/openvpn/Easy-RSA/PKI/ISSUED/.CRT
- The private key to the customer in /etc/openvpn/easy-psa/pki/private/.Key
Note : At any time, you can change the configuration of your OpenVPN server by modifying the config file: /etc/openvpn/server.confused
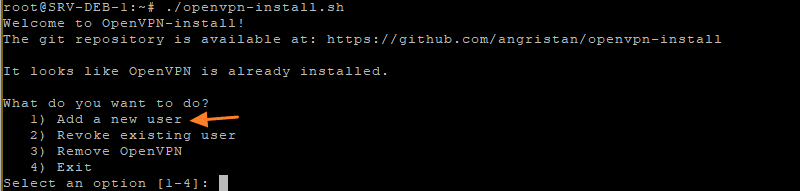
D. Add a new openvpn customer
At any time, you can add a new pure customer that each machine that connects has its own certificate. Whether for Add or delete a new customer, just re -execute the script and make the choice “1”.
sudo ./OpenVPN-Install.sh
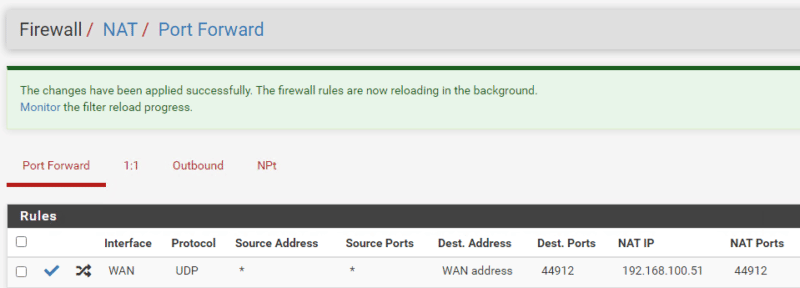
E. In NAT mode: the Port Redirection rule
In NAT mode, that is to say with a VPN server connected behind a router/firewall where the NAT is activated, you will have to Create a Port Redirection rule. Otherwise, flows for your public IP address on port 44912 will not be redirected to the VPN server.
- If these concepts are blurred for you: NAT and PAT for beginners
Thus, on my firewall, I create a rule to redirect UDP/44912 flows for my public IP address for the VPN server (192.168.100.51).
III. Test the VPN connection
The configuration file generated previously (/Root/PC-Flo.OVPN) in the user profile must be transferred to the computer which must connect to VPN. If you are on Windows, you can use Winscp or SCP, and under Linux you can use SCP.
HAS. On windows
On Windows, you will have to install Openvpn Gui or Openvpn Connect. Personally, I use OPENVPN Gui So I have to copy and paste the OVPN file in the following directory:
C: \ Program Files \ Openvpn \ Config
Thus, in my VPN client, I can see my new VPN connection appear which takes up for name that of the OVPN file:

Clicking on “Connect“, i have to Enter the password associated with the “PC-Flo” customer In order to authenticate me with my certificate.
Once connected, I can Access my Debian 11 server in SSH thanks to its local IP address, to know “192.168.100.51“”. I can also access the other servers in my remote infrastructure. If I access the Internet, I go through my VPN and I therefore use my VPN internet connection !
On the Windows side, looking at the IP configuration of my machine, I see that the VPN tunnel works on the network “10.8.0.0/24“Since I have the IP address”10.8.0.2/24“”. This subnet is defined in the file “/etc/openvpn/server.Conf “from the VPN server via the” Server 10 line.8.0.0 255.255.255.0 “. In terms of DNS servers, those of Cloudflare are defined (1.0.0.1 and 1.1.1.1) and that I had chosen during the initial configuration.

B. On Linux
If your customer post, which should use the VPN, is under Linux, you can install OpenVPN via this command:
Sudo ApT-Get Install Openvpn
Then the OVPN configuration file must be deposited at this location:
/etc/openvpn/customer/
To trigger a connection based on this configuration file, it will be enough to do:
OPENVPN--CLIENT-CONFIG/etc/OPENVPN/Customer/PC-Flo.OVPN
VS. Newspapers on the VPN server
Connection of the customer position is visible in the newspapers of the VPN server, by executing the order below.
Journalctl-identifying OVPN-Server
For example, when connecting from my Windows Customer Post, the following newspapers are visible:
SRV-DEB-1 OVPN-Server [436393]: Multi: Multi_init Called, R = 256 V = 256 SRV-DEB-1 OVPN-Server [436393]: Ifconfig Pool IPV4: Base = 10.8.0.2 size = 252 SRV-DEB-1 OVPN-Server [436393]: IFCONFIG POOL LIST SRV-DEB-1 OVPN-Server [436393]: Initialization Sequence Completed SRV-DEB-1 OVPN-Server [436393] ::: 53471 OUTGOING CHANNEL ENCRYPTION: 'AES-256-CTR' Initialized with 256 Bit Key Srv-Deb-1 OVPN-Server [436393] :: 53471 OUTGOing Control Channel Encryption: USING 256 Bit message HASH 'SHA256' For HMAC Authentication SRV-DEB-1 OVPN-Server-Server [436393]:: 53471 Incoming Control Channel Encryption: Cipher 'AES-256-CTR' Initialized With 256 Bit Key SRV-DEB-1 OVPN-Server [436393] ::: 53471 Incoming Control Channel Encryption: Using 256 BIT HASH 'SHA256 'For HMAC Authentication SRV-DEB-1 OVPN-Server [436393] :: 53471 TLS: Initial Packet from [AF_INET] 89.87.49.50: 53471, SID = EB971C1D A6A6884B SRV-DEB-1 OVPN-Server [436393] :: 53471 VERIFY OK: DEPTH = 1, CN = CN_UIEY50OEG1ZHZHNLA8 SRV-DEB-1 OVPN-TOER [436393]:: = 0, CN = PC-Flo SRV-DEB-1 OVPN-Server [436393] :: 53471 Peer Info: IV_VER = 2.5.6 SRV-DEB-1 OVPN-Server [436393] :: 53471 Peer Info: Iv_plat = win SRV-DEB-1 OVPN-Server [436393] :: 53471 Peer Info: IV_Proto = 6 SRV-DEB-1 OVPN-Server [436393] ::: 53471 PEER INFO: IV_NCP = 2 SRV-DEB-1 OVPN-Server [436393 ]:: 53471 peer info: IV_ciphers = AES-256-GCM: AES-128-GCM SRV-DEB-1 OVPN-Server [436393] ::: 53471 Peer Info: IV_LZ4 = 1 SRV-DEB-1 OVPN-Server [436393 ]:: 53471 peer info: IV_LZ4V2 = 1 SRV-DEB-1 OVPN-Server [436393] :: 53471 Peer Info: IV_LZO = 1 SRV-DEB-1 OVPN-Server [436393]:: 53471 Peer Info: IV_CC_STUB = 1 SRV-DEB-1 OVPN-Server [436393] :: 53471 Peer Info: IV_Comp_Stubv2 = 1 SRV-DEB-1 OVPN-Server [436393] ::: 53471 Peer Info: IV_TCPNL = 1 Srv-Deb-1 Ovpn-Server [436393 ]:: 53471 peer info: iv_gui_ver =OPENVPN_GUI_11 SRV-DEB-1 OVPN-Server [436393] :: 53471 Peer Info: IV_SSO = Openurl, CRTEXT SRV-DEB-1 OVPN-Server [436393] :: 53471 Control Channel: TLSV1.3, Cipher TLSV1.3 tls_aes_256_gcm_sha384, 256 bit EC, curve: prime256v1 srv-deb-1 ovpn-server [436393] :: 53471 [PC-Flo] Peer Connection initiated with [AF_INET] : 53471
In addition, you can visualize the iptable rules with the command below:
iptables -t nat -l -n -v
This command should allow you to see that the post -ft chain contains this line:
2200 971K Masquerade All - * ENS192 10.8.0.0/24 0.0.0.0/0 An essential line for VPN flows to be correctly routed and transported.
Iv. Conclusion
This tutorial is coming to an end: we have just seen a simple way of set up an openvpn server under Debian 11 Using this superb installation script. I took the time to explain to you what the script was doing so that you can understand what you are doing, at the same time. Know that there are many possible configurations for the implementation of a VPN with OpenVPN.
To set up a VPN to connect to a complete infrastructure, I recommend that you set it up on your firewall in order to be able to manage flows directly at this level. It will be easier to authorize only certain protocols in the VPN tunnel or to allow flows only to certain hosts. On the other hand, for a VPN that you use for personal use, to bypass censorship for example, this solution is ideal.
Share this article 


- ← Previous text4shell: a critical security flaw in the Apache Commons Text library
- More than 20 million accumulated downloads for these malware and next android applications →
Florian Burnel
System and network engineer, Co-founder of IT-Connect and Microsoft MVP “Cloud and Datacenter Management”. I want to share my experience and my discoveries through my articles. Generalist with a particular attraction for Microsoft solutions and scripting. Good reading.
Florian has 4966 posts and counting.See All Posts by Florian
How to mount your own VPN on a server
Because the functioning of a VPN is based on servers, network protocols and complex safety technologies, mounting your own VPN may seem out of reach of the simple mortal. Is this really the case ? We tried to set up our own VPN on a server ourselves.
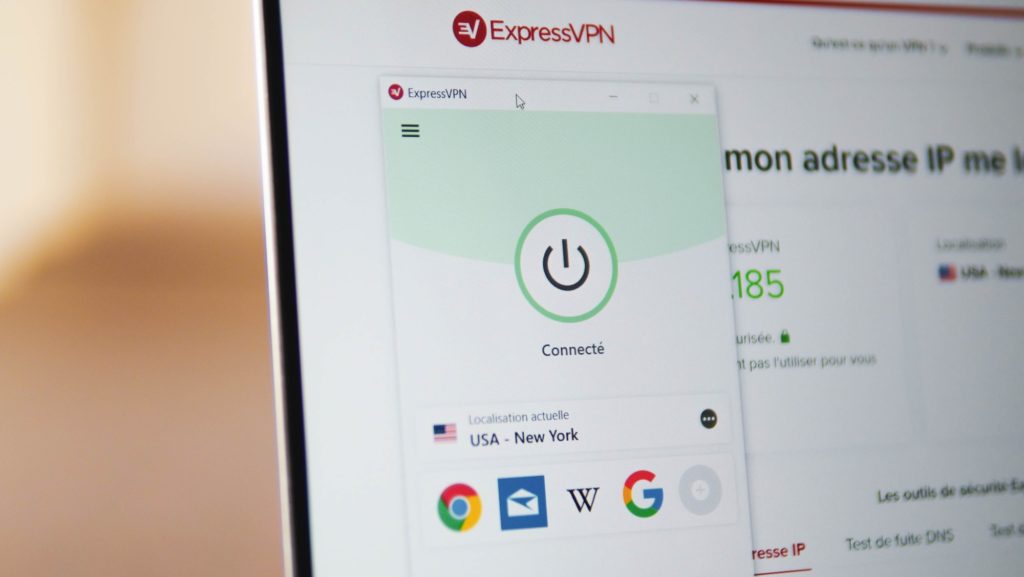
Is it so difficult that it sets up your own VPN service ? And is the operation profitable compared to a “ready-to-use” VPN service, such as ExpressVPN ? To answer it, we put ourselves in the shoes of a potential user and started by exploring the web. Literature on the subject does not give up, but what is certain is that there are dozens of ways to make a homemade VPN, to degrees of very varied difficulties.
For this article, we have retained three and we will explain in detail the most “simple” method. Raising your VPN yourself does not necessarily require big computer knowledge. On the other hand, you have to have time in front of yourself and not be afraid of putting your hands in the citch.
Install a homemade VPN on a Raspberry Pi
Piratelab published a long very detailed tutorial in French to install a VPN on a Raspberry Pi. This is the method that requires the most prerequisites: configuration of the Raspberry Pi, the Internet box then applications. The principle is to transform the small computer that is the Raspberry Pi into a VPN server that we will configure yourself. By connecting to it, you will then go through the IP address of your Raspberry Pi and you will benefit from the Internet connection (and the associated IP) to which it is connected (that of your home for example). If this is a fiber connection, the flow will be excellent, but if it is an ADSL connection, you will be mechanically limited.

Install a VPN on a virtual machine by installing Algo VPN
If you are really not afraid of command lines on a virtual machine, then the Algo VPN solution is for you. This is a very easy to install VPN solution (but much less to configure), open source, which allows you to install a VPN (with Wireguard or IPSEC protocols) on many virtual machines. The American developer Lenny Zeltser wrote a very complete tutorial in English on this subject on his blog.
Go through the turnkey solutions of hosts
But the simplest solution, for the general public, to create your own VPN is to go through the “turnkey” solutions of hosts. This is the solution that we are going to detail below. To use it we will take the example of the host Scaleway (other hosts offer identical solutions, whether at OVH or Digitalocean). He indeed offers in his instance options to use “instantapps”.
Concretely, in two clicks and a few minutes, it is possible to have a server with a distribution (Ubuntu ML) and a preinstalled application. The user then only has to pay the rental of the server and to configure their online command application.
Rent your server
To start, open an account at Scaleway. Registration is free but requires entering a bank card number and making a payment pre-authorization of 2 euros. This is normal, you are about to rent a server and these are priced at the month or at the minute.
In the interface, click Instance, in the left sidebar, then on the green button ” Create an Instance »». Congratulations, you are about to set up your first server. A server personalization menu is then displayed. In step 1 (” Choose an Image »), Click Instantapps, then choose OpenVPN.

This is where you will configure your server. We have chosen to locate our server in Amsterdam, in the Netherlands. It is there that our future IP address will be relocated.
Now comes the choice of server type. We need a small server that will take care of relocating our IP address and navigating on the internet for us. We do not need a powerful server here, the cheapest will do the trick for the needs of this tutorial.

Go to the Development tab and take the cheapest option, that with a maximum flow of 200 Mb/s.
You just have to give a little name to your body and especially to associate it with a SSH key. We are not going to explain how to generate an SSH key and associate it with the instance, Scaleway or OVH explain it perfectly in their documentation. For the rest of this tutorial, we will go through Putty software to enter the command lines.
Configure OpenVPN
If all these steps are carried out, you are now in possession of a server on which openvpn is installed. We must now configure OpenVPN directly on the server.
Connect to the server, either through the terminal (on Mac and Linux), or via Putty (Windows). When the server asks you to identify yourself, just enter Root. We will now configure openvpn so that it can identify us on the server when we connect with a VPN application. More specifically, we will create a user profile.
To start, enter the “Root” command. The server indicates that OPENVPN has been installed and that it is ready to use.
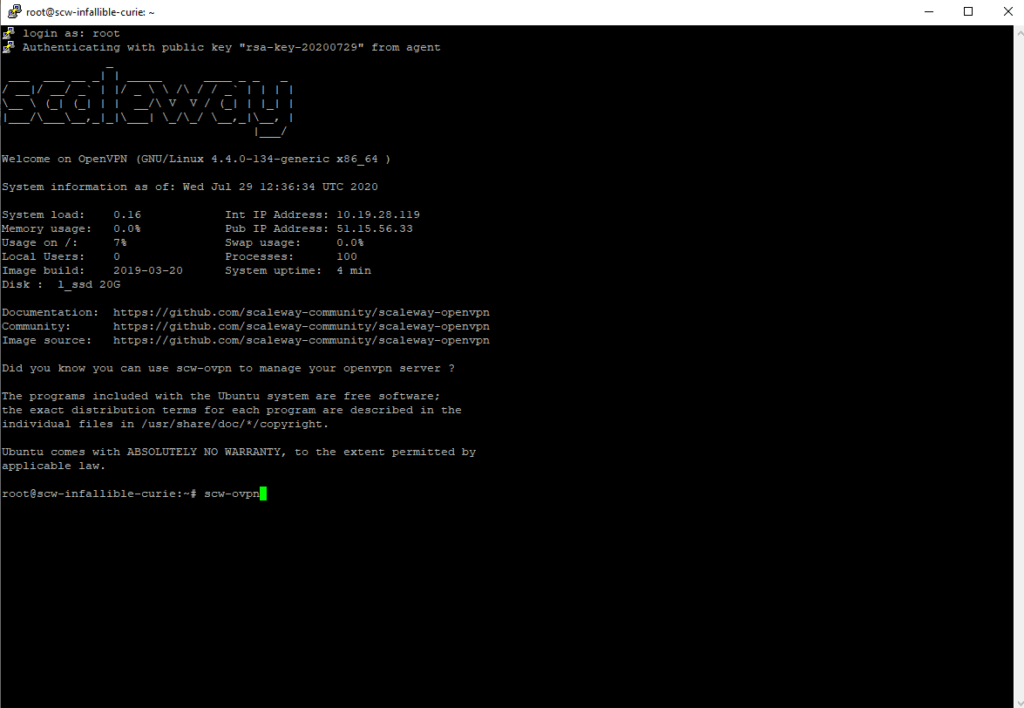
Then enter the “SCW-OVPN” command, which will create a new user.
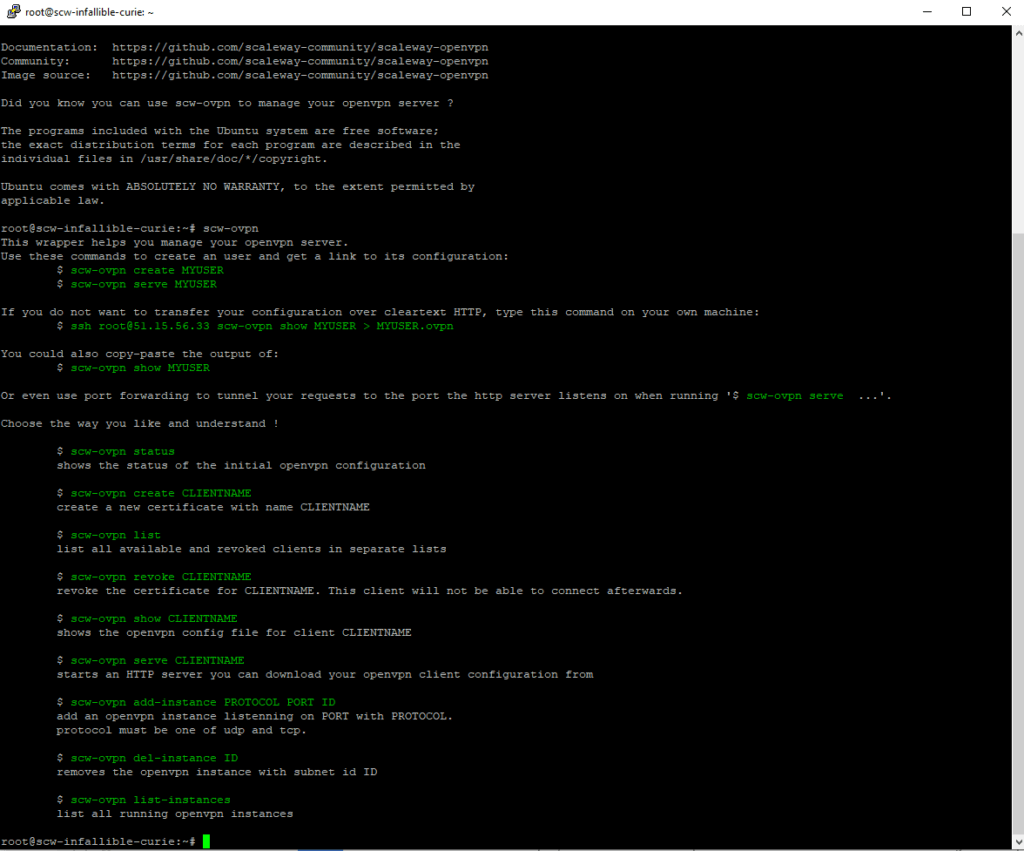
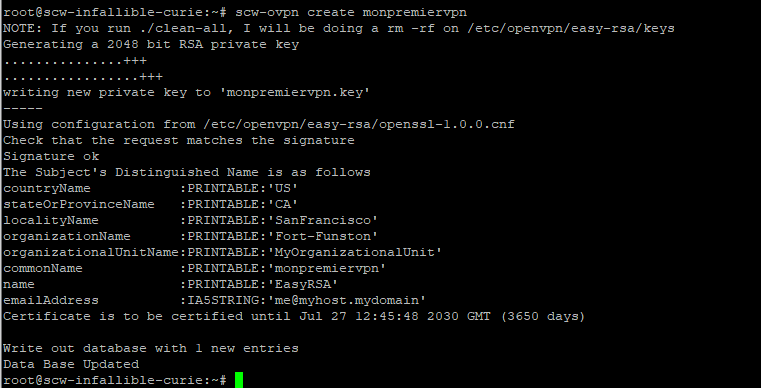
To create a new user, enter the “SCW-OVPN CREATE Name” command, or nomutilizer is, as its name suggests, the user’s name you are going to take. Here we have put “Monpremiervpn”.
Now that it is created, you need the file .OVPN that will allow you to identify yourself on the server when you use your VPN customer to connect.
To generate the file .OVPN Enter the “SCW-OVPN Serve Nomutilizing” command. The server will then generate a link allowing you to download the file .OVPN.
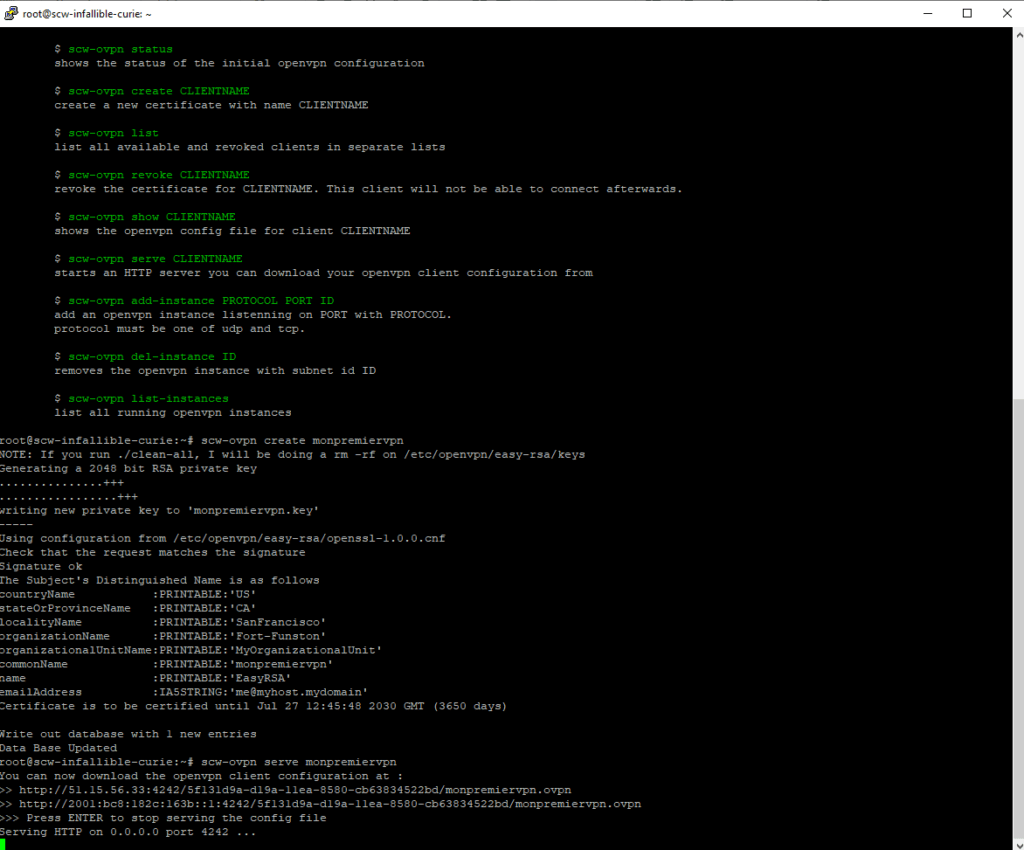
Copy the link generated automatically by OpenVPN to your browser (or download it with a SSH command if you are a command line) to download the file. Please note, the link is only available during the time of this order: as soon as you press Entry, the link will expire.
Use a VPN customer
Once you have recovered the file .OVPN, the hardest is made. All you have to do is download a VPN customer. That of Openvpn does the case very well. Download it, then install it. Then just import the file .OVPN in the customer to connect to the server through a tunnel.

Congratulations, you just put up your first VPN !
Easy, but limited
To answer the question that interests us: no, it is not very complicated to create your own VPN. But the constraints are numerous and the service offered for the general public is not really advantageous compared to a solution like ExpressVPN.
A long installation
You must indeed take the time to install several software (openvpn, putty), learn and understand how an SSH key works and open an account with a host. ExpressVPN has an application available on a large number of devices (computer, mobile, etc.), which only requires three clicks to settle and which is entirely translated in French.

It is possible to choose the country in which we want to connect and in some cases, the precise city in which we want to connect. A search engine is also present.
An unattractive price
In our example, Scaleway offers its Instantapp OpenVPN service at a price of 4.99 euros (out-tax) per month. ExpressVPN currently offers its one year subscription for less than 6 euros per month. It is almost equivalent for a very different quality of service.
Limited features
The good question to ask is not so much to know if it is complicated to create your own VPN as to know what you want to do with your VPN. In our example, our VPN is located in the Netherlands and works with a basic application, openvpn.
In other words, you have only one server where ExpressVPN offers more than 3,000 in 160 different locations. You will not have access to split tunneling features or a large choice of protocol. The flow of our house VPN is also lower than that offered by ExpressvPN servers. Finally, this unique server located in Europe will not allow you to access foreign catalogs of SVOD platforms.

The Split Tunneling allows you to circumscribe the VPN connection to specific applications.
Currently, very few hosts offer servers located in the United States. And even if they would, access to the American catalog of Netflix is not guaranteed. With a solution like ExpressVPN, the question does not arise: just connect to an American or Canadian server to access the foreign catalog on which
A good VPN supplier is simpler
In short, if you need a VPN with a single server, limited features and you are not afraid to put your hands in the control lines, you can have fun mounting your own VPN. If you need a solution that works in two clicks, with thousands of servers and a strong privacy policy, ExpressVPN is one of the best choices of the moment.

ExpressVPN currently offers a special offer on its one year subscription. This one has three free months. This subscription therefore amounts to less than 6 euros per month. To get an idea of the quality of the service, you also have 30 days of “satisfied or reimbursed” tests during which you can stop and get your subscription reimbursed at any time by contacting the after-sales service, without it not question.

You wonder what is the best VPN ? Our selection of the best VPNs The answer is in our comparator
This article was carried out in collaboration with ExpressVPN
This is content created by independent editors within the Humanoid XP entity. The editorial team of Numerama did not participate in its creation. We are committed to our readers so that these contents are interesting, qualitative and correspond to their interests.