


Google Maps tutorial to create your itinerary in the USA, how to make a course on Google Map?
![]()
How to make a course on Google Map
A click on this button alternatively passes the card bottom of the “plan” mode in “satellite photo” mode.
“Plan” mode is the default mode. On this view, the roads, parks, forests, borders, water areas are displayed.
The “satellite” mode is the assembly of photos taken by plane and satellite. Certain areas, such as large cities, have a very high level of definition (by the meter).
Google Maps tutorial
Google has developed a very powerful and very useful tool for those who organize their trip to the USA: Google Maps.
This tool, easy to use, allows you to:
calculate the distance and the journey time between 2 or more points,
Obtain detailed navigation information from a route,
See an area in card mode, sky view or relief,
And many more.
The site is perfectly responsive and is used very well on a mobile. Likewise, there is a Google Maps application for smartphone (Andoid and iOS). Nevertheless, we advise you to use a computer to create your routes and cards: you will have more options at your disposal and the use of a mouse and a large screen makes the task much easier.
A variant of Google Maps, called Google My Maps, allows you to create very complete cards, with routes and points of interest. This is the ideal tool to design a card of your course to insert in your roadbook !

Google Maps
Presentation by Google Maps
Google Maps is available at Google address.FR/MAPS.
Google Maps is a free service provided by Google.
Once the Google Maps page is open, a full screen card appears to you. By default, the card is centered on your connection location (detected via your Internet or IP browser).
Search for a place
On the top left of the map, a field allows you to search for any place in the world: a city, a region, a state, but also a full address, a hotel, a restaurant, a business. The possibilities are large. You can even enter coordinates (decimal format).
Place your cursor in the search field, enter your keyboard search and type on Entrance or click on the magnifying glass.
The card is then refocused on the search result and a marker is placed on the card.
A panel is also open to the left, giving you more information and options on your search result.

Card navigation
Zoom on the card : there are 2 main methods to adjust the card zoom.
- Use the mouse roulette: a shot in front zoome in front, a roller stroke back zooms back.
- Use the zoom buttons located at the bottom right of the card: the “+” zoome button in front, the “-” zoome button back.
The more you zoom in, the more the details of the card appear (cities, roads, buildings. )).
Go to the card : there are 2 main methods to move on the card.
- Use the directional arrows on the keyboard: ↑ to move north, ↓ to move south, → to move east, ← to move west.
- Use the mouse: just “catch” the card while holding the left mouse button, move the mouse, then release the left mouse button.
Change the card bottom
Bottom left of the card, a large “layers” square button allows you to change the bottom of the card.
A click on this button alternatively passes the card bottom of the “plan” mode in “satellite photo” mode.
“Plan” mode is the default mode. On this view, the roads, parks, forests, borders, water areas are displayed.
The “satellite” mode is the assembly of photos taken by plane and satellite. Certain areas, such as large cities, have a very high level of definition (by the meter).

Other options are available when you change your view:
- “Public transport” allows you to display metro lines and stations in the cities that have them.
- “Traffic” allows you to display traffic conditions in real time, with a green/orange/red color code.
- “By bike” allows you to display the cycle paths.
- “Relief” allows you to change the card bottom by displaying the relief and the level curves (altitude in feet).
- “Street view” allows you to display areas where it is possible to go into “immersion” mode. Click on a blue area and you will have a 360 ° photo of the place.
Calculate a route
To calculate a route between 2 points, click on the route button located at the top left, next to the search field.
A panel opens on the left. Enter the departure place in the first field using the keyboard or by clicking on the map.
Then enter the place of arrival in the second field using the keyboard or by clicking on the map.
The system then automatically calculates the shortest route between the two selected points. This appears in blue on the map. Other alternative routes are sometimes offered (in gray).

If necessary, you can move the starting and arrival points by “catching” them with your mouse.
On the left panel, the following information are displayed:
- the total distance of the route (in miles),
- Total car trip by car,
- clicking on Details, management indications to reach the place of arrival from the departure place.
If you want to extend your route (to completely draw your circuit for example), place your mouse on the next step, right -click and click on Add a destination.
Repeat the operation for all your steps.
Please note, the number of steps is limited to 10 (but there is a tip to increase this limit a little).

On a calculated route, it is possible to force the system to go through a particular point or road.
To do this, on the map, place your mouse on the blue route of the route, “catch” this one with a left click and drop the white point where you want the route pass.
You can add 7 intermediate steps to your layout.
By combining the addition of destinations and the addition of intermediate steps, we can therefore draw a circuit comprising 17 steps.

The left panel offers some interesting options:

- During a simple trip to B, it is possible to reverse the departure and arrival places by clicking on the double arrow.
- The buttons at the top allow you to choose the means of transport (car, public transport, walking, cycling, plane. )).
- The button Options Allows you to define your preferences: avoid motorways, tolls or ferries, display distances in miles or kilometers.
- During a trip with at least one step, it is possible to modify the order of the steps by “catching” one of them and by moving it vertically.
Route
To print your itinerary, click the button Menu top left and click on To print.
Set the zoom level and center the card using the buttons at the top right and click on Print.
You can also save your route by recovering the link of your card: Click on Share or integrate the card and copy the link.
If you want to integrate a card into your electronic roadbook (a Microsoft Word or Google Doc document for example), just make a screenshot with the tool offered by your operating system. Remember to go to full screen mode (F11) and hide the side panel to get the largest card possible, with maximum details.
Google My Maps
Presentation of Google My Maps
Google My Maps is a modified version of Google Maps, specially designed to create personalized cards.
If you are looking for a free and easy -to -use tool to create a global card of the route for your road trip, with markers and lines for each step, Google My Maps should satisfy you.
Google My Maps is accessible at Mymaps address.Google.com.
Before you can use this service, you must create a Google account, if you don’t already have a.
Once connected, you will find on the home page of My Maps all the cards you created.
To create a new card, click the button + Create a card on the top corner left.

My Maps’ interface looks quite like that of Google Maps.
- a field of research to find an address or a place.
- zoom buttons, bottom right.
The left panel will list all the journeys, markers and traces that you will add to the card.
At the top, click on the name of the card (“unit” card “by default) to modify this.
At the bottom of this panel, click on Basic card to change the card bottom (plan, relief, satellite. )).
Your card is automatically saved at each modification. You can cancel or restore an action by clicking on the icons Cancel And Restore located below the research field.
Add a marker
To add a marker to the card, click on the icon Add a benchmark located below the research field.
Then click on the card, at the desired location. You can then give your marker a name (and possibly add a description and photos).
Click on Save To confirm the creation of the marker.
You can then change the coloring color and icon. Click on the marker and click on the icon Style. You can then choose the color of the marker and modify the icon.
To move a marker, click on it and “catch it” to move it.
To delete a marker, click it and click on the icon Delete the element.

Add a route
To add a layout on the card, click on the icon Line located below the search field, and click on Add a line or a shape.
Then click on the card, at the desired location as a starting point. Move your slider to the following place (intermediate step) and click to draw a straight line.
Repeat for all your intermediate steps.
To add the final step, make a double click.
You can then give a name to your layout (and possibly add a description and photos).
Click on Save To confirm the creation of the layout.
You can then change the color and thickness of the line. Click on the route and click the icon Style. You can then choose the color of the layout and its thickness.
You can move the final and intermediate steps of a route by “catching” the white dots.
Likewise, you can add intermediate steps by grabbing and moving the white point between 2 steps.
To delete an intermediate step, right click on it and click on Delete the point.
To delete a route, click it and click on the icon Delete the element.

Add a route
To add a route to the card, click on the icon Line located below the search field, and click on Add a car route.
Then click on the card, at the desired location as a starting point. Move your cursor to the following location (intermediate step) and click to draw the route.
Repeat for all your intermediate steps.
To add the final step, make a double click.
You can move the final and intermediate stages of an itinerary by “catching” the white points.
Likewise, you can add intermediate steps by clicking on the route and catching the white point located between 2 steps.
To remove an intermediate step, click on it.
To delete a route, right click on the start or arrival stage and click on Delete the route.
Card
To print your card, click on the 3 vertical points located at the top right of the side panel and click on Print the card.
Adjust the page format, orientation and output format and click on Print.
If you want to integrate a card into your electronic roadbook (a Microsoft Word or Google Doc document for example), just make a screenshot with the tool offered by your operating system. Remember to go to full screen mode (F11) to get the largest card possible, with maximum details.
By dommm063
Updated on June 05, 2023
How to make a course on Google Map ?

Scroll the site to the left or right, then select your current position. Under “are you now ?”, Press yes. Press display in the history of your journeys For see the places you visited and the time you were there.
How to trace a circle on Maps ?
Start either by searching for address or using card commands to navigate to the location of your choice. Then click on a position on the card and drag your cursor to draw the circle.
How to measure a route on a card ?
- Open Google Maps on your computer.
- Right click on the starting point.
- Select Measure a distance.
- To create a trip to measure, click anywhere on the map . .
- When you have finished, click Close.
Why Maps no longer records my journeys ?
In any case, the solution is simple, just empty the application cache. Simply meet in Settings> Apps> Maps > Empty the cache.
Why I no longer see my journeys on Maps ?
To do this: go on settings then google then google account. At the top, press data and personalization. Under “Activity Commands”, Press History of positions, at the top, activate or deactivate Historic Positions.
How to make a 20 km circle on Google Maps ?
You just need to enter your address: “Address”, the radius: ” 20 km », The color of the edge and the bottom of the circle : “Border” and “Circle” and if you wish, to see only the edge: “Only Show Border” to check.
How to trace a 10 km circle on Maps ?
Google Maps Enter the departure address, position yourself on the red pictogram then right click on measure a distance. Left click on the destination address, Google Maps will trace a line with the mileage at “bird flight” between your two addresses.
How to measure your journey ?
- Look for your starting point with the search engine.
- Locate your starting point precisely. .
- Right -click on your starting point and click on Measure a distance.
How to know the distance traveled ?
You need two values, speed and journey time. Two information is essential if you want to be able to calculate the distance (d) traveled by a moving object: its speed (V) and the journey time (t). So, you can use the following formula: D = V × T.
How to use Google Maps on your computer?
- Open Google Maps on your computer. Connect with the Google account you use on your mobile device. Click on menu at the top left. Click on your trips . To see another date, select a day, a month and a year at the top.
How to view your trips on Google Maps?
- If the option is activated on your mobile, Google is able to record a history of all your trips. If this can be useful, visualizing all its trips on a card can also be frightening. To consult your travel history, open the main Google Maps menu, and press your trips.
How to search for a route on Google Maps?
- From an office web browser, Google Maps allows you to quickly search for a route without having to enter an address. Just right click on your starting point and select itinerary from this place. Then right click on the point of arrival and choose route to this place. 16.
How to navigate Google Maps?
- By default, by clicking on the “Route” button, Google Maps gives you the preliminary route route (car, bus, on foot, by bike or even by plane – depending on your choice, if available) to your final destination , and this from your current location (if you have activated geolocation on your device).
How to use Google Maps as tours planning
In 2020, Google Maps was used by a billion users per month. He is the free route planner and the route mapping tool when it comes to planning personal trips, measuring the distance between two locations and discovering new exciting benchmarks in his environment. It is an excellent tours planning tool for several stops for personal use.
Although it has many advantages for both individual users and small Maman-et-Pop stores, there is one thing Google Maps cannot do-Optimization of routes for commercial routing. And companies with high logistics intensity need an optimization of routes to reduce costs, save more money and save time.
Contents
When to use Google Maps as a route planner
The Google Maps itinerary planner has been created to help individual users:
- Go from point to to point B
- Discover new places
Find local businesses - Cartograph a bicycle, jogging or walking route
- Personal travel planning
How to optimize my itinerary using Google Maps
Google Maps can be used for any type of itinerary as long as it does not require an itinerary optimization: there is no optimization and planning tool for Google tours. When you add more than 2 stops to a Google Maps route, you must manually change the stopping sequence to make sure the shortest and fastest itinerary.
When not using Google Maps as a commercial tours planning
The Google Maps itinerary planner may not be what you are looking for if you run a delivery company, a messaging service, a field service operation or any other company with high logistics. In addition, if you need a multiple stopper planner capable of routing more than 10 addresses, the Google routing solution is not.
When you have to plan routes according to your business needs and optimization constraints, Google Maps cannot help you.
You must go from the MAPS route planner to multiple stopwater routing software, route optimization software or a route planner when you want:
- Plan routes with hundreds of thousands of addresses in a few seconds
- Optimize your tours according to your type of fleet, customer variables and business rules
- Earl more money by visiting more customers in less time and with fewer resources
- Spend less in petrol and payroll
Analyze routing data and generate relationships with logistics KPIs - Allow communication and collaboration between delivery teams
For a more detailed comparison of advantages and disadvantages, we recommend that you compare Google Maps with software solutions dedicated to route planning. For example, Route4me vs Google Maps or the routes of Google vs Mapquest, etc.
How to plan a multiple stop route on Google Maps
Although this requires planning your stop sequence in advance, you can plan a route with several stops on Google Maps. You can add up to 10 stops to a Google Maps itinerary. The downside to planning multiple arrest tours on Google Maps is that you cannot optimize it. In other words, to plan a profitable Google Maps itinerary, you must sequence your stops manually.
Here’s how to plan a multiple stop route in 6 easy steps:
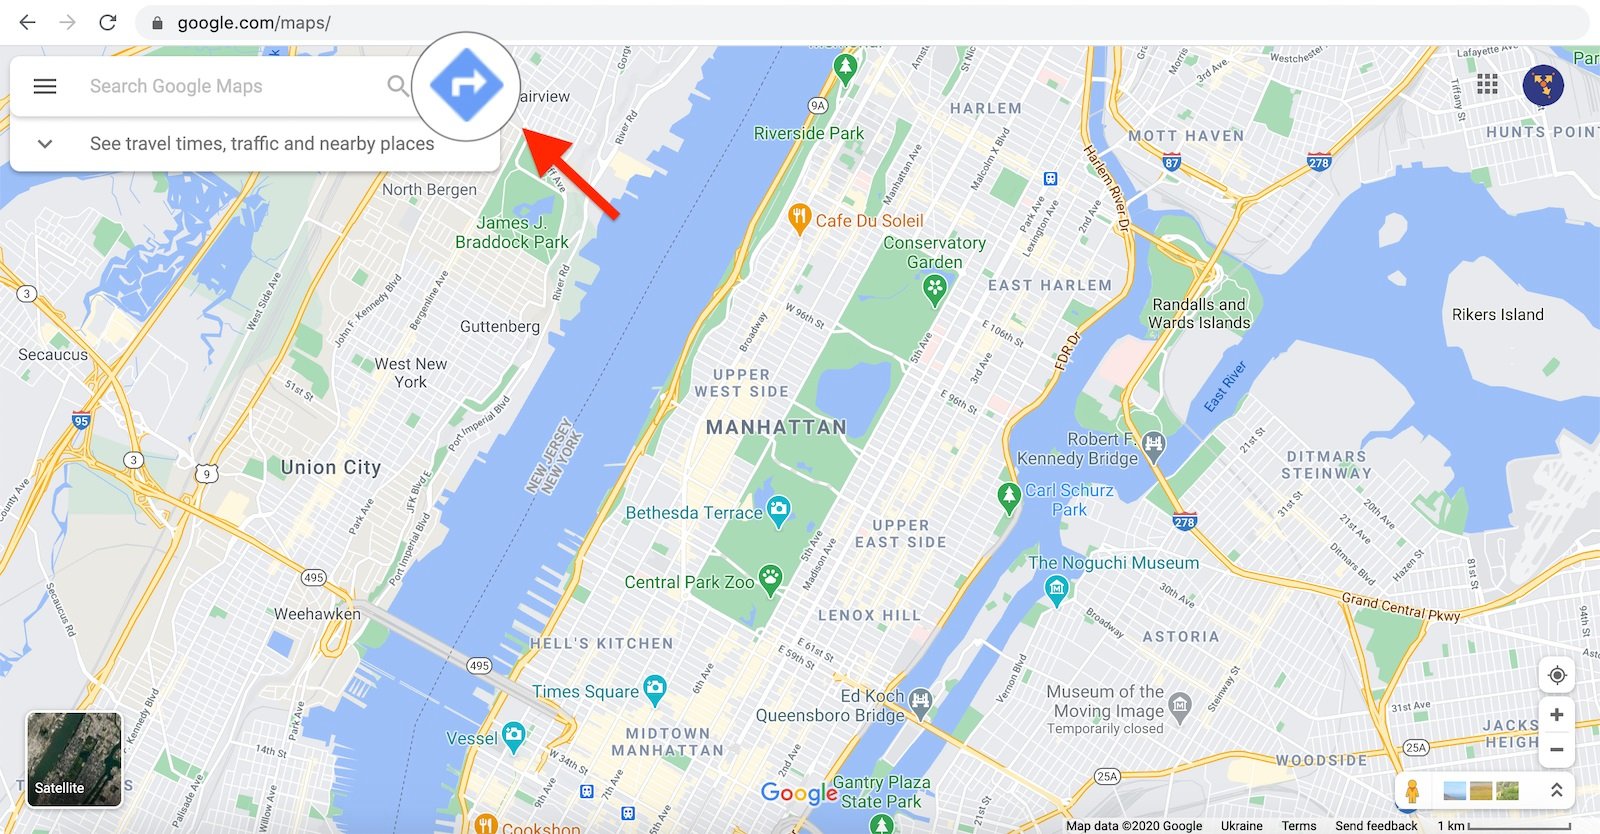
1. Open the Google Maps website and click on the Directions icon
Open your Internet browser and go to Google Maps by manually typing the web address in the address bar (https: // www.Google.com/maps/) or by simply looking for “Google Maps” on Google.
After opening the Google Maps website, click the blue arrow at the top left of the screen.
Obtain a route on the Multiple Multi Maps itinerary planner
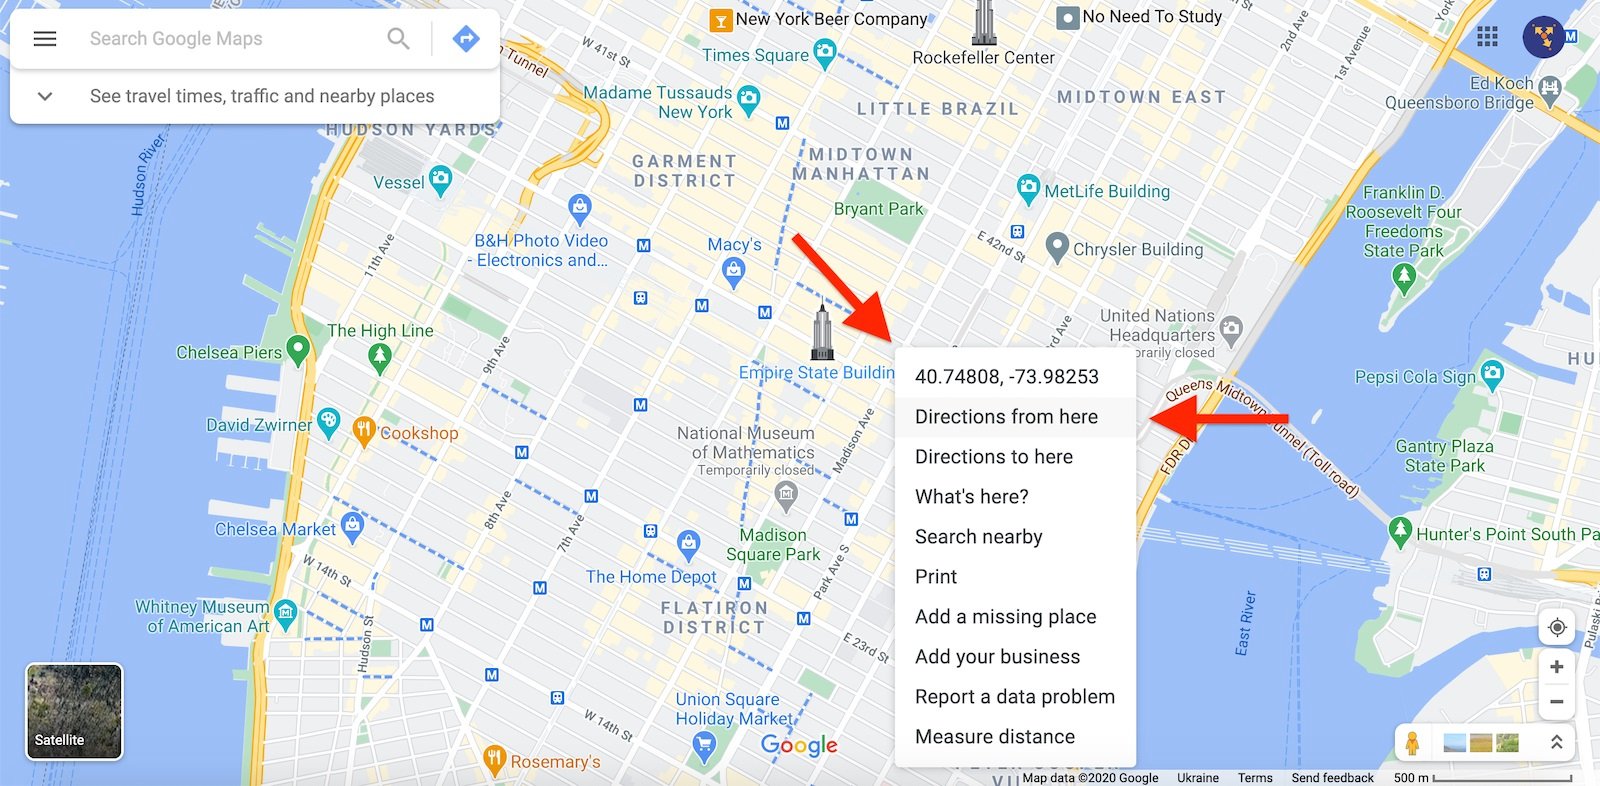
2. Enter the departure address
The Google Maps web route planner allows you to enter an address, use your current position or choose a point on the card as a starting point for your multiple stops itinerary. To choose a departure address directly on the card, you must right -click on the card and select the option Directions from ICI.
Place a pin on the map to add an address on the Google Maps itinerary planner
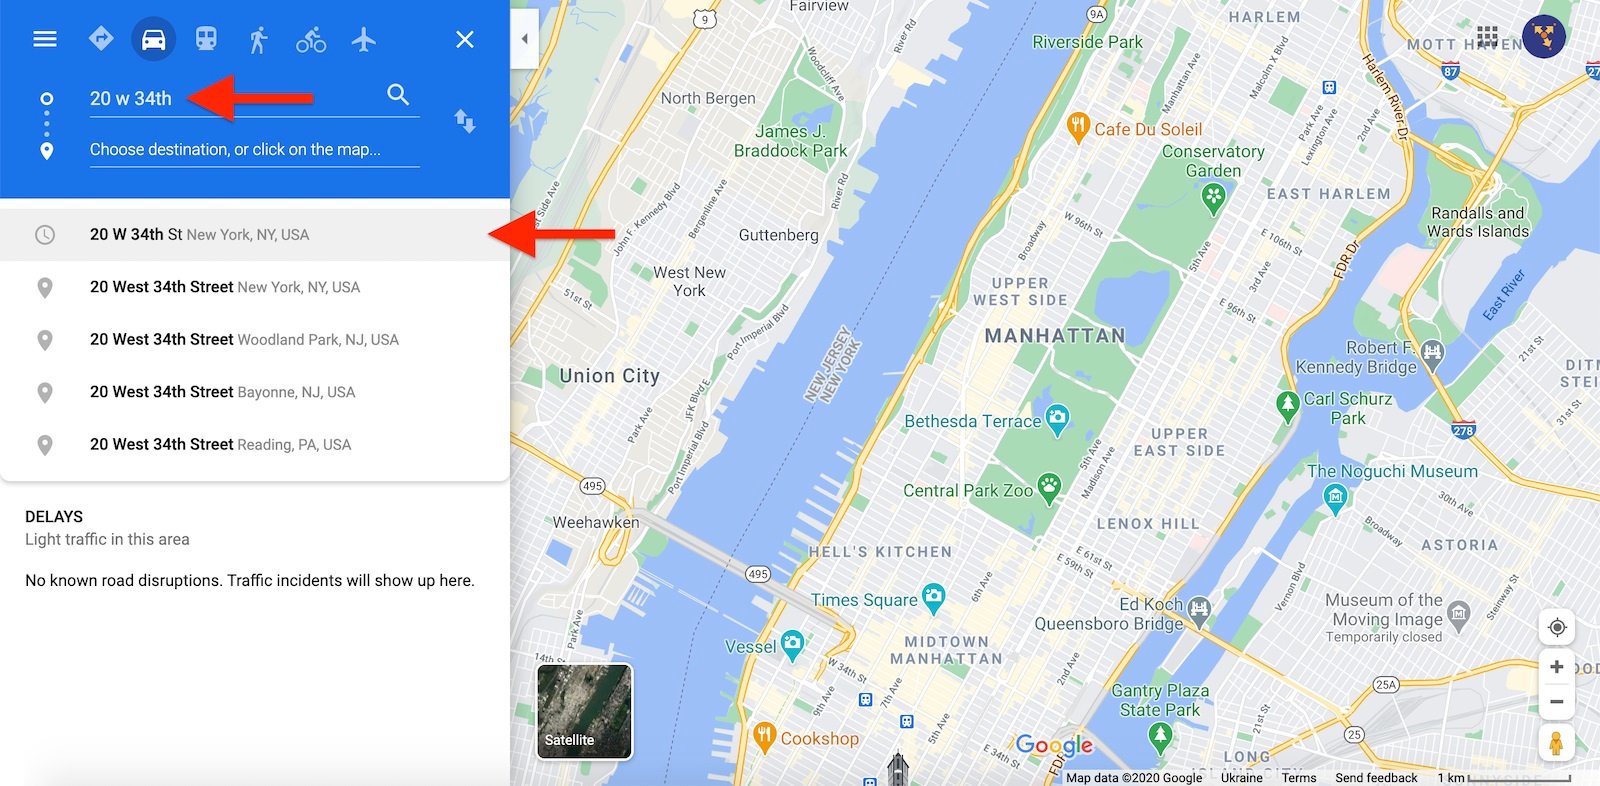
Alternatively, you can enter the addresses completely or partially and select one of the suggested options.
Entry of addresses on the Google Maps itinerary planner
3. Add the destination address
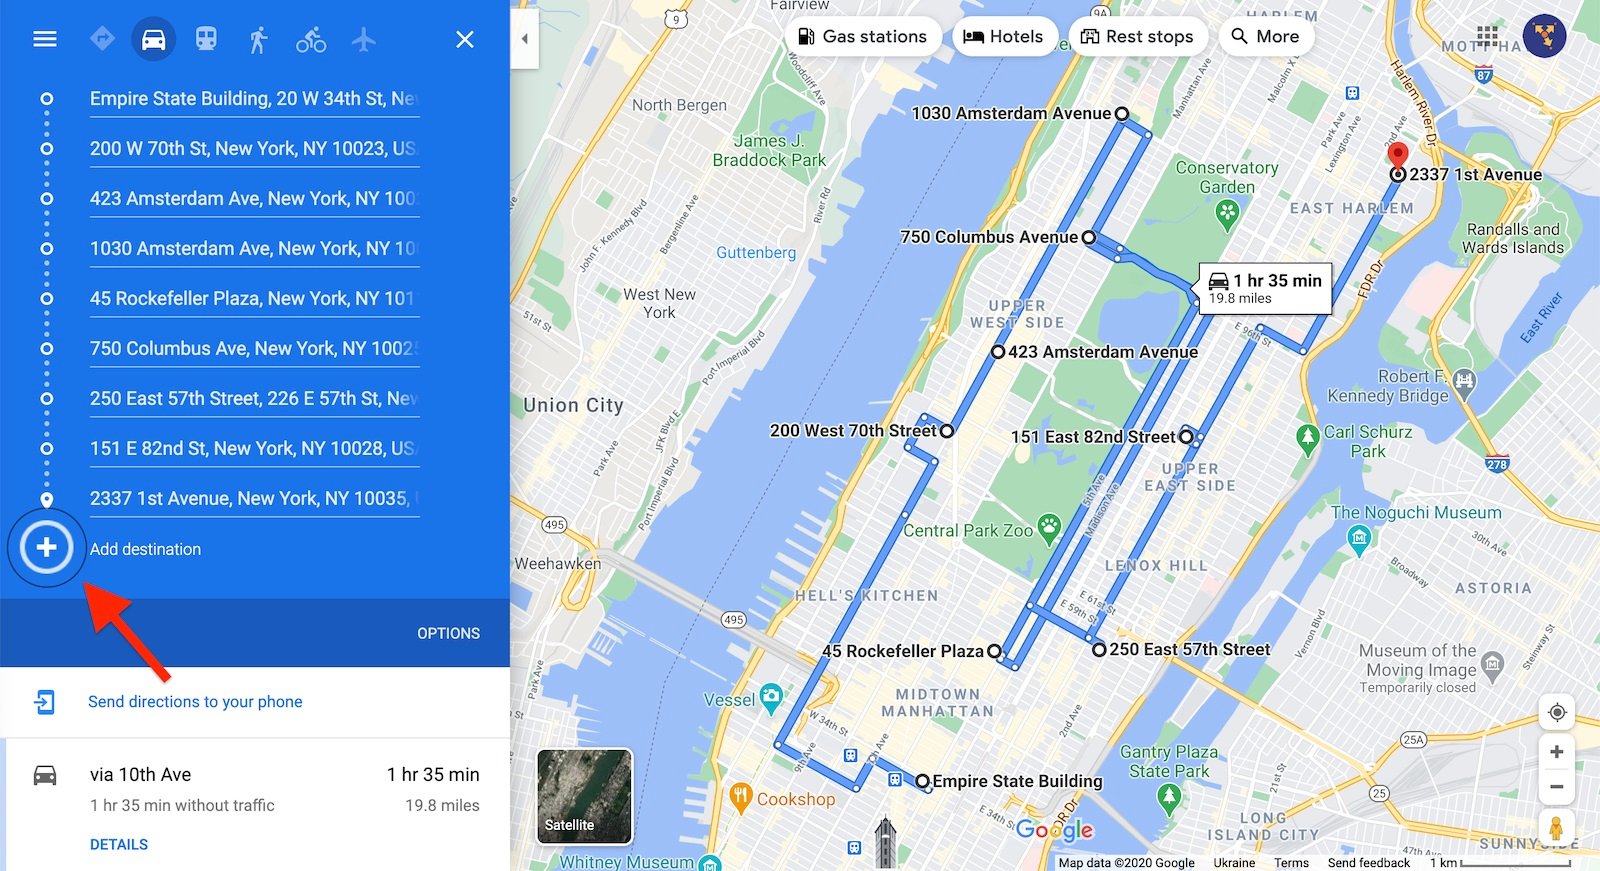
After finishing step 4, click the more surrounded button to start adding your multiple stops. Repeat this process until you have managed to add all your 10 delivery addresses.
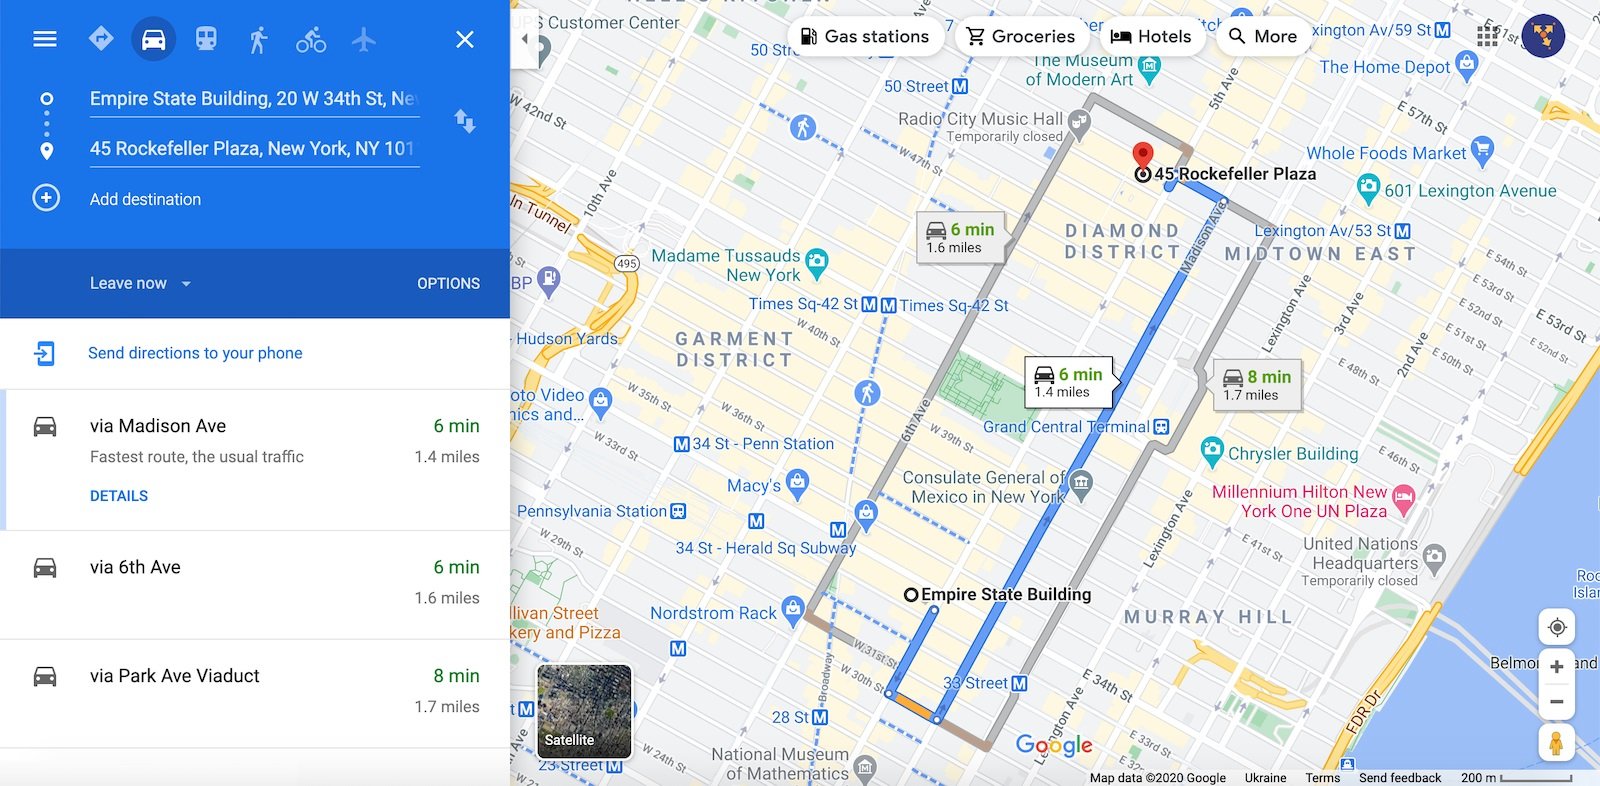
4. Add several stops on Google Maps
After finishing step 4, click the more surrounded button to start adding your multiple stops. Repeat this process until you have managed to add all your 10 delivery addresses.
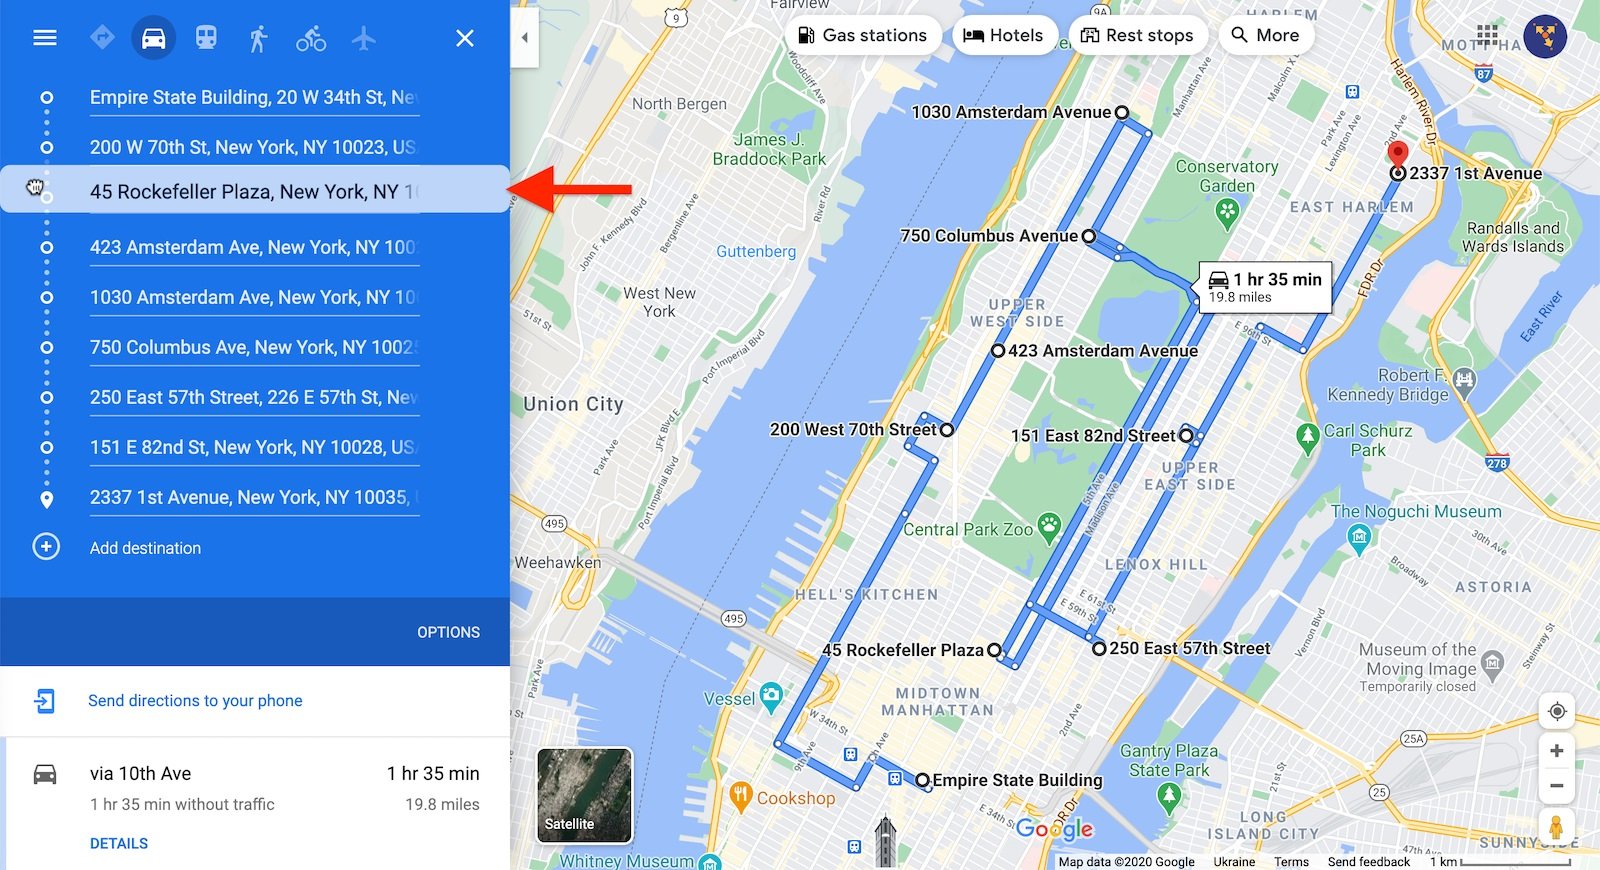
Move the added stops to modify the sequence and manually select the best addresses order for your route. You can change the order order on your route by clicking on an address, dragging it and placing it in the right place in the list.
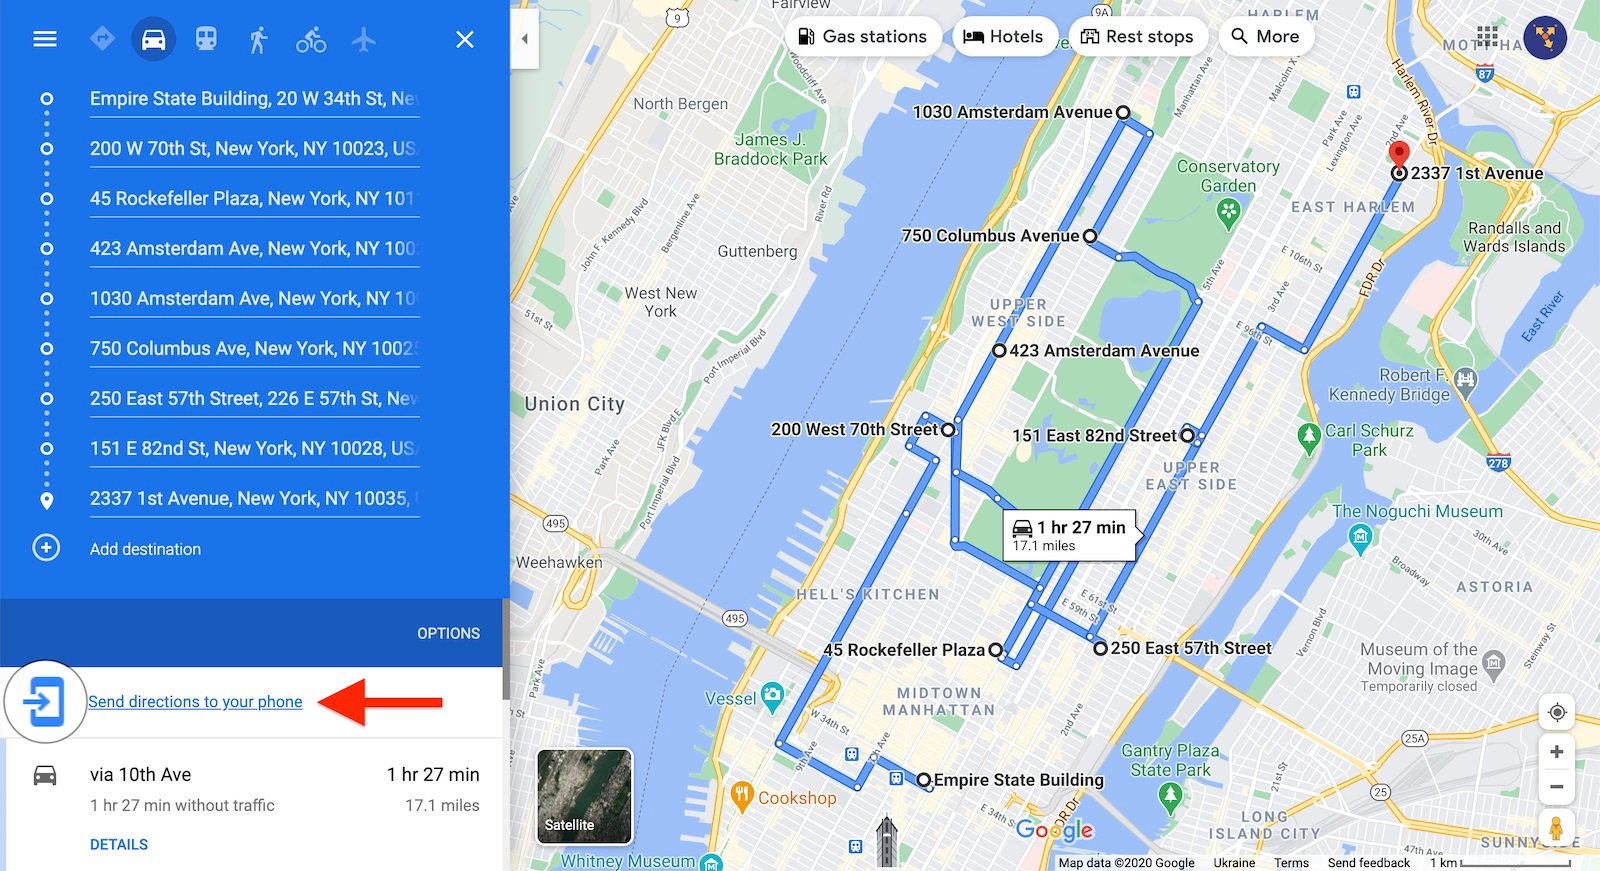
5. Send the Google Maps itinerary to the mobile – send the route to the mobile
The last stage of the creation of a multiple stop itinerary with the Google Maps itinerary planner is to share the route with your drivers. To send the Google Maps multiple stops, click on the Shipping button to your phone at the top of the screen.
6. Navigate the Google Maps itinerary on mobile
After planning your route with multiple stops on Google Maps and sent it to your phone, you can travel the route using the Google Maps route planning app on an iOS or Android device.

Route planner against Google Maps web route planner
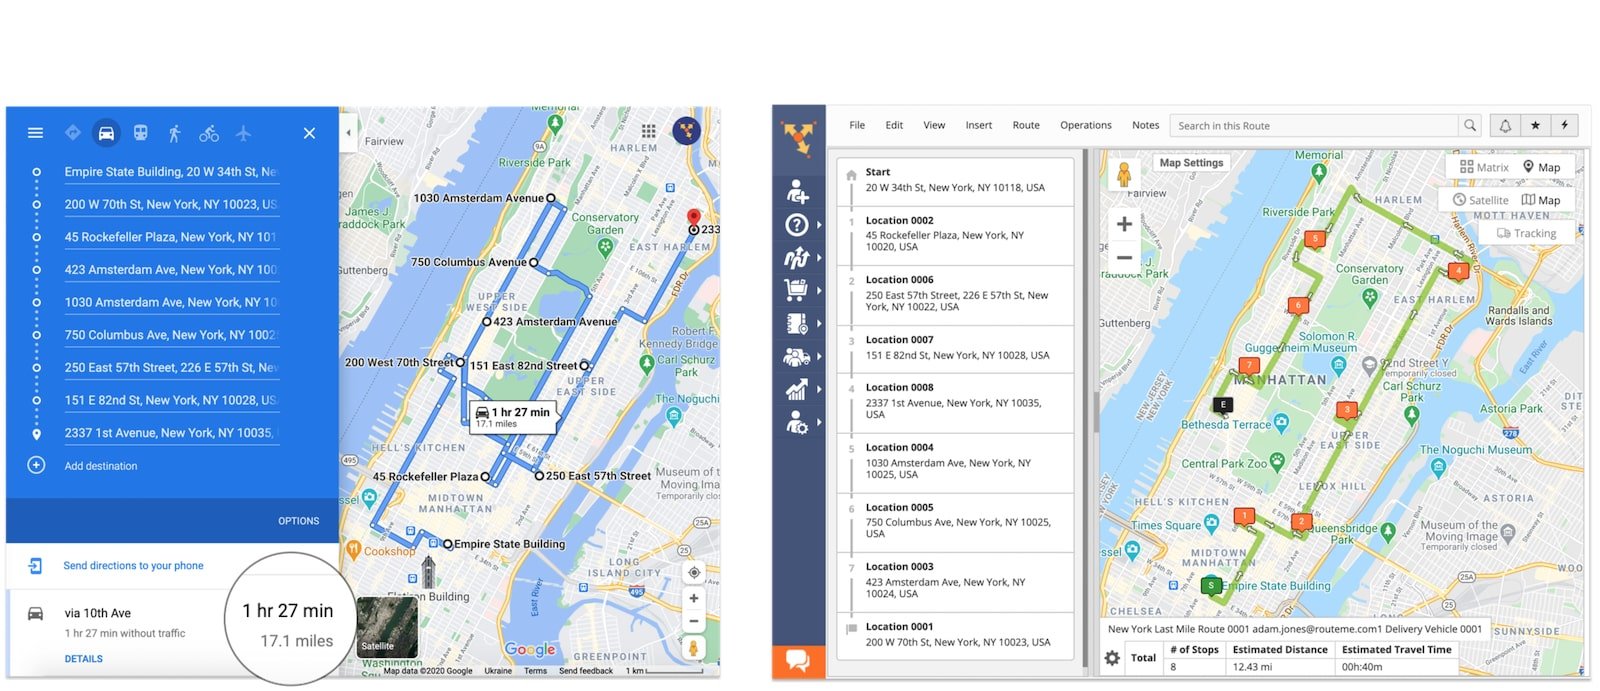
When you plan a multiple stop itinerary on a route planner or routing software, you will get results considerably better than with Google Maps. The distance and the duration of the route will be considerably smaller on a planned route on a multiple stopping itinerary planner than on Google Maps.
Since you must manually optimize the multi-stop routes of the Google Maps itinerary planner, the final route of the route may not meet your expectations. While stopping routes on a planned and optimized route on the Road 4ME route planner will automatically be sequenced in the most profitable and profitable way.
Below, you can see an example of Route4me compared to Google Maps routes for the same places on the card. In addition, you can try to compare Google Maps and Mapquest routes or any other planning or route software.
Get the free trial of unlimited stops from the route planner Route4me today and win the last kilometer !
All the trademarks, logos, and brand names on this page are for identification purposes only. We do not endorse these trademarks, logos, and brand names. All The Trademarks, Logos, and Brand Names Are the Property of Their Respective Owners. If Any of the Trademarks, Logos, and Brand Names Are Your Property or the Property of Your Company, and you would like us to remove them from our website, please contact us at [Email Protected] to submit your Request.
Nogging in “itinerary planning guide”
- Route4me route planning software reviews
- Choose the best GPS heavyweight app for commercial vehicles.
- How to plan a delivery route on the Google Maps itinerary planner ?
About Route4me
Route4me has more than 35,000 customers on almost all continents. Android and iPhone -Route4me mobile and iPhone applications have been downloaded more than 2 million times since 2009. Extremely easy to use, applications synchronize routes, allow two -way communication with drivers, offer detailed instructions, delivery confirmation, etc. Behind the scenes, the Road Operational Optimization Platform4ME combines high performance algorithms with data science, automatic learning and big data to plan, optimize and analyze routes of almost all sizes in real time.
Categories
- Frequent questions
- Itinerary planning glossary
- Route planning guide
- Route4me route planning software reviews
- Choose the best GPS heavyweight app for commercial vehicles.
- How to plan a delivery route on the Google Maps itinerary planner ?
- How to use Google Maps as tours planning