


Configure the Chrome remote desktop service for Windows on Compute Engine | Cloud architecture center | Google Cloud, the favicons return to the serp desktop Google – Abundance
![]()
The favicons return to the serp desktop google
Remote office default resolution can be modified to better correspond to the resolution of the office of your local computers.
Configure the Chrome remote desktop service for Windows on Compute Engine
This tutorial describes how to configure the Chrome remote desktop service for a Virtual Machine Instance (VM) Microsoft Windows on Compute Engine. To obtain separate instructions for VM Linux, see the Linux virtual machine page. This service allows you to remotely access applications with a graphic user interface from a local computer or a mobile device.
When you follow this tutorial, the default firewall rules allow bureau connections at a distance Chrome. You don’t need to configure additional firewall rules.
The VM needs access to the Internet (with an external IP address or via a NAT gateway), and you use your Google account for authentication and authorization.
Two chrome remote desktop configuration methods are described:
- Interactive method using Windows RDP (Remote Desktop Protocol) protocol. This method requires that the VM be directly accessible from your local computer using an RDP customer, which may not be possible in all situations.
- Non -interactive method using a start -up script to install and configure the Chrome remote desktop during the creation of the VM. This method should be used if firewalls prevent direct access to VM or if you do not have access to an RDP customer, for example on Chrome OS.
In this tutorial, we start from the principle that you know Microsoft Windows and the PowerShell command line.
To find out more about other solutions to create virtual workstations, see the Create Virtual Workstation page.
Goals
- Create an instance of VM Compute Engine under Windows on which the Chrome remote desktop service can be executed
- Install and configure the Chrome Distance Office Service on the VM instance
- Connect from your local computer to the desktop environment on the VM instance
Costs
This tutorial uses billable components of Google Cloud, including:
Use the cost simulator to generate cost estimate according to your planned use.
Before you start
- Connect to your Google Cloud account. If you start on Google Cloud, create an account to assess the performance of our products in real conditions. New customers also benefit from $ 300 of free credits to execute, test and deploy workloads.
- In Google Cloud Console, on the project selection page, select or create a Google Cloud project. Noticed : If you do not plan to keep the resources created in this procedure, create a project instead of selecting an existing project. After following these steps, you can delete the project. This leads to the abolition of all the resources associated with it. Access the project selector
- Check that billing is activated for your Google Cloud project.
- Activate the Compute Engine API Activate the API
Once you have finished the tasks described in this document, you can avoid continuing to pay costs by deleting the resources you have created. For more information, see the Cleaning section.
Check the roles
- In the Google Cloud console, access the page I AM. Access IAM
- Select the project.
- In the column Main account, Look for the line that contains your email address. If your email address does not appear in this column, it means that you have no role.
- In the column Role of the line containing your email address, check if the list of roles includes the required roles.
Assign
- In the Google Cloud console, access the page I AM. Access IAM
- Select the project.
- Click on person_add Grant.
- In the field New main accounts, Enter your email address.
- In the list Selectinon a role, Select a role.
- To allocate additional roles, click Add Add another role and add each additional role.
- Click on Save.
Interactive installation with RDP
To install the Chrome remote desktop interactively, you must be able to connect to the remote VM using an RDP customer. In this tutorial, you will create the VM in the default VPC with default firewall rules to exhibit the RDP 3339 port on the Internet.
If this is not possible in your environment, use the non -interactive method described later in this document.
Create a Compute Engine Instance
For the purposes of this tutorial, the type of default machine is used. If you use it for your own environment, you can adjust the type of machine, the name, the region, the size of the starter disk or other settings.
Console
- In the Google Cloud console, access the page VM instances ::
- Click on Create.
- Define the name of the instance on CRDHOST .
- Check the box Activate the display device, Because the Chrome remote desktop requires a display device on Windows VM.
- Below Starter disk, click on To modify To open the panel Starter disk.
- In the list Operating system, select Windows Server.
- In the list Version, select Windows Server 2022 Datacenter.
- Click on Select To close the panel.
- Click on Create.
Cloud Shell
- Open Cloud Shell. Open Cloud Shell
- Define the area of your choice:
Zone = us-central1-b Region = US-Central1 Gcloud Config Set Compute/Zone "$" GCLOUD Compute Instances CREATE CRDHOST \--MACHINE-TYPE = E2-MEDIUM \--SCOPES = Cloud-Platform \--Enable-Display-Device \-Image-Family = Windows-2022 \-Image-Project = Windows- Cloud \-Boot-Disk-Size = 50gb \-Boot-Disk-Device-Name = Crdhost Connect to the VM instance with RDP
- In Google Cloud Console, access the page VM instances. Access the “VM instances” page
- Make sure a green check check is displayed next to the name of your CRDHOST body, indicating that the instance is ready.
- Click on the name of the CRDHOST instance to open the page VM instance information.
- Below Remote access, click on Define a Windows password, then on Define To create your account on the remote machine. This step automatically generates your password. Note the password or copy it to a secure temporary file.
- To connect to the remote instance, click on the arrow Arrow_drop_down next to the button RDP, Then select Download the RDP file. You can open the RDP file using the RDP customer of your choice.
- When your RDP client invites you to enter a password, enter the one you have generated previously.
- When you are invited to indicate whether your computer can be detected by other PCs and network devices, click on No.
- Close it Server manager’s dashboard If it is open.
Install the Chrome remote desktop service
The next step is to install Google Chrome and the Chrome remote desktop service on the VM instance.
- In your RDP session, click the button To start up In the Windows taskbar, enter PowerShell, then select the Windows PowerShell application.
- When the PowerShell prompt is displayed, download and run the Chrome remote desktop installation program.
$ install = "$ approx: temp \ chromeremotesktophost.MSI "$ uri = 'https: // dl.Google.Com/Edgedl/Chrome-Remote-Desktop/Chromeremotesktophost.MSI '(New Object Net.Webclient).Downloadfile ($ uri, "$ install") && `start-break $ install -wait &&` Remove-$ install Configure the Chrome Remote Desktop Service
You will now generate a Windows command that starts the desktop service from Chrome and associates it with your Google account.
- On your local computer, go to the CHROME Remote Office Command Line Configuration page using the Chrome browser.
- Connect with a Google account if you have not already done it. This is the account that will be used to allow remote access.
- On the page Set Up Another Computer (Configure another computer), click on Begin (Start), then on Next (Following).
- Click on To allow. You must authorize the Office Remote Chrome to access your account. If you accept, the page displays several command lines, including one for Windows (PowerShell) similar to the following:
& "$ \ Google \ chrome remote desktop \ Currentversion \ Remoting_start_host.ex "` -code no "> encoded_authentication_token"`-Redirect-url = "https: // Remotesktop.Google.com/_/oauthredirect "` -Name = $ send: Computerume
Non -interactive installation
In this approach, you configure the VM instance so that it has a start -up script that runs during the creation of the VM.
With this approach, the VM does not need to be directly accessible from Internet, although she needs to access has Internet.
Authorize the Chrome Remote Office Service
You will now generate a Windows command that you will use later in the specialization script. As part of this procedure, you provide authorization information included in the order.
- On your local computer, go to the CHROME Remote Office Command Line Configuration page using the Chrome browser.
- Connect with a Google account if you have not already done it. This is the account that will be used to allow remote access.
- Click on To start, then on Following.
- Click on To allow.
- Authorize the Office Remote Chrome to access your account. The page now contains several command lines, including one for Windows (CMD) similar to the following:
"%Programfiles (x86)%\ google \ chrome remote desktop \ currentversion \ remotting_start_host.EXE " -CODE NO"> encoded_authentication_token"-Redirect-url =" https: // Remotesktop.Google.com/_/oauthredirect " -Name =%computerame%
Copy the starter command in Cloud Shell
The next step is to create a file in your Cloud Shell instance containing the start -up command you have just generated.
- Open Cloud Shell. Open Cloud Shell
- Create a file for the starter command:
CAT> CRD-AUTH-COMMAND.TXT Create the start -up script
- Copy the following code block and stick it to Cloud Shell.
CAT CRD-SYSPREP-Script.PS1 $ erroractionpreference = 'stop' Function Get-metadata ([String] $ metadataname) < try < $value = (Invoke-RestMethod ` -Headers @` -Uri "http://metadata.google.internal/computeMetadata/v1/instance/attributes/$metadataName") > wrestling < # Report but ignore REST errors. Write-Host $_ >If ($ Value -eq $ null -or $ value.Length -eq 0) < throw "Metadata value for ""$metadataName"" not specified. Skipping Chrome Remote Desktop service installation." >Return $ Value> # Get Config from metadata # $ CRDCOMMAN = Get-metadata ('CRD-COMMAND') $ CRDPIN = Get-metadata ('CRD-PIN') $ CRDNAME = Get-metadata ('CRD-NAME') If ($ crdpin -isnot [int32] -or $ crdpin -gt 999999 -or $ crdpin -LT 0) < throw "Metadata ""crd-pin""=""$crdPin"" is not a 6 digit number. Skipping Chrome Remote Desktop service installation." ># Prefix $ crdpin with zeros if required. $ CRDPIN = $ CRDPIN.Tostring ("000000"); # Extract the authentication code and redirect url arguments from the # Remote Dekstop Startup Command Line. # $ CRDCommandargs = $ CRDCOMMAN.Split ('') $ codearg = $ CRDCommandargs | Select-string -pattern '-Code = "[^"]+"' $ redirectarg = $ crdCommandargs | select-string -pattern '-Redirect-url =" [^"]+"' if (-not $ codearg )) < throw 'Cannot get --code= parameter from crd-command. Skipping Chrome Remote Desktop service installation.' >If (-not $ redirectarg) < throw 'Cannot get --redirect-url= parameter from crd-command. Skipping Chrome Remote Desktop service installation.' >Write-Host 'Downloading Chrome Remote Desktop.'$ install = "$ approx: temp \ chromeremotesktophost.MSI "$ uri = 'https: // dl.Google.Com/Edgedl/Chrome-Remote-Desktop/Chromeremotesktophost.MSI '(New Object Net.Webclient).Downloadfile ($ Uri, "$ install") Write-Host 'Instaling Chrome Remote Desktop.'& msiexec.Ex /I $ install /QUIET | OUT-DEFAULT Remove-ITEM $ Install Write-Host 'Starting Chrome Remote Desktop Service.'& "$ \ Google \ chrome remote desktop \ Currentversion \ Remoting_start_host.EX "` $ codearg $ redirectarg-Name = "$ crdname" -pin = "$ crdpin" | Out-default write-host 'Download chrome.'$ install = "$ approx: temp \ chrome_installer.ex "$ uri = 'https: // dl.Google.com/chrome/install/latest/chrome_installer.EX '(New-Object net.Webclient).Downloadfile ($ Uri, "$ install") Write-Host 'Instaling Chrome.'& $ install /silent /install | OUT-DEFAULT Remove-ÉM $ Install EOF - Download and install the Office Host Remote Chrome.
- Recover the following metadata settings:
- CRD-Command: Windows authentication and start-up command
- CRD-PIN: Six-digit code used for additional authentication
- CRD-Name: Name of the instance
Create a Windows virtual machine
You will now create a Windows VM using the files created previously to configure the desktop Chrome.
For the needs of this tutorial, the type of E2-Medium machine is used. If you use it for your own environment, you can adjust the type of machine, the name, the region, the size of the starter disk or other settings.
- In Cloud Shell, define the area of your choice:
Zone = us-central1-b Region = US-Central1 Gcloud Config Set Compute/Zone "$"CRD_PIN =Your-PINInstance_name = crdhostGCLOUD Compute Instances CREATE $ \--MACHINE-TYPE = E2-MEDIUM \--SCOPES = Cloud-Platform \--Enable-Display-Device \-Image-Family = Windows-2022 \-Image-Project = Windows- Cloud \-Boot-Disk-Size = 50gb \-Boot-Disk-Device-Name = $ \-Metadata = CRD-Pin = $, CRD-Name = $ \-Metadata-From-File = CRD- Command = CRD-AUTH-COMMAND.TXT, SYSPREP-SPECIALIZE-SCRCT-PS1 = CRD-SYSPREP-Script.PS1Monitor the start of the VM
You can check that the starter script works by checking the saved messages on the VM serial port when it was created.
- In Cloud Shell, display the saved messages when starting the VM:
GCLOUD COMPUTE TAIL-SERIAL-Port-Output $ instances
If the configuration of the Chrome remote desktop is successful, the following newspaper lines are displayed:
Found SYSPREP-SPECIALIZE-SCRCT-PS1 in METADATA. SYSPREP-SPECIALIZE-SCRCT-PS1: Downloading Chrome Remote Desktop. SYSPREP-SPECIALIZE-SCRCT-PS1: Instaling Chrome Remote Desktop. SYSPREP-SPECIALIZE-SCRCT-PS1: Downloading Chrome. SYSPREP-SPECIALIZE-SCRCT-PS1: Instaling Chrome. SYSPREP-SPECIALIZE-SCRCT-PS1: Starting Chrome Remote Desktop Service. SYSPREP-SPECIALIZE-SCRCT-PS1 Exit Status 0 Finized Running Specialize Scripts.
In case of failure of the desktop configuration Chrome remotely, an error message is displayed. Example :
SYSPREP-SPECIALIZE-SCRCT-PS1: COULDN'T START Host: OAUTH ERROR.
This error indicates that the oauth token on the Authentication page of the Office Remote Chrome is no longer valid, either because it has already been used, or because it has expired. To correct this error, connect via RDP and develop an interactive configuration as described previously, or delete the VM and relaunch the configuration process. When the following message is displayed on the serial port, the VM is ready.
GceinstanceSup: -------------------------------------------------------------------------------------- ------------- GceinstanceSup: Setup finished body. crdhost is ready to use. GceinstanceSup: ------------------------------------------------------------
Create a Windows user account
- In Google Cloud Console, access the page VM instances. Access the “VM instances” page
- Click on the name of the CRDHOST instance to open the page VM instance information.
- Below Remote access, click on Define a Windows password, then on Define To create your account on the remote machine. This step automatically generates your password. Note the username and password, or copy them to a secure temporary file.
Connect to the VM instance with the Chrome remote desktop
You can connect to the VM instance using the Chrome Remote Office Application.
- On your local computer, go to the Office Website Remote Chrome.
- Click on Access my computer.
- If you have not yet been connected to Google, log in with the same Google account as that used to configure the Office Service Chrome Remote. Your new instance of VM CRDHOST is displayed in the list Remote devices.
- Click on the remote desktop instance.
- When you are invited, enter the code you have created previously, then click on the arrow Arrow_forward to connect you. You are now connected to the Windows connection screen of your Compute Engine Distant instance.
- If you are invited, always authorize the Office Application Remote Reading Your Crancies and Copy and Paste Local and Distant Applications.
- Press any button, then enter the Windows user password that you generated previously. Note that the remote keyboard by default is in American English. Consequently, the characters entered may not correspond to those of your local keyboard. Nor can you copy and paste the password.
You are now connected to the Windows desk remote.
Improve the user experience in the remote desktop
This section provides instructions to modify the parameters to improve the user experience in the remote desktop.
Install the Chrome Office Application Remote
The Chrome remote desktop application allows the display in a separate window and offers keyboard shortcuts which are normally intercepted by Chrome to be used on the remote system.
If this application is not installed, proceed as follows:
- Open the panel Session options Using the button chevron_left which appears when you move the mouse on the side of the window.
- In the section Install App (Install the application), click on Begin (To start).
- Click on Install.
The remote desktop session opens again in its own application window.
You can move all desktop sessions from a chrome tab to the application window by clicking on the icon Open with open_New In the address bar.
Improve screen resolution
Remote office default resolution can be modified to better correspond to the resolution of the office of your local computers.
- Right click on the background of the office remotely, then select Display settings.
- In the drop -down list Resolution, Select another screen resolution.
- Confirm the new screen resolution in the dialog box.
Reactivate the service
If you have mistakenly disabled connections to the remote instance in the client application, you can reconfigure the service, then reactivate it by following the instructions on the configure bureau service chrome.
To clean
To prevent the resources used during this tutorial to be billed on your Google Cloud account, delete the project containing the resources, or keep the project and delete individual resources.
Delete the project
The easiest way to prevent billing is to remove the project you have created for this tutorial.
To remove the project:
- Attention : The deletion of a project will have the following effects:
- All the content of the project is deleted. If you have used an existing project for the tasks of this document, when you delete it, you also delete any other work done in the project.
- Personalized projects IDs are lost. When you have created this project, you may have created a personalized project ID that you want to use in the future. To keep the URLs that use the project ID, such as an APPSPOT URL.com, delete the resources selected in the project instead of deleting the entire project.
If you plan to explore several architectures, tutorials and fast starting guides, reusing projects can help you not exceed the quota limits of projects.
Remove the compute Instance Engine
Instead of deleting the complete project, you can delete the VM body created for this tutorial. For that, proceed as following :

- In the Google Cloud console, access the VM instances page: access the VM instances page
- Check the name of the instance created previously (CRDHOST).
- Click on the button Delete (Delete) at the top of the page. The abolition of the body takes a few moments.
Cancel the authorization assigned to the body in the Chrome remote office
If you no longer want to connect to the VM instance, you can deactivate it and delete it from the list Remote Devices (remote devices).
- On your local computer, go to the Chrome Remote Desktop Remote Device List (List of remote desktops List for the Chrome remote desktop).
- Click Delete next to the name of the CRDHOST instance
- Click on OK To confirm that you want to deactivate the connection to the remote device.
Following steps
- Find out how to configure the chrome remote desktop on Linux virtual machines.
- Discover the other options to create a virtual workstation.
- Discover reference architectures, patterns and good practices concerning Google Cloud. Consult our Cloud Architecture Center.
Comment
Unless otherwise indicated, the content of this page is governed by a Creative Commons Assignment 4 license.0, and code samples are governed by a Apache 2 license.0. For more information, see the rules of the Google Developers site. Java is a registered trademark of Oracle and/or its affiliated companies.
Last update on 2022/11/16 (UTC).
The favicons return to the serp desktop google

Almost 3 years after a failed first attempt, Google reinforces favicons in the Serp Desktop to unify them as much as possible its pages of the mobile results.
Let us recall the facts: in January 2020, Google had set up a serp desktop very close to that on mobile with in particular the display of the favicon of the site in front of each result as well as color changes for the URL of the page, in particular. Here is what it was:
Serp Google with favicons and with advertisements in early 2020. Source: Twitter
Following this change, an outcry was quickly heard, arguing that the distinction between advertisements and natural results was even less clear than before with this new display. Also, a few days later, Google had retroped and removed favicons on natural results to keep them only on advertisements. At that time, Google had reacted by indicating that it would set up several tests in order to place (or not) the favicons in certain other places of the SERP…
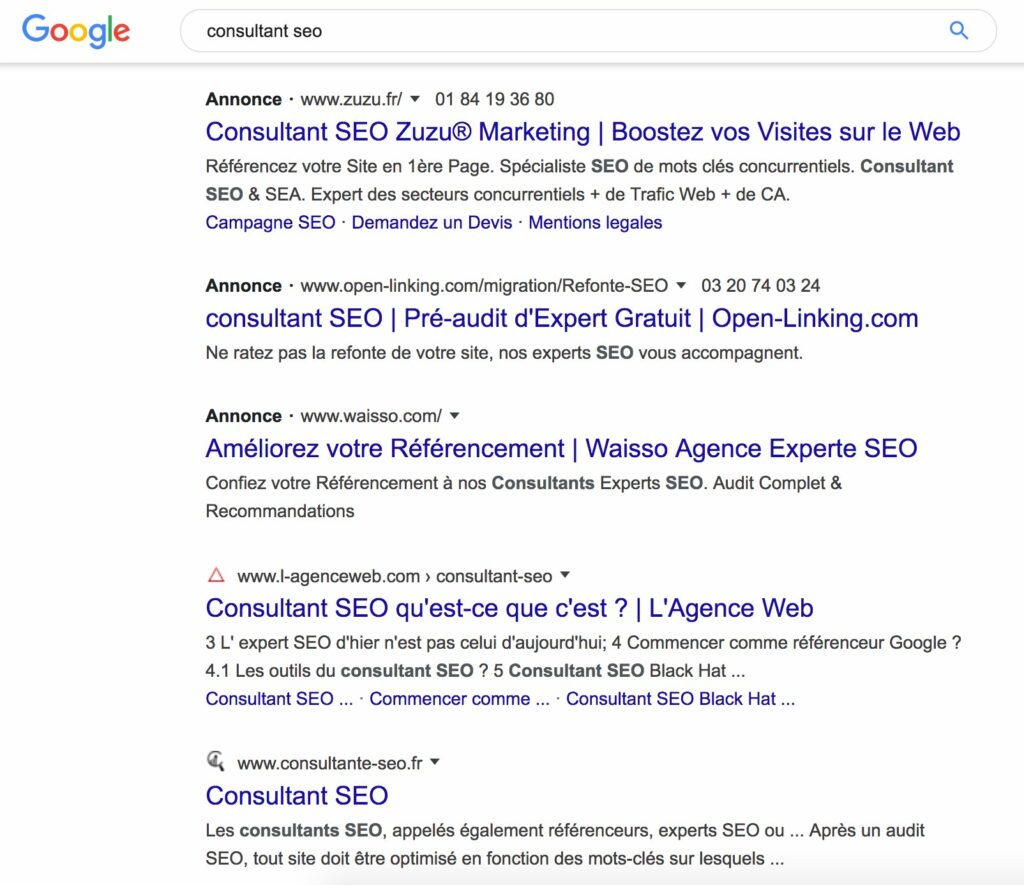
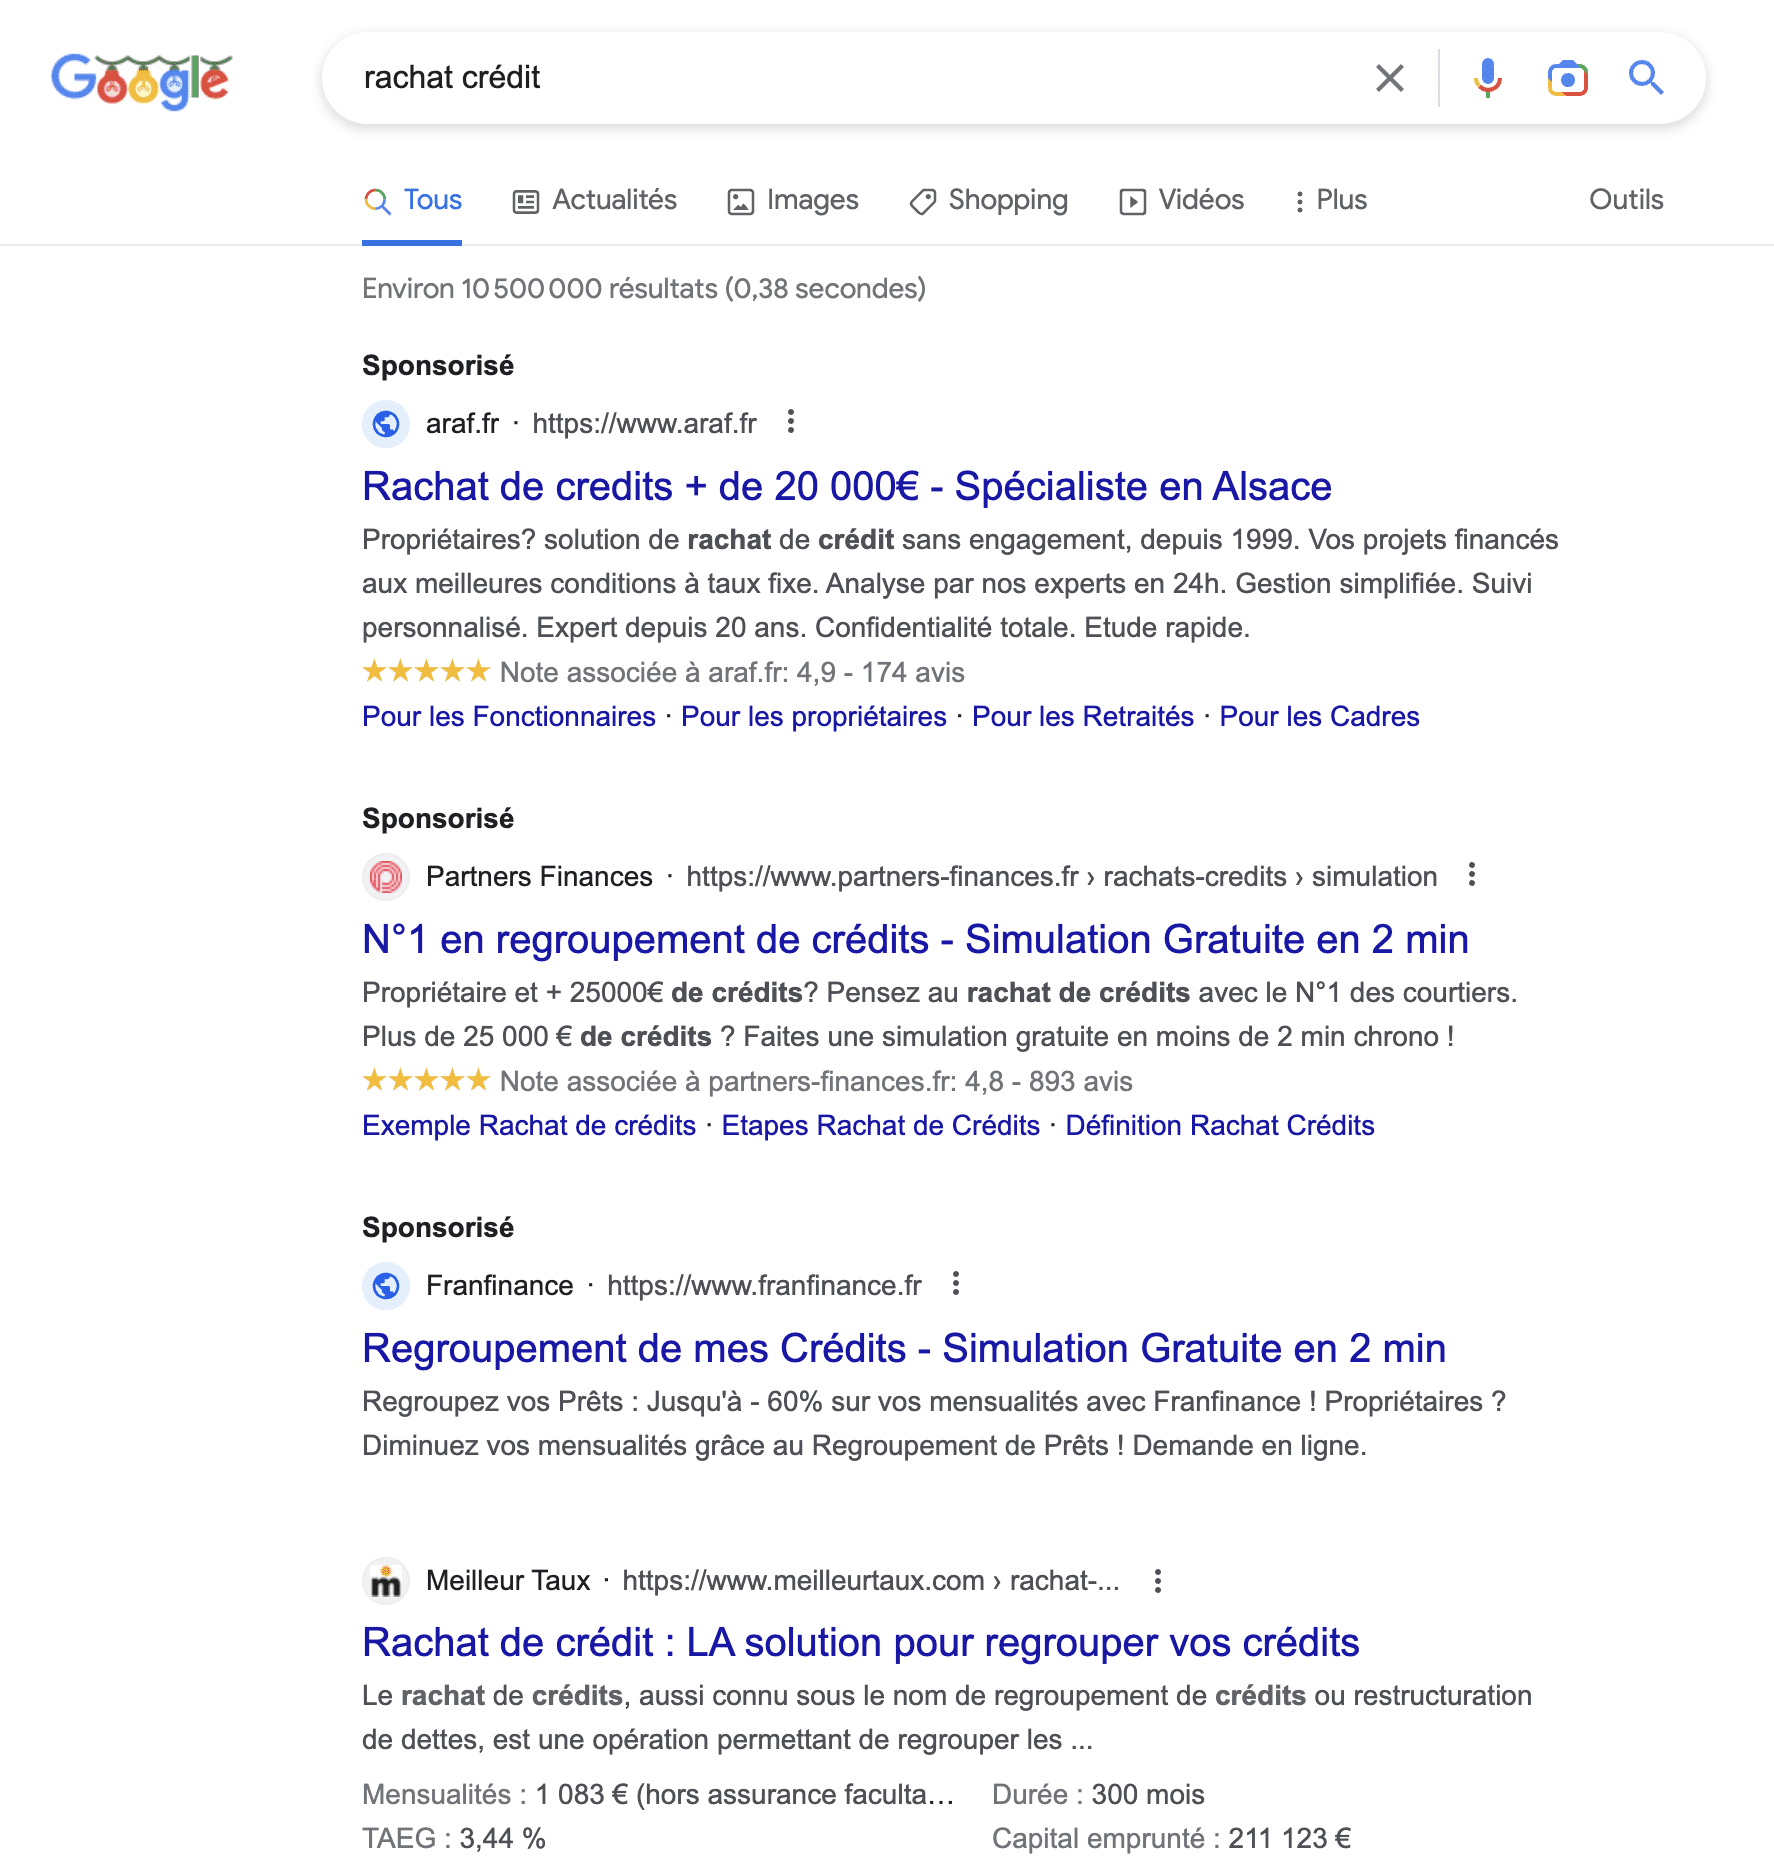
It would seem that, almost 3 years later, the favicons have reappeared in the Serp Desktop Google, since with us, after tests carried out on 4 different browsers for several days of presence, they are now well installed on the left of the ‘Location reserved for the name of the site and the page URL (see illustrations below). Many Internet users have also confirmed that favicons were also present in their Serp today. We can therefore imagine that it is no longer a small -scale test and that the final deployment is underway. The favicon seems to be displayed this time in a background of color.
For Googles Ads advertisements, same display, but with the mention “sponsored” above. Note that this new provision still pushes the natural results down a little more, since there is a leap to the line after the mention “sponsored”, unlike the previous situation, where the mention “ad” was positioned on the left URL.
For the moment, no lifting of shields has come to disturb the sleep of Google teams for this display, however very similar to that offered previously. But the holiday season is certainly more conducive to launching this type of noise reform ..
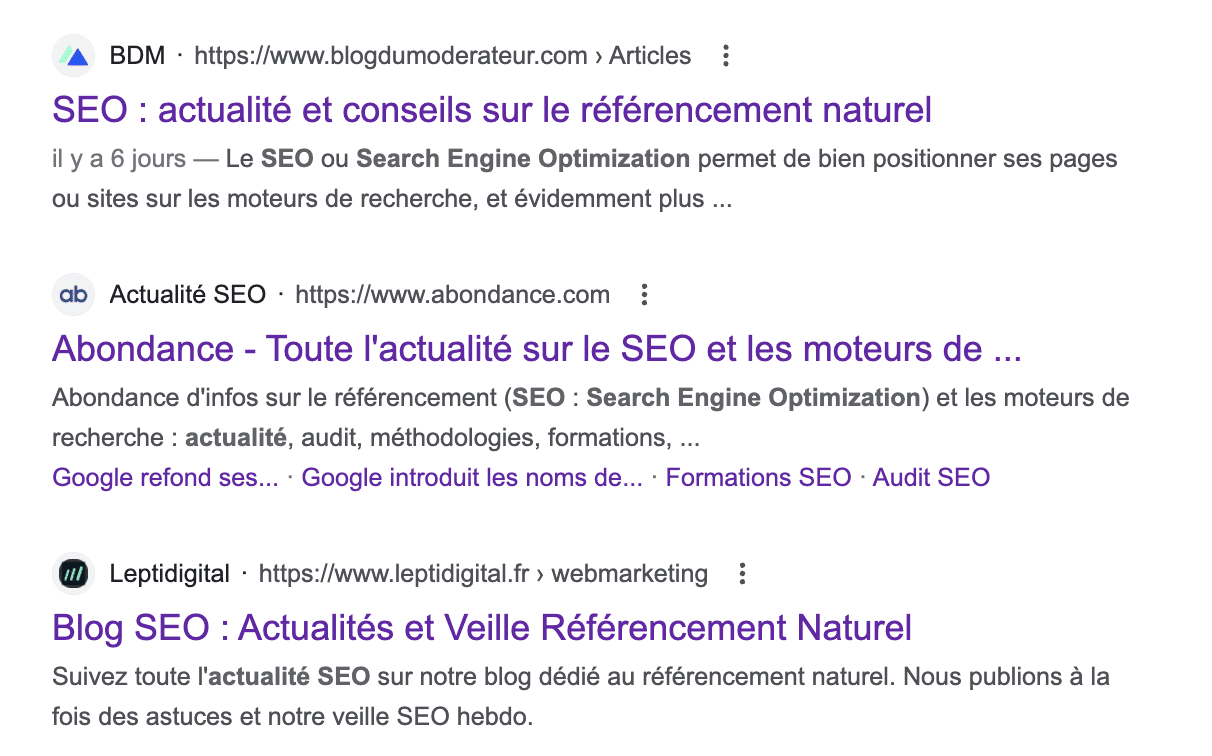
Serp Google with favicons and without advertisements. Source: Abundance
Serp Google with favicons and with advertisements. Source: Abundance
Additional articles:
- Google introduces the names of sites in its mobile serps
Double novelty in Google mobile serps for a few. - New display for images in the Google SERP
Google has changed its method of displaying images in its. - 25% of SERP on Google Desktop do not generate any click [Study]
Semrush offers a study on the behavior of Internet users when they. - Google’s new design of SERP Desktop is now in place
From now on, Desktop search results have new information.