


3 Ways Transfer data from one iPhone to another without iCloud, 4 methods to easily transfer iPhone to iPhone to iPhone
![]()
4 methods to easily transfer iPhone to iPhone data
Note: since the implementation of MacOS Catalina, iTunes has not been available and has been replaced by Apple Music. In this case, you can use the Finder.
[3 ways] Transfer data from one iPhone to another without iCloud
This guide shows you how to transfer data from one iPhone to another without iCloud, including means to transfer all or only certain contacts, photos, music, etc.
By Yveline/Updated on 06/06/2023
Why transfer iPhone to iPhone without iCloud ?
You know that you can use iCloud to transfer the data from an old iPhone to a new iPhone: restore from an iCloud backup or activate iCloud synchronization. However, some of the iCloud limitations make you prefer iPhone to iPhone transfer without iCloud.
● Limited storage space. iCloud provides only 5 GB of free storage space, which is far from sufficient to store all your important data.
● Stable Internet connection. iCloud needs a good internet network to work. If the network is bad, the recovery or synchronization process can take a long time.
● Selective transfer. iCloud does not support selective transfer. You have no choice but to transfer everything, including certain files you don’t need.
● Risk of data loss. If you have already configured your iPhone, you must first erase the device to restore. This operation leads to the loss of your existing data.
● Unable to transfer between two Apple identifiers. It only allows data to be transferred between two iPhone with the same Apple identifier, while you want to transfer data from an Apple identifier to another.
● ICloud problem for Windows. Some users have reported two serious problems with iCloud for Windows after synchronizing photos of their iPhone on iCloud: corrupt videos and display of foreign photos.
Fortunately, iCloud is not the only way to transfer data from an iPhone. Here, in this guide, I will present 3 methods that can help you carry out the iPhone to iPloud data without iCloud. All these methods are applied for iPhone SE 2022, iPhone 13, iPhone 14.
- Fonetool: transfer data from one iPhone to another without iCloud
- Quick start: transfer data from one iPhone to another without iCloud
- iTunes: transfer data from one iPhone to another without iCloud
Here are some simple comparisons that can help you make the right choice.
Quick start iPhone
4 methods to easily transfer iPhone to iPhone data
You have just acquired the latest iPhone ? If you have been a user of iOS for a few years, you are aware that the transfer of data between your old iPhone and the new is essential. In this article, we will explain you How to transfer your iPhone to iPhone data thanks to Anytrans, iCloud, iTunes and Airdrop.

Quick access (summary):
1. How to transfer iPhone to iPhone data with Anytrans ?
After acquiring your iPhone, you can, like most people, use iTunes or iCloud, with certain restrictions on the recovery of data from your old model.
There is another possible method with Anytrans to transfer only the elements you really need. This is one of the Best devices to easily transfer your iPhone data. Anytrans is a tool that allows you to transfer files, music, photos, videos, contacts, calendar, historical conversations, applications … in short, All the content on your phone.
Thanks to the “Switcher phone” feature, Data synchronization is done much faster and makes it possible to merge files from 2 iPhones.
It is also possible to make a data transfer between an Android and iOS device. In any case, rest assured, no data is deleted.
Thanks to Anytrans, you can take full advantage of your new iPhone without having the puzzle of data transfer !
| BENEFITS | Disadvantages |
| A Quick execution speed in the transfer of files. A Windows and Mac compatible software which allows you to transfer data from both iOS and Android. Practical features such as Application transfer and the Selective data transfer. The data on the iPhone is kept and can be saved on PC. A refund is possible in 60 days If satisfaction is not there. | There trial version is limited On the number of file transfers. To make a Complete iPhone transfer, it must either be done under several days or Buy the software. |
Now let’s go to the practical case ! To do this, download Anytrans for free, then install the software on your PC or Mac.
For Transfer your data from your old iPhone to your new iPhone, Here are the steps to follow:
- Start Anytrans and Connect your devices via USB ports. Go to the section Switcher phone and select “Telephone to iPhone”.

- Then select the device ” source “ (your old iPhone) and the target (new iPhone), then click Next.

- Select Then the data you want to transfer and click on Following.

- It is also possible to Choose precisely the data to be transferred. This is a very useful feature if you want to take advantage of your new iPhone to sort through your files for example. For this, go to the section ” More ” of Device manager.

- And here, in just a few clicks, your data is transferred to your new iPhone !

2. Transfer iPhone to iPhone data via iCloud
A second transfer method is possible with iCloud. ICloud stores all iOS data online and allows you to synchronize it between your Apple devices. There are two ways to transfer iPhone to iPhone with iCloud: via backup or through the special data synchronization option. Below, we detail the stages of the transfer using the backup:

- On your old iPhone, Connect to your iCloud account and save the latest version of your phone (Settings> iCloud> iCloud backup> Save now))
- Then turn on your new iPhone And Follow the instructions on the home screen.
- Choose a WiFi network To carry out the transfer and continue to follow the instructions until “Restore from iCloud”.
- Connect to your iCloud account Then Choose the backup (normally that the most recent)).
- Launch the backup and follow the steps to complete the data transfer.
However, the use of iCloud has several drawbacks. First of all, this method requireshave access to a stable connection And there is No choice possible in selecting the data to be transferred. In addition, the operation take more time Unlike Anytrans (between 30 and 60 minutes).
3. Transfer data from one iPhone to another with iTunes or Finder
Finally, the third and last method to transfer your iPhone iPhone data is to go through iTunes or the Mac Finder.
iTunes allows you to transfer everything you have signed up in your phone’s memory. Therefore, What is synchronized on iCloud will not be transferred (But recoverable when you connect your account to your new device)).
Note: since the implementation of MacOS Catalina, iTunes has not been available and has been replaced by Apple Music. In this case, you can use the Finder.
Follow the instructions below to transfer your data with iTunes or the Finder:

Transfer with iTunes
- Connect theOld iPhone on the computer Using a cable USB.
- Launch iTunes and click on‘Appliance icon in the upper left corner, then on Save now. This operation can last a few minutes.
- When the safeguard is finalized, Disconnect the old iPhone And Connect the new iPhone to the computer.
- Choose the restoration method ” Restore via a Mac or PC ” and the most recent backup.
- When the backup is installed, follow the steps to Finish synchronization.
Transfer with Finder
- Connect theold iPhone with a USB cable.
- Open the Finder window.
- In the section “Locations”, Click on theyour iPhone icon.
- Click on “Trust” If you are invited to trust this computer. Then, on ” Save now “.
- Connect your new iPhone.
- Go to the section “Application & Data”. Then select “Restore from Mac or PC”.
- Then follow the instructions on the screen to Finish configuration.
- When the transfer is finished, check Well if you have recovered all the data on your old iPhone.

The drawback with these last two methods is that The backup carried out may result in data loss during the transfer like music, ringtones and applications in particular.
3. Transfer data from one iPhone to another with Airdrop
Ardrop is a extremely practical and powerful functionality of Apple which allows Easily share content between iOS, macOS and iPados devices. With Airdrop, you can transfer a multitude of data types between iphones.
![]()
What types of data can be transferred from iPhone to iPhone with Airdrop ?
Here is a list of some of the data you can share with Airdrop:
- Photos and videos : The tool is ideal for sharing photos and videos. You can transfer photos and videos from one iPhone to another without loss of quality, which is not always the case with other sharing methods.
- Contacts : You can easily share contacts from one iPhone to another . It is a simple and easy way to share contact information.
- Web sites : If you have found an interesting website you want to share, Airdrop can do it. He will open the website on the Safari application on the other iPhone.
- Maps positions : If you want to share a specific place on Maps, you can do it with Airdrop. It is ideal for sharing meeting places or points of interest.
- Documents : You can share documents such as PDF files, notes, pages, Numbers or Keynote documents via Airdrop.
- Applications : You can share links to apps from the App Store. The application will open directly into the App Store on the other device.
To note : AlthoughArdrop is extremely useful for sharing data in an occasional and rapid way, it is not not designed for a complete and mass data transfer between two devices. For a full transfer of data (like when you change iPhone), it would be better to use methods such as backup and catering via iCloud or iTunes, or tools like Anytrans.
How to transfer data with Airdrop ? (Tutorial)
Transfering data from one iPhone to another with Airdrop is a relatively simple process that can be accomplished in a few steps.
Prerequisites: THE two iPhones must be nearby each other (usually less than 10m) so that Airdrop works. In addition, Airdrop requires that the two iPhones be Connected to the Internet and Bluetooth.
Here’s how to do it:
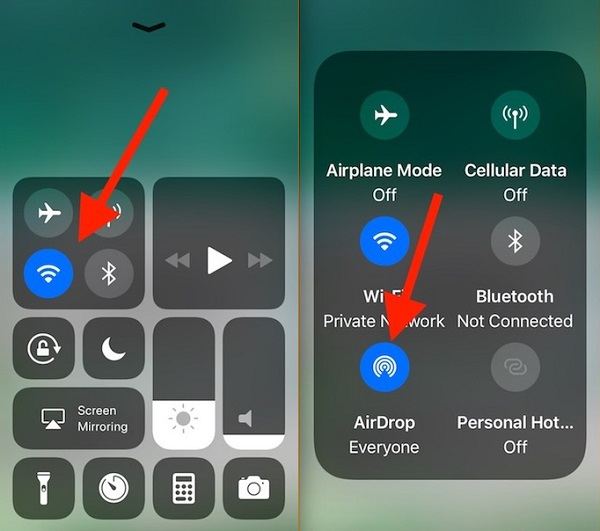
- Activate Airdrop on both devices ::
- On each iPhone, open the Control center while sweeping down From the upper right corner of the screen (or upwards from the bottom of the screen on iPhone models with a home button).
- Press firmly (or hold down) on the control group that includes the Wi-Fi and Bluetooth button.
- You will see a Ardrop button. Press it and choose “Contacts only” or “everyone”, Depending on your preferences.
- Select the content to share ::
- On l‘IPhone Source, Open the application that contains the content you want to share. For example, if you want to share a photo, open the photos application and select the photo you want to share.
- Share content ::
- Once you have selected content, Press the sharing button. It is generally an icon that looks like a Box with an outgoing arrow from the top.
- Choose the destination iPhone ::
- Once you have pressed the sharing button, an Finnately opens with different sharing options.
- In the Ardrop section, you should See the other iPhone if he is nearby and Airdrop is activated.
- Press the iPhone icon To start sharing content.
- Accept content on the destination iPhone ::
- On thedestination iPhone, A notification will appear to inform you that another iPhone wants to share content with you. Press on ” Accept “ To receive content.
Conclusion
Following the three methods we have just presented to you, you now have all the keys in hand to transfer the data of your old iPhone to the new.
If you want to opt for the simplest and fastest method, The solution proposed by Anytrans should suit you. Indeed, it allows you to use your new iPhone faster and unlike iCloud and iTunes, your data is fully transferred (music, applications, ringtones … including).
This article was written by Imobia as part of a sponsored partnership with Anytrans
Before leaving ..
If this article on How to transfer iPhone iPhone data You liked it, do not hesitate to share it on social networks and to Subscribe to our digital newsletter To receive our next articles.
You can also follow our best items via our RSS feed: https: // www.leptidigital.FR/TAG/Newsletter-Digital/Feed/(you just have to insert it into your favorite RSS feed reader (ex: feedly))).
We are also active on LinkedIn, Twitter, Facebook and YouTube. We meet there ?
For any questions associated with this article, do not hesitate to use the “Comments” section to tell us about your remark, we will answer you as soon as possible (with pleasure).
How to transfer data from one iPhone to another without iCloud or iTunes
![]()
When it comes to transferring data from one iPhone to another, iCloud could be the optimal option for its simplicity, convenience, accessibility and safety. In addition to these excellent characteristics, iCloud is also accompanied by restrictions, such as a limited storage space, a strong dependence on the Internet, limited choices in terms of transfer of certain data, etc. All these restrictions can prevent you from using iCloud.
Whatever the reasons why you give up using iCloud, there are other plausible means to allow you to transfer everything from one iPhone to another. Below you will find the five ways you can use to transfer data from one iPhone to another without iCloud. They are all organized in the order of ease of difficulty. Apply the one that best suits your needs.
Method 1. How to transfer data from one iPhone to another with iPhone transfer software
Applies to: photos, videos, contacts, audio files (music, ringtones, vocal memos, audio books), books.
As long as your iOS devices operate under iOS 8 or more, you can use the iOS data transfer tool – Easeus Mobimover to transfer files supported from one iPhone to another without iCloud or iTunes. With this software, you are able to transfer several or all files to your new device without synchronization. Apart from that, this tool can also help you do things like:
- Manage iOS data as you wish.
- Save all or some iOS data on your computer without problem.
- Transfer WhatsApp messages to a new phone.
- Download desired videos from any site.
If you want to have these functions, do not hesitate to download this powerful tool to your computer to try it.
Step 1.Connect your iPhone/iPad to your computer. Open Easeus Mobimover, then go to manager> Browse & transfer to select the data category you want to transfer. You can also use the quick transfer function to transfer your data from one iPhone to another.
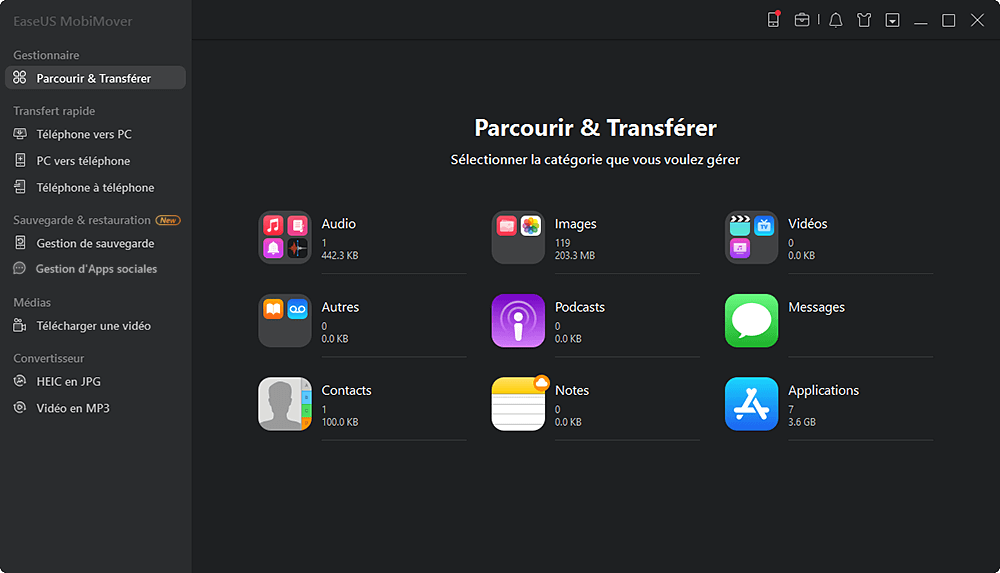
2nd step. Choose the data you want to move from one iPhone to another (define the source and target iPhones correctly by clicking on the phone icon in the upper toolbar).
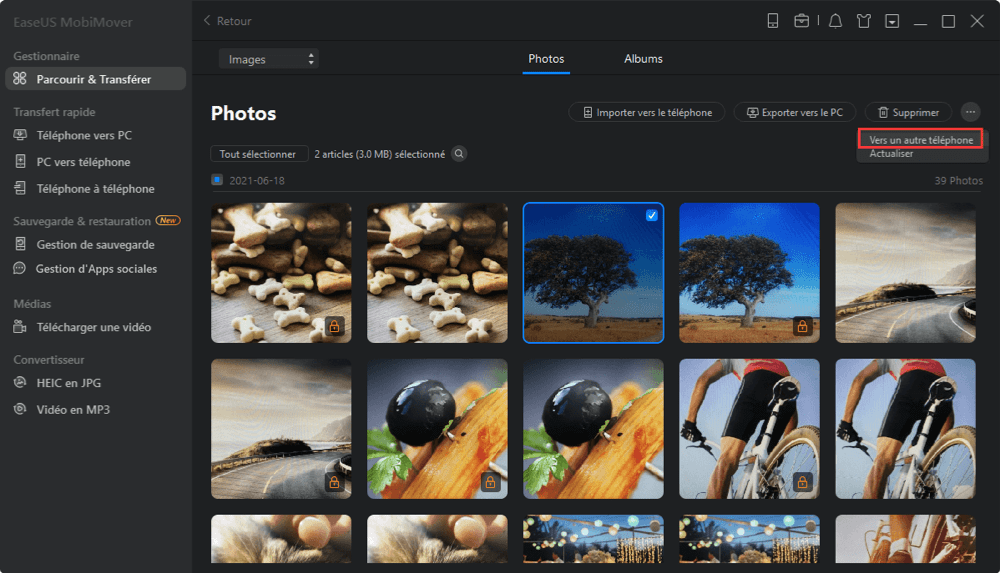
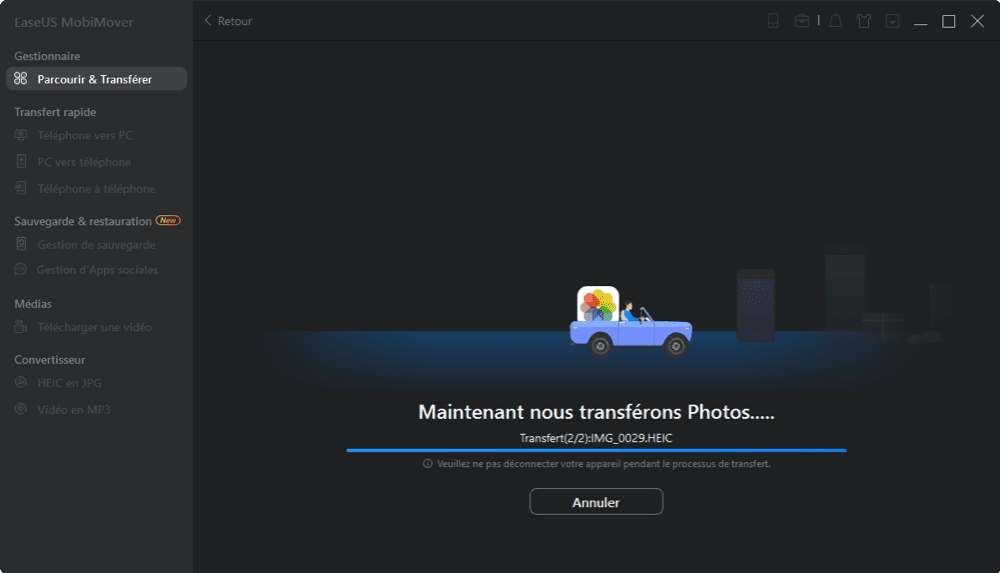
Step 3. Click on “Towards another phone” to start transferring iPhone data to another. Once the transfer is completed, go to your target device to check the transferred elements.
With Easeus Mobimover, you can also enrich the contents of your iOS device by important files from the computer (Mac or PC) to the iOS or in Downloading videos from any site using URL to your iPhone/iPad.
Method 2. How to transfer data from one iPhone to another without iCloud
Applies to: all data from your iPhone
Quick Start provides one of the best ways to configure and transfer your data from one iPhone to another without using iCloud. If iPhone source and target iPhone both use iOS 12.4 or a later version, Quick Start will allow you to transfer your data using the migration option to the iPhone. It is a utility present in iOS 11 and the subsequent versions that can help transfer information and data to a new device. Make sure your old iPhone and the new iPhone work under iOS 12. 4 or a later version, then follow the steps below to configure your new iPhone and transfer all data to your new wireless device.
Step 1. Activate the Bluetooth function on your old iPhone and turn on your new iPhone.
2nd step. Place the new iPhone near your old iPhone and you will see the Quick Start screen displayed on your iPhone Source with the option of using your Apple ID to configure your new iPhone.
Step 3. Make sure this is the Apple identifier you want to use and click on “Continue”.
Step 4. Then you can see an animation on the new iPhone. Hold the old iPhone above the new one, center animation in the viewfinder, then you can see a message saying “finish on the new iPhone”.
Step 5. Enter the old iPhone access code on the new iPhone.
Step 6. Follow the instructions on the screen to configure Faceid or Touch ID on the new device.
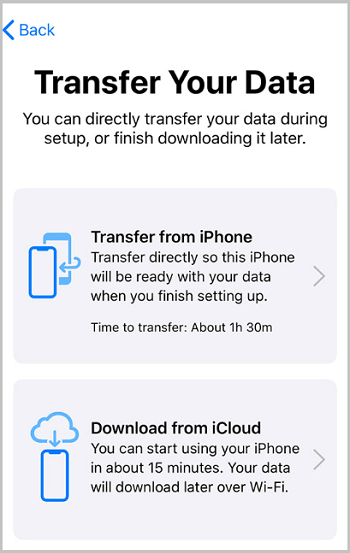
STEP 7. Now click on “Transfer from the iPhone” to start transferring all data from one iPhone to another.
Step 8. Once the process is finished, you have transferred everything from your old iPhone to the new device transparently.
Method 3. Transfer data from one iPhone to another via Airdrop
Applies to: photos, videos, websites, locations, etc.
Airdrop is another practical option that allows you to share files between two iOS devices supporting Airdrop. If you want to transfer photos, contacts or other files from one iOS device to another, Airdrop is a good choice.
Step 1. Make sure the two iPhones are within the range of Bluetooth and Wi-Fi.
2nd step. Activate the Bluetooth and Wi-Fi functions and make sure that the personal hotspot function is disabled on iPhones. Then activate Airdrop. (Set the transfer of files to “contacts only” or “everyone” accordingly).
Step 3. Select the files you want to send, for example photos, and click the “Share” button.
Step 4. Click on “Airdrop” and select the target device.
Step 5. On the target iPhone, click on “Accept” to receive the items.
It happens that Airdrop does not work on an iPhone/iPad. If you encounter this problem, learn to solve it first or try one of the other usable methods instead.
The two above methods are better suitable for users who wish to copy data to a used iPhone. If you want to transfer data from an old iPhone to a new iPhone that has not yet been configured, it is advisable to use Quickstart and iTunes/Finder.
Method 4. Transfer from one iPhone to another with iTunes backup
Applies to: almost all data and settings
An iTunes backup includes almost all the data and all the settings of the iOS device. But there are certain exclusions, in particular the content of iTunes and App Stores, the content synchronized from iTunes, the data already stored in iCloud, etc. (You can check the details from Apple here).
The use of iTunes backup is quite similar to that of iCloud backup: to transfer data from one iPhone to another with iTunes, you must first save the old device, then restore the data of the new phone to from the iTunes backup while configuring the new device. Download and install the latest version of iTunes to your computer. Then follow the instructions to transfer the data to your new iPhone/iPad via iTunes:
To make a backup of the old device:
Step 1. Connect your old device to the computer using the USB port.
2nd step. In iTunes, click the “Device” button and click “Summary”.
Step 3. Click on “Save now” to start saving your old iPhone.
To restore your new device from backup:
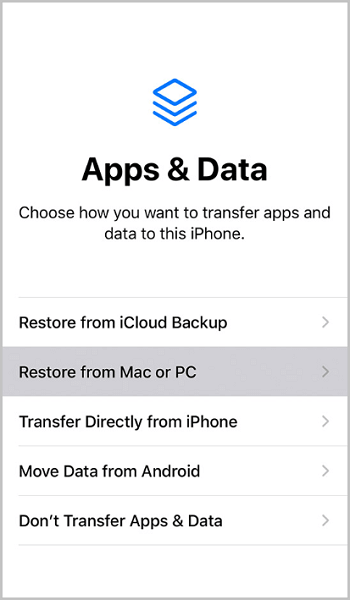
Step 1. Turn on your new device and follow the configuration steps until you see the “Applications and data” screen.
2nd step. Choose “Restore from Mac or PC” and connect your new iPhone to the computer you used to save your old iPhone.
Step 3. In iTunes, click on the “device” tab and select “Restore the backup”.
Step 4. Choose the right backup and wait for the process to end. (If you have encrypted the backup, you will have to enter the password before the catering process).
Step 5. Finish the rest of the steps in the installation.
Method 5. Transfer data to the new iPhone via Finder
As we all know, iTunes is dead and Apple replaced him by Finder on macOS Catalina computers. If you are a Mac user, using Finder is a good option. The steps are similar to those of the use of iTunes, which are detailed below.
To make a copy of your old iPhone:
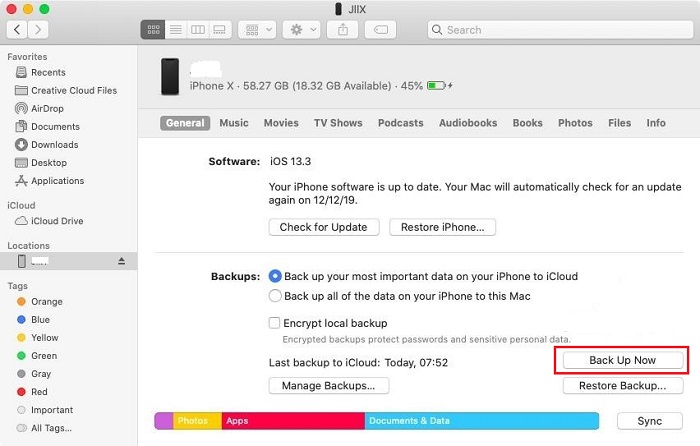
Step 1. Connect your old iPhone to your Mac running MacOS Catalina.
2nd step. Open the Finder window.
Step 3. In the locations section, click on the icon of your iPhone.
Step 4. Click on “Trust” if you are invited to trust this computer.
Step 5. Click on “Save now”.
To restore your new device from backup:
Step 1. Disconnect your old iPhone and connect your new iPhone to the computer.
2nd step. Configure your new iPhone until you reach the “Application & Data” page.
Step 3. On this page, select “Restore from Mac or PC”.
Step 4. Then follow the instructions on the screen to complete the rest of the configuration steps.
In summary
As long as you want to copy data from one iPhone/iPad to another, you can follow this guide to achieve it. After mastering the methods presented here, you will know how to proceed whenever you need to transfer photos, videos, contacts and other types of files.
I hope this guide can help you as I wish.